GOAD on proxmox - Part2 - Templating with packer
![]()
- If you follow the guide in part1, we now got a proxmox environment, some vlans, and a provisioning CT with the tools installed.
- On this chapter we will prepare the proxmox template for our future VMs.
- This part is here to transform a windows iso into a proxmox template ready to use.
- To doing that we will use packer proxmox-iso plugin https://developer.hashicorp.com/packer/plugins/builders/proxmox/iso
Download the ISOs
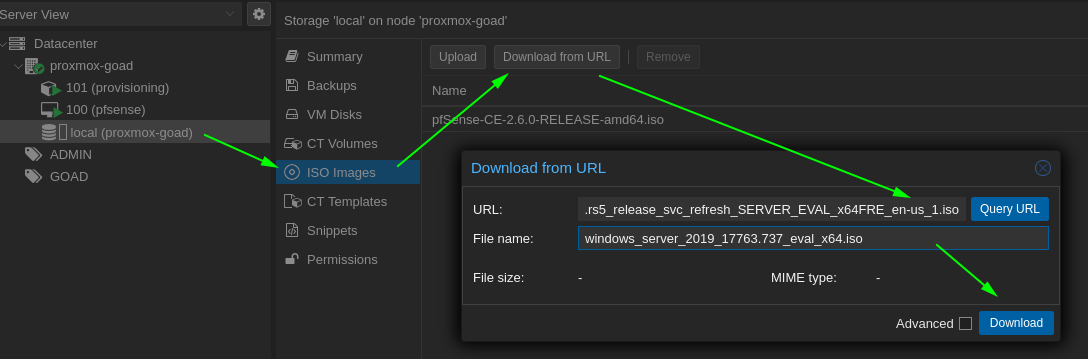
- First we will have to get the iso to use in our environment.
- We go to the download from url and start download the iso :
1
2
3
cd /var/lib/vz/template/iso
wget https://software-download.microsoft.com/download/pr/17763.737.190906-2324.rs5_release_svc_refresh_SERVER_EVAL_x64FRE_en-us_1.iso -O windows_server_2019_17763.737_eval_x64.iso
wget https://software-download.microsoft.com/download/pr/Windows_Server_2016_Datacenter_EVAL_en-us_14393_refresh.ISO -O windows_server_2016_14393.0_eval_x64.iso
Download cloudbase-init
- Go into goad folder and download cloudbase-init
1
2
cd /root/GOAD/packer/proxmox/scripts/sysprep
wget https://cloudbase.it/downloads/CloudbaseInitSetup_Stable_x64.msi
- Cloudbase-init is a service we will launch on each windows vm, this service will take the proxmox configuration to change the vm ip and other stuff.
create a dedicated user
To create our provisioning user for packer we will use the proxmox ssh:
Create our dedicated user :
1
2
pveum useradd infra_as_code@pve
pveum passwd infra_as_code@pve
Note : all the user creation can also be done with the proxmox web gui
- Create a dedicated role for packer :
1
pveum roleadd Packer -privs "VM.Config.Disk VM.Config.CPU VM.Config.Memory Datastore.AllocateTemplate Datastore.Audit Datastore.AllocateSpace Sys.Modify VM.Config.Options VM.Allocate VM.Audit VM.Console VM.Config.CDROM VM.Config.Cloudinit VM.Config.Network VM.PowerMgmt VM.Config.HWType VM.Monitor SDN.Use"
- Associate this role to our user
1
pveum acl modify / -user 'infra_as_code@pve' -role Packer
If you got a 403 during packer install is because the rules may have change in another version of proxmox. Consider giving the user the Administrator role to solve the issue.
1
pveum acl modify / -user 'infra_as_code@pve' -role Administrator
Prepare config.auto.pkrvars.hcl
- Now go to /root/GOAD/packer/proxmox/ and modify the config.auto.pkrvars.hcl template file
1
2
cd /root/GOAD/packer/proxmox/
cp config.auto.pkrvars.hcl.template config.auto.pkrvars.hcl
- The config.auto.pkrvars.hcl file will contain all the informations needed by packer to contact the proxmox api
1
2
3
4
5
6
7
proxmox_url             = "https://proxmox:8006/api2/json"
proxmox_username        = "user"
proxmox_token           = "changeme"
proxmox_skip_tls_verify = "true"
proxmox_node            = "mynode"
proxmox_pool            = "mypool"
proxmox_storage         = "local"
- proxmox_url : here the proxmox url from the provisioning vm point of view : “https://192.168.1.1:8006/api/json”
- proxmox_username/proxmox_password : here we will create a dedicated user
- proxmox_node : our proxmox node name “proxmox-goad”
- proxmox_pool : “GOAD”
proxmox_storage : “local”
- Now we got all the information for the config.auto.pkrvars.hcl file :
1
2
3
4
5
6
7
proxmox_url             = "https://192.168.1.1:8006/api2/json"
proxmox_username        = "infra_as_code@pve"
proxmox_password        = "changeme"
proxmox_skip_tls_verify = "true"
proxmox_node            = "proxmox-goad"
proxmox_pool            = "GOAD"
proxmox_storage         = "local"
Prepare iso files
- To create a template with proxmox and packer, we will need to create some iso file containing our scripts.
We doing that because packer can’t create a floppy drive a:\ on proxmox so you have to create an iso file with our custom scripts
- We run the build_proxmox_iso.sh script :
1
2
cd /root/GOAD/packer/proxmox/
./build_proxmox_iso.sh
- Let’s review the script result :
1
2
3
4
5
6
7
8
9
10
11
12
13
14
15
16
17
18
19
20
21
22
23
24
25
26
27
28
29
30
31
32
33
34
35
36
37
[+] Build iso winserver2016 with cloudinit
Warning: Creating ISO-9660:1999 (version 2) filesystem.
Warning: ISO-9660 filenames longer than 31 may cause buffer overflows in the OS.
Total translation table size: 0
Total rockridge attributes bytes: 257
Total directory bytes: 376
Path table size(bytes): 10
Max brk space used 0
191 extents written (0 MB)
[+] update windows_server2016_proxmox_cloudinit.pkvars.hcl

[+] Build iso winserver2019 with cloudinit
Warning: Creating ISO-9660:1999 (version 2) filesystem.
Warning: ISO-9660 filenames longer than 31 may cause buffer overflows in the OS.
Total translation table size: 0
Total rockridge attributes bytes: 257
Total directory bytes: 376
Path table size(bytes): 10
Max brk space used 0
191 extents written (0 MB)
[+] update windows_server2019_proxmox_cloudinit.pkvars.hcl

[+] Build iso for scripts
Warning: Creating ISO-9660:1999 (version 2) filesystem.
Warning: ISO-9660 filenames longer than 31 may cause buffer overflows in the OS.
 15.99% done, estimate finish Thu Apr 13 20:27:45 2023
 31.90% done, estimate finish Thu Apr 13 20:27:45 2023
 47.86% done, estimate finish Thu Apr 13 20:27:45 2023
 63.78% done, estimate finish Thu Apr 13 20:27:45 2023
 79.74% done, estimate finish Thu Apr 13 20:27:45 2023
 95.66% done, estimate finish Thu Apr 13 20:27:46 2023
Total translation table size: 0
Total rockridge attributes bytes: 1686
Total directory bytes: 3268
Path table size(bytes): 26
Max brk space used 0
31370 extents written (61 MB)
- The script take answer_files/2016_proxmox_cloudinit folder and create the iso file : ./iso/Autounattend_winserver2016_cloudinit.iso
- Next it will generate the sha256sum of the iso and change it in the file windows_server2019_proxmox_cloudinit.pkvars.hcl
- After it will take the folder answer_files/2019_proxmox_cloudinit to create the iso file : ./iso/Autounattend_winserver2019_cloudinit.iso
- and change the sha256sum into windows_server2019_proxmox_cloudinit.pkvars.hcl
And to finish it will generate the file ./iso/scripts_withcloudinit.iso
- As the cloudinit iso file is pretty large we will copy it from the proxmox ssh access.
1
2
ssh goadproxmox
scp root@192.168.1.3:/root/GOAD/packer/proxmox/iso/scripts_withcloudinit.iso /var/lib/vz/template/iso/scripts_withcloudinit.iso
- On the proxmox we will download the file virtio-win.iso
1
2
3
ssh goadproxmox
cd /var/lib/vz/template/iso
wget https://fedorapeople.org/groups/virt/virtio-win/direct-downloads/stable-virtio/virtio-win.iso
- Ok so now we have our iso files ready :

packer.pkr.hcl
- A generic packer.pkr.hcl file is present in GOAD folder :
1
2
3
4
5
6
7
8
9
10
11
12
13
14
15
16
17
18
19
20
21
22
23
24
25
26
27
28
29
30
31
32
33
34
35
36
37
38
39
40
41
42
43
44
45
46
47
48
49
50
51
52
53
54
55
56
57
58
59
60
61
62
63
64
65
66
67
68
69
70
71
72
73
74
75
76
77
78
79
80
81
packer {
  required_plugins {
    proxmox = {
      version = ">= 1.1.2"
      source  = "github.com/hashicorp/proxmox"
    }
  }
}

source "proxmox-iso" "windows" {
  additional_iso_files {
    device           = "sata3"
    iso_checksum     = "${var.autounattend_checksum}"
    iso_storage_pool = "local"
    iso_url          = "${var.autounattend_iso}"
    unmount          = true
  }
  additional_iso_files {
    device   = "sata4"
    iso_file = "local:iso/virtio-win.iso"
    unmount  = true
  }

  additional_iso_files {
    device   = "sata5"
    iso_file = "local:iso/scripts_withcloudinit.iso"
    unmount  = true
  }
  cloud_init              = true
  cloud_init_storage_pool = "${var.proxmox_storage}"
  communicator            = "winrm"
  cores                   = "${var.vm_cpu_cores}"
  disks {
    disk_size         = "${var.vm_disk_size}"
    format            = "qcow2"
    storage_pool      = "${var.proxmox_storage}"
    type              = "sata"
  }
  insecure_skip_tls_verify = "${var.proxmox_skip_tls_verify}"
  iso_file                 = "${var.iso_file}"
  memory                   = "${var.vm_memory}"
  network_adapters {
    bridge = "vmbr3"
    model  = "virtio"
    vlan_tag = "10"
  }
  node                 = "${var.proxmox_node}"
  os                   = "${var.os}"
  password             = "${var.proxmox_password}"
  pool                 = "${var.proxmox_pool}"
  proxmox_url          = "${var.proxmox_url}"
  sockets              = "${var.vm_sockets}"
  template_description = "${var.template_description}"
  template_name        = "${var.vm_name}"
  username             = "${var.proxmox_username}"
  vm_name              = "${var.vm_name}"
  winrm_insecure       = true
  winrm_no_proxy       = true
  winrm_password       = "${var.winrm_password}"
  winrm_timeout        = "30m"
  winrm_use_ssl        = true
  winrm_username       = "${var.winrm_username}"
}

build {
  sources = ["source.proxmox-iso.windows"]

  provisioner "powershell" {
    elevated_password = "vagrant"
    elevated_user     = "vagrant"
    scripts           = ["${path.root}/scripts/sysprep/cloudbase-init.ps1"]
  }

  provisioner "powershell" {
    elevated_password = "vagrant"
    elevated_user     = "vagrant"
    pause_before      = "1m0s"
    scripts           = ["${path.root}/scripts/sysprep/cloudbase-init-p2.ps1"]
  }

}
computer configuration
- The computer creation template will look like this example : windows_server2019_proxmox_cloudinit.pkvars.hcl
1
2
3
4
5
6
7
8
9
10
11
12
winrm_username        = "vagrant"
winrm_password        = "vagrant"
vm_name               = "WinServer2019x64-cloudinit"
template_description  = "Windows Server 2019 64-bit - build 17763.737.190906-2324 - template built with Packer - cloudinit - "
iso_file              = "local:iso/windows_server_2019_17763.737_eval_x64.iso"
autounattend_iso      = "./iso/Autounattend_winserver2019_cloudinit.iso"
autounattend_checksum = "sha256:05d0fc782ed5dafa98078735a27fe25173943150850389694cc3a7a499d47dfd"
vm_cpu_cores          = "2"
vm_memory             = "4096"
vm_disk_size          = "40G"
vm_sockets            = "1"
os                    = "win10"
launch packer
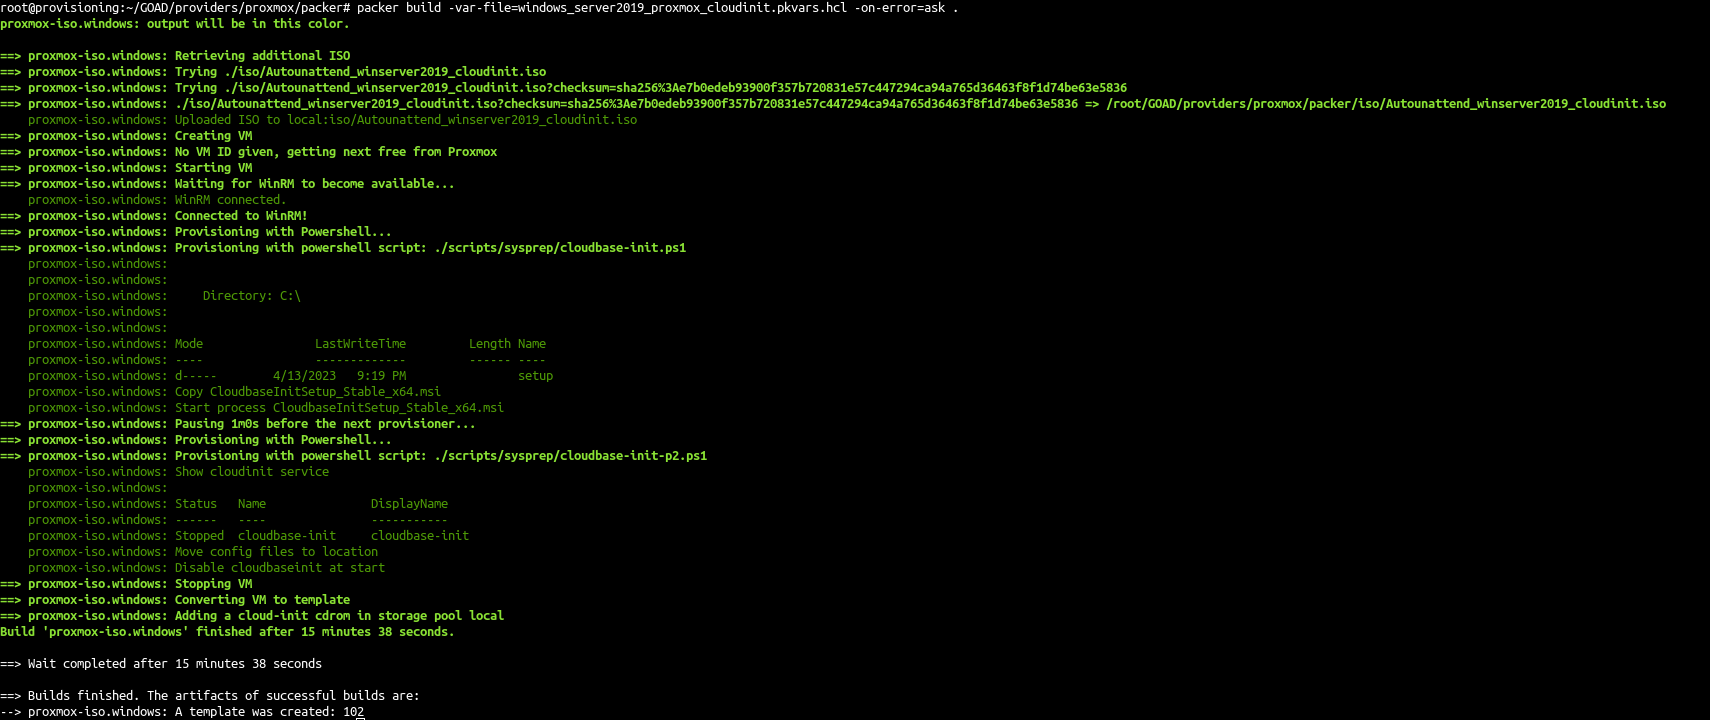
- Now all is ready we will launch the packer template build:
1
2
3
packer init .
packer validate -var-file=windows_server2019_proxmox_cloudinit.pkvars.hcl .
packer build -var-file=windows_server2019_proxmox_cloudinit.pkvars.hcl .
And do the same for windows server 2016
windows_server2016_proxmox_cloudinit.pkvars.hcl :
1
2
3
4
5
6
7
8
9
10
11
12
winrm_username = "vagrant"
winrm_password = "vagrant"
vm_name = "WinServer2016x64-cloudinit"
template_description = "Windows Server 2016 64-bit - build 14393 - template built with Packer - cloudinit - "
iso_file = "local:iso/windows_server_2016_14393.0_eval_x64.iso"
autounattend_iso = "./iso/Autounattend_winserver2016_cloudinit.iso"
autounattend_checksum = "sha256:e8d5ff2475e5aba185424d3c09ac1de617700ea120c10eba777301de7a337c17"
vm_cpu_cores = "2"
vm_memory = "4096"
vm_disk_size = "40G"
vm_sockets = "1"
os = "win10"
1
2
packer validate -var-file=windows_server2016_proxmox_cloudinit.pkvars.hcl .
packer build -var-file=windows_server2016_proxmox_cloudinit.pkvars.hcl .
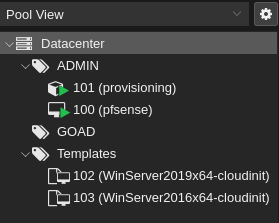
- As a final result we got our two templates created ready to create the lab VMs
update: Please note that on last goad release there is also uptodate template to build This will launch the windows update during the template creation but it will take a long time to build if you use NHA or SCCM you should build the up-to-date template
resources
- https://holdmybeersecurity.com/2020/10/03/creating-a-windows-10-64-bit-vm-on-proxmox-with-packer-v1-6-3-and-vault/
- https://dev.to/aaronktberry/creating-proxmox-templates-with-packer-1b35
- https://www.robert-jensen.dk/posts/2021-auto-install-cloudbase-init/
- https://thrivenextgen.com/troubleshooting-windows-server-sysprep-issues-with-cloudbase-init/
- https://yetiops.net/posts/proxmox-terraform-cloudinit-windows/#cloudbase-init
- https://aaron-kt-berry.medium.com/creating-proxmox-templates-with-packer-7ada62474c44