GOAD on proxmox - Part1 - Proxmox and pfsense
![]()
Introduction
Some people asked me how to install GOAD on proxmox. I wanted to document this a long time ago but never found the time to do this. Now it will be done ;)
For this blog post we will start from 0 to a full working lab build on top of proxmox and pfsense.
- This blog post serie will be in 5 parts :
- Part 1 : proxmox, pfsense and provisioning vm installation
- Part 2 : Templating with Packer
- Part 3 : Providing with Terraform
- Part 4 : Provisioning with ansible
- Part 5 : Openvpn lab access
- The final result to obtain should be something like this :
I am not a proxmox and neither a pfsense expert, this install is the result of a lot of reading and try & fail tests. If you see mistakes feel free to contact me on twitter or discord to explain me why i am wrong (thank you :))
Access to proxmox
To build the lab i bought this server at kimsufi on a special offer :
- Intel Xeon 8vCPU
- 32 GB DDR3
- 4TB HDD

- Total with tva at the time of buying was 47.98€ with taxes and it will be 23.99€ with taxes on next month without engagement.
Just to be clear, i have nothing to do with OVH, i just give you this information to be totally transparent on how the server cost and where you can find the same. If you find cheaper elsewhere or if you want to build it at home do what you want ;)
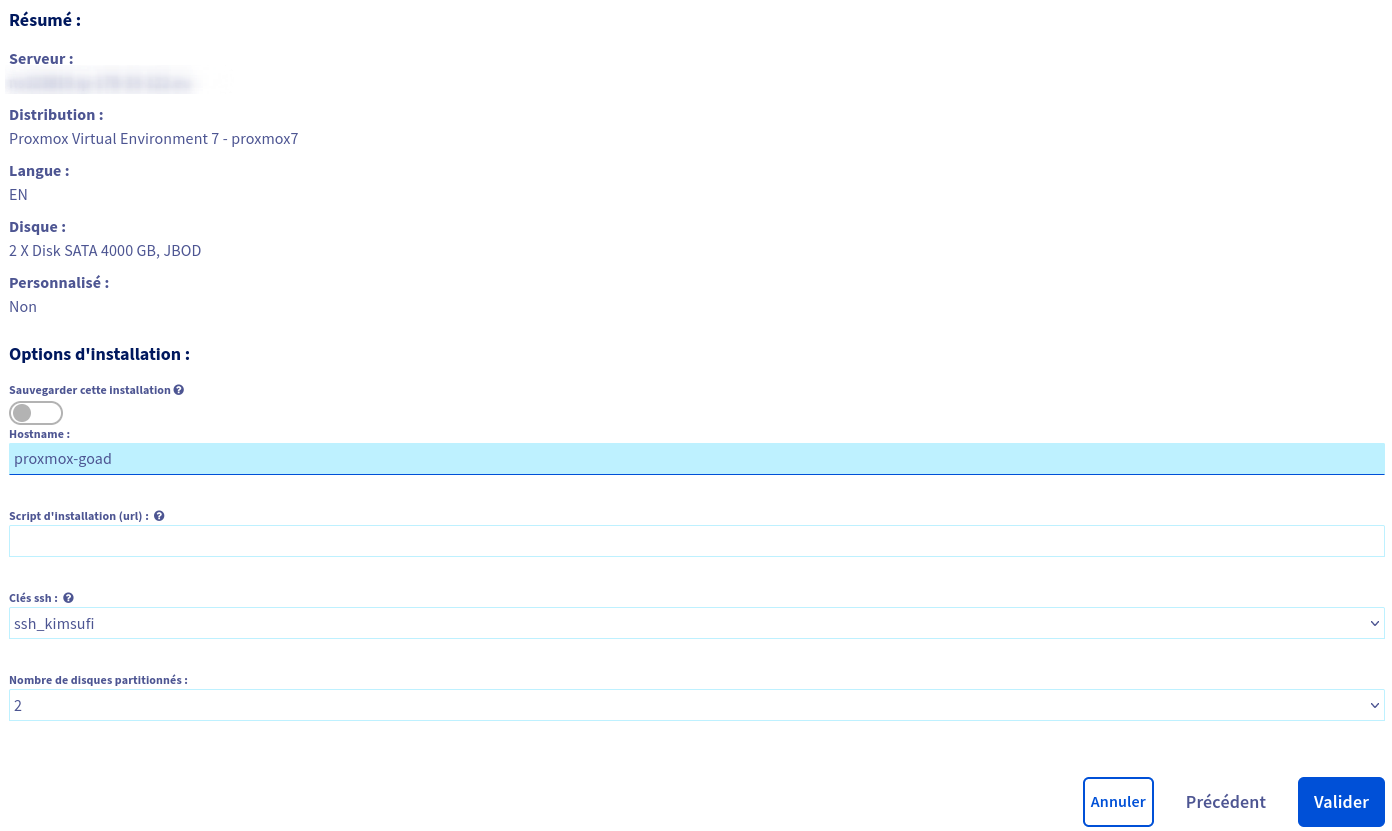
- Next we will have to add an ssh key to the ovh interface
- And launch the installation with proxmox ovh template (maybe oneday i will do the esxi, but for this blog post it will be on proxmox)

- We finish to choose the option (hostname and ssh key), and we will wait for the install to complete
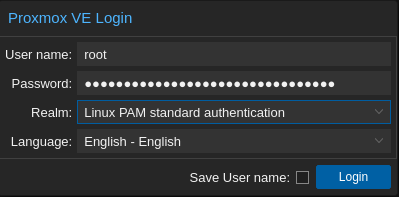
- Once the install finish we can connect to our instance:
1
ssh root@x.x.x.x
- Now we will setup our root password with :
1
passwd root
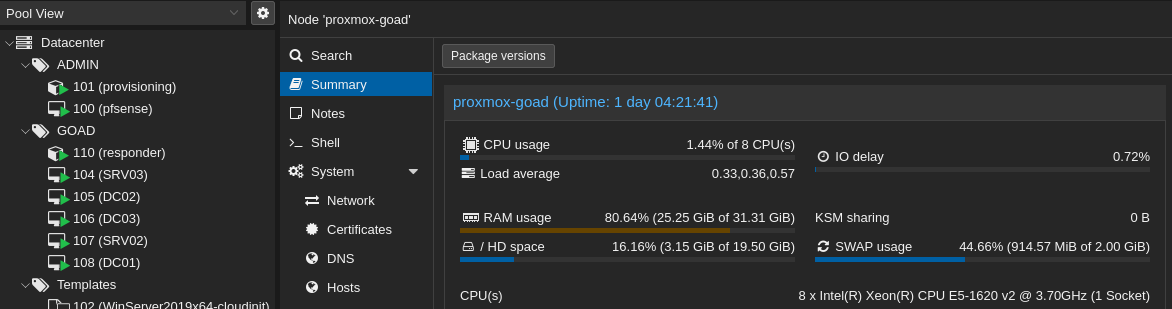
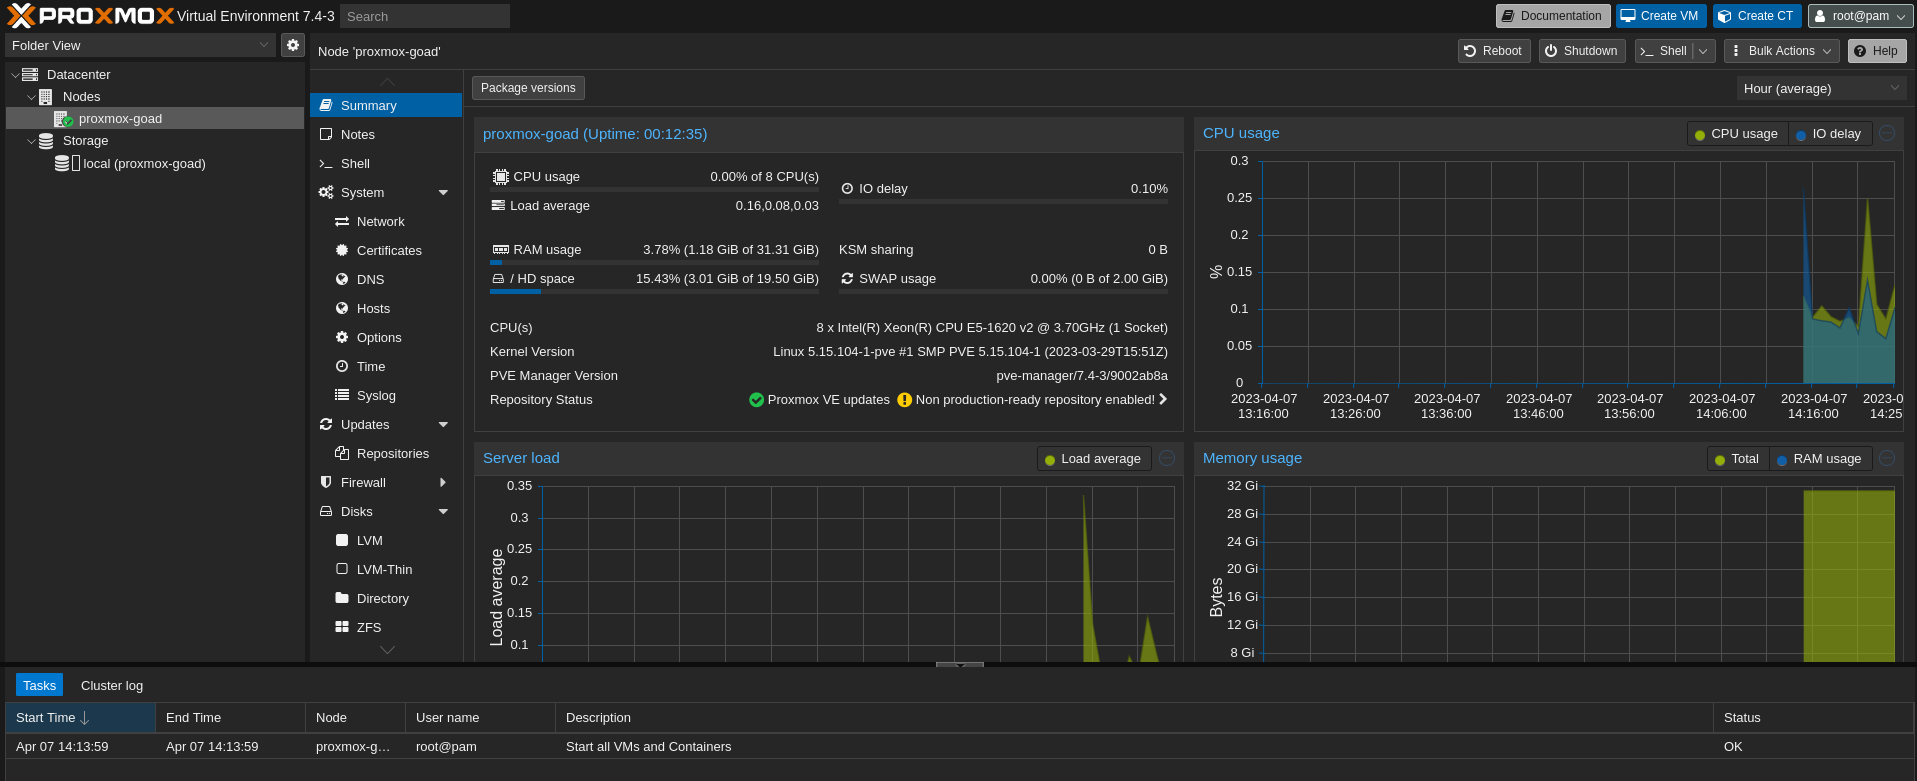
- Once our root password is setup we can go to the proxmox interface : https://x.x.x.x:8006/, and we can login with our root user with realm PAM standard authentication
- And we have access to the proxmox interface :
Prepare for pfsense
![]()
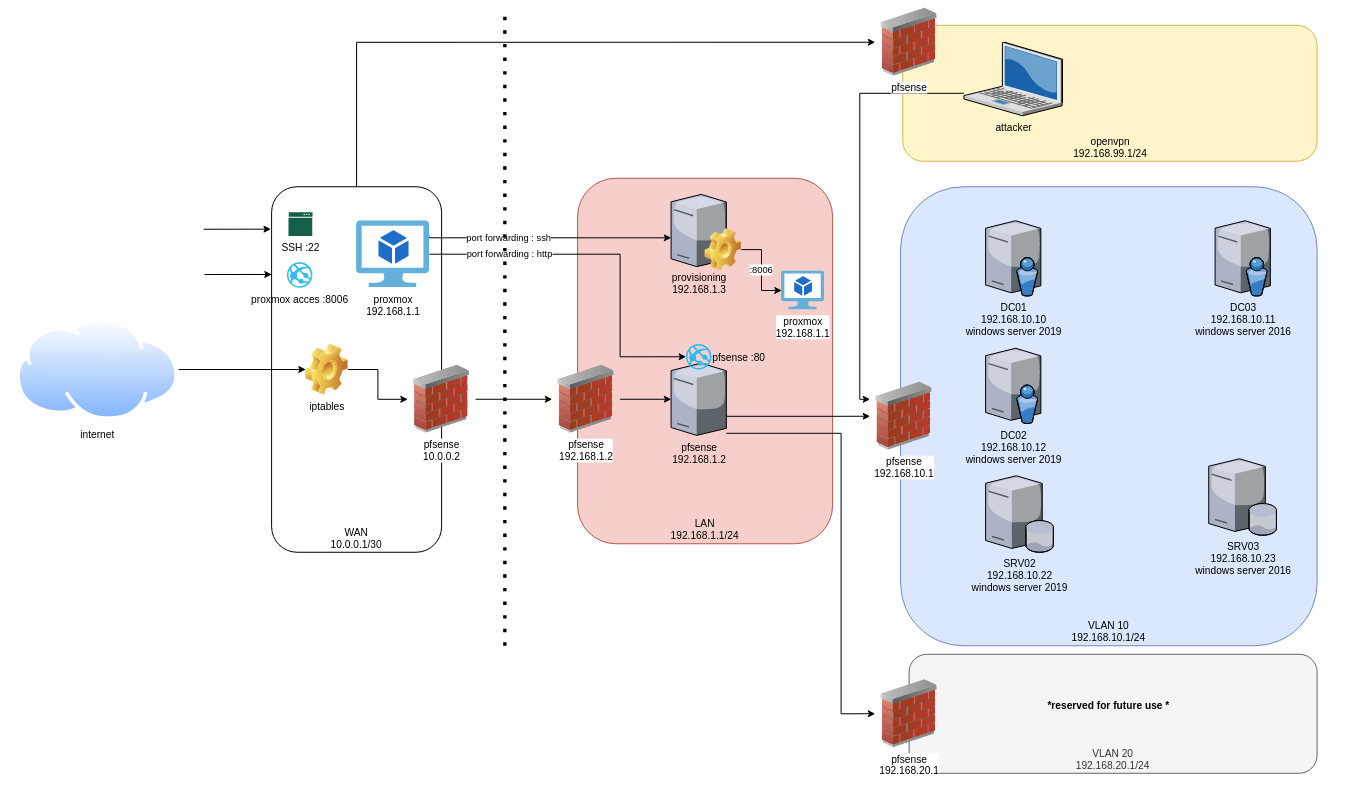
- Once we have our proxmox ready, we can start to prepare our server network for pfsense.
- The target architecture will be something like that :
- By default proxmox came up with this network :

- The network we will build will be in multiple part :
- 10.0.0.0/30 (10.0.0.1-10.0.0.2) : this will be the WAN network with only 2 ips, one for proxmox host, and the other one for pfsense
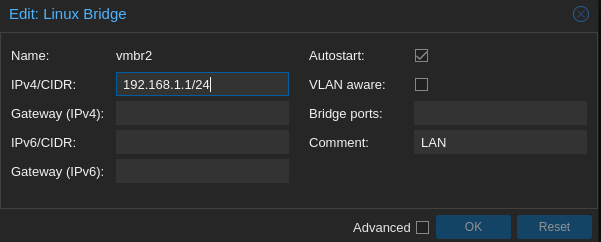
- 192.168.1.1/24 (192.168.1.1-192.168.1.254) : this will be the LAN network for the pfsense and the provisioning machine
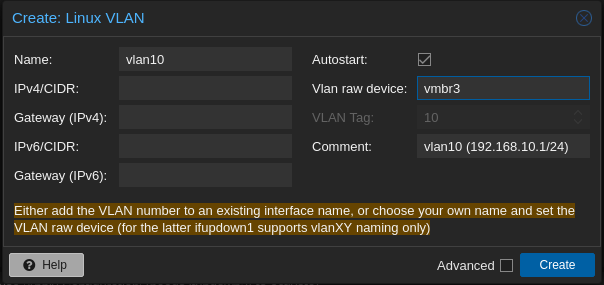
- 192.168.10.1/24 (192.168.10.1-192.168.10.254) : VLAN1 for the GOAD’s vm
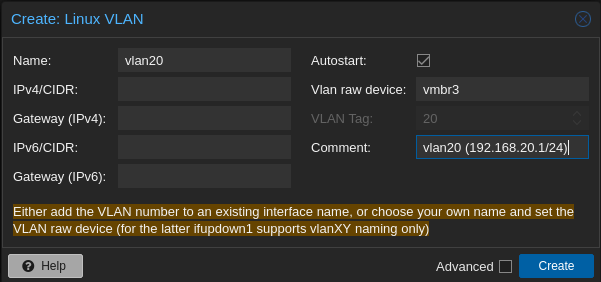
- 192.168.20.1/24 (192.168.20.1-192.168.20.254) : VLAN2 for future projects
- 10.10.10.0/24 (10.10.10.0-10.10.10.254) : openvpn for vpn users (will be manage by pfsense later)
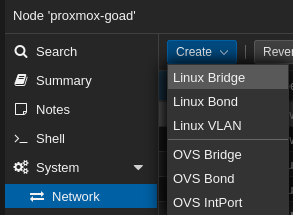
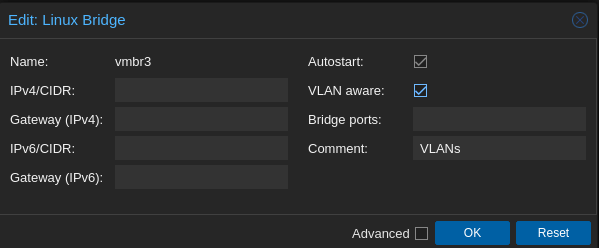
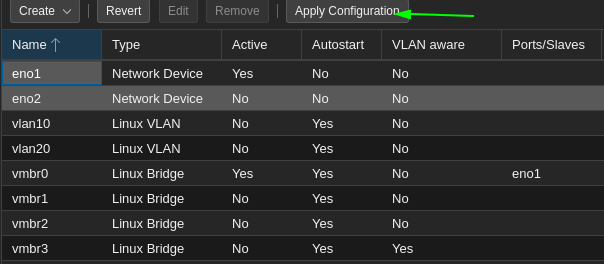
- In order to do that we will create 3 new linux bridge.
- Click create > Linux bridge
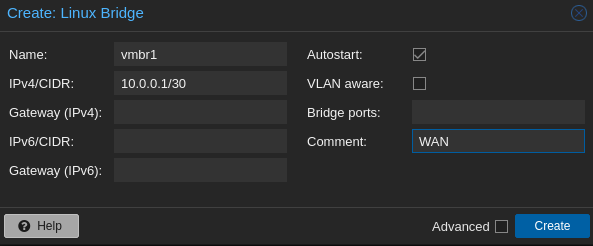
- vmbr1 (for WAN):
- vmbr2 (for LAN):
- vmbr3 (for the VLANs), with vlan aware selected:
- And next we will create our 2 vlan : Create > Linux Vlan
- In the end we get something like that :

- Now click on apply configuration
Install pfsense
- To install pfsense we will first download the last pfsense community edition iso file : https://www.pfsense.org/download/
Update: pfsense offline CE iso is no longer directly available. You can find it on dakota state university mirror : https://repo.ialab.dsu.edu/pfsense/
- And we will upload the pfsense iso to proxmox
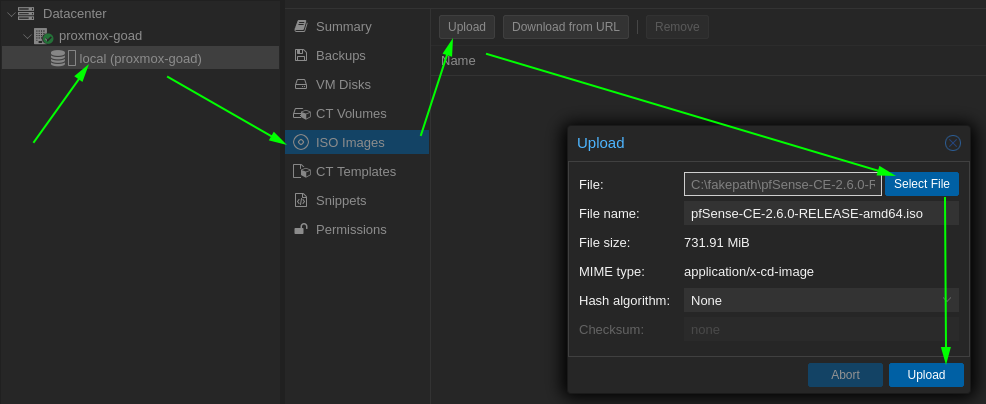
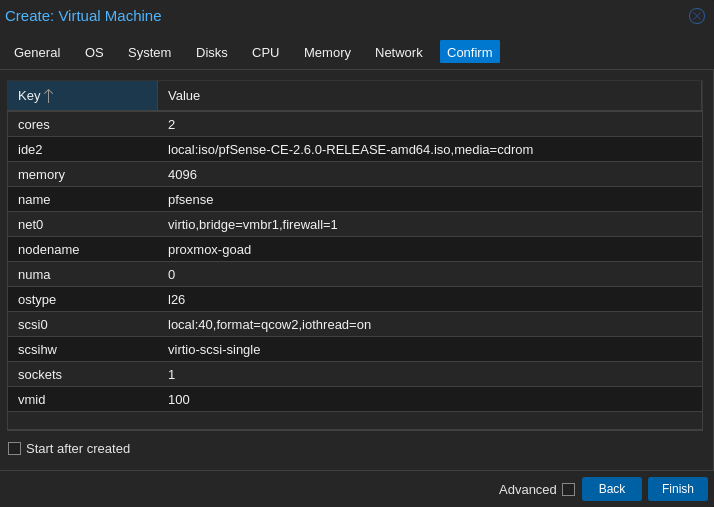
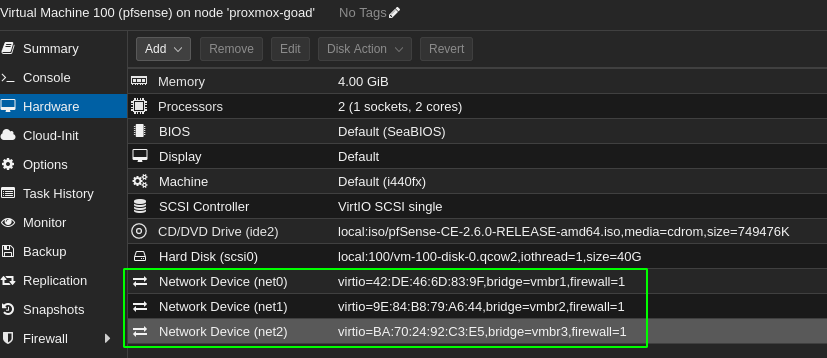
- Once the image uploaded create a VM

- I choosed : 2 vpcu, 4096 ram, 40Gb disk, and the network interface vmbr1 for creation (and i didn’t check the start after creation)
- One the vm created edit the network to add vmbr2 and vmbr3
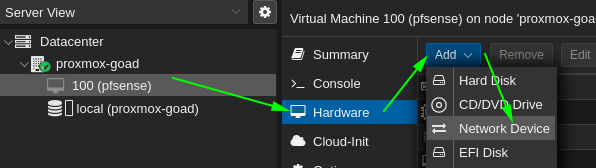
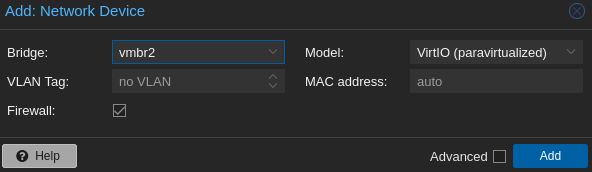
- And do the same for vmbr3
And then start the vm
- Now this is a story of install screen, this is really straightforward so i will not detail this.
- Accept -> install -> OK, then choose your keymap, and then just do next/next/next until the end of the installation.
- At the end just do not open a shell and choose to reboot
If you have trouble during the install you can find a very well detailed installation guide at this address : https://www.virtualizationhowto.com/2022/08/pfsense-proxmox-install-process-and-configuration/
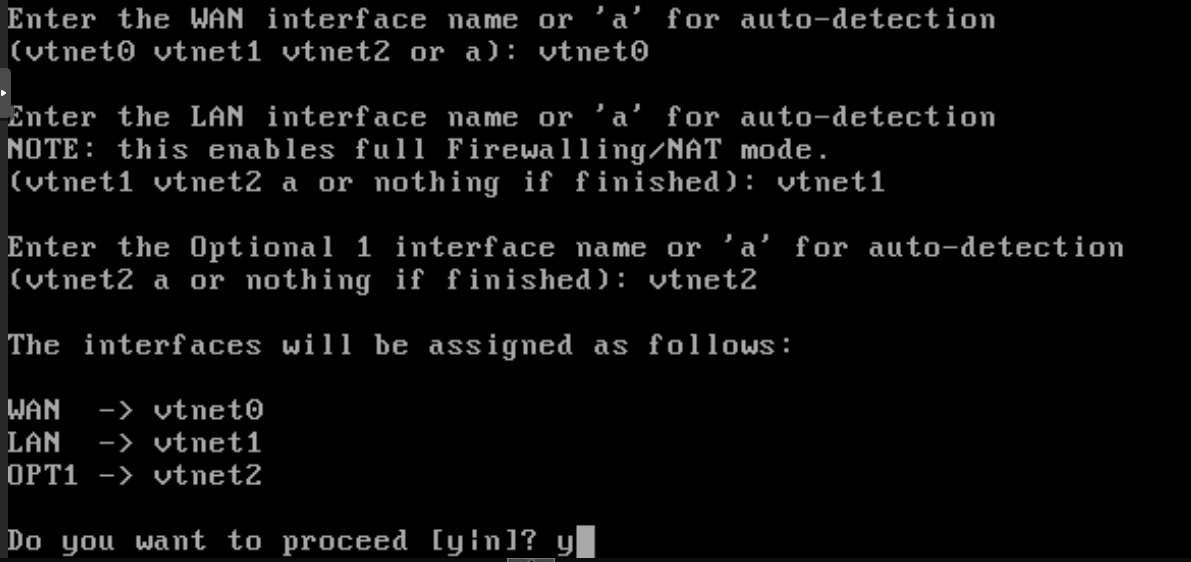
After the reboot just answer no to the question “Should vlans be set up now”

Then setup the interface association:
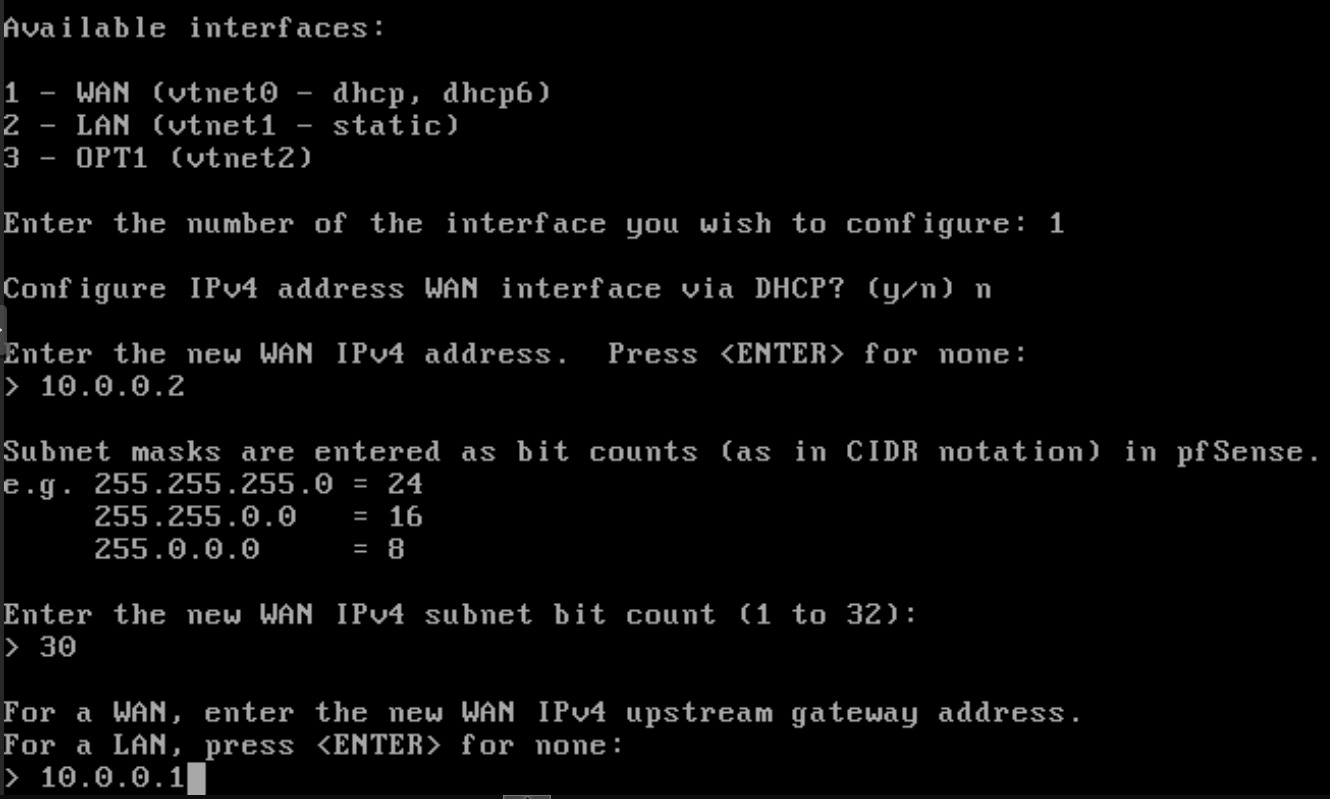
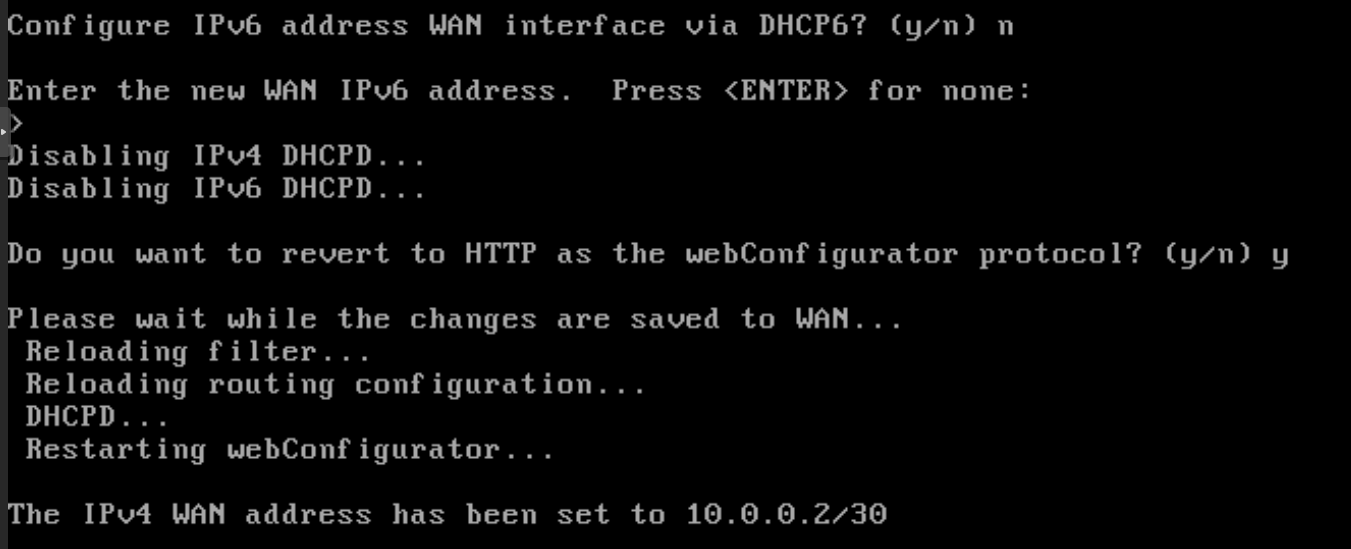
- Once all this steps are complete we will assign the ip 10.0.0.2/30 to the wan interface
- 10.0.0.1 to the gateway address
- and no dhcpv6 and ipv6
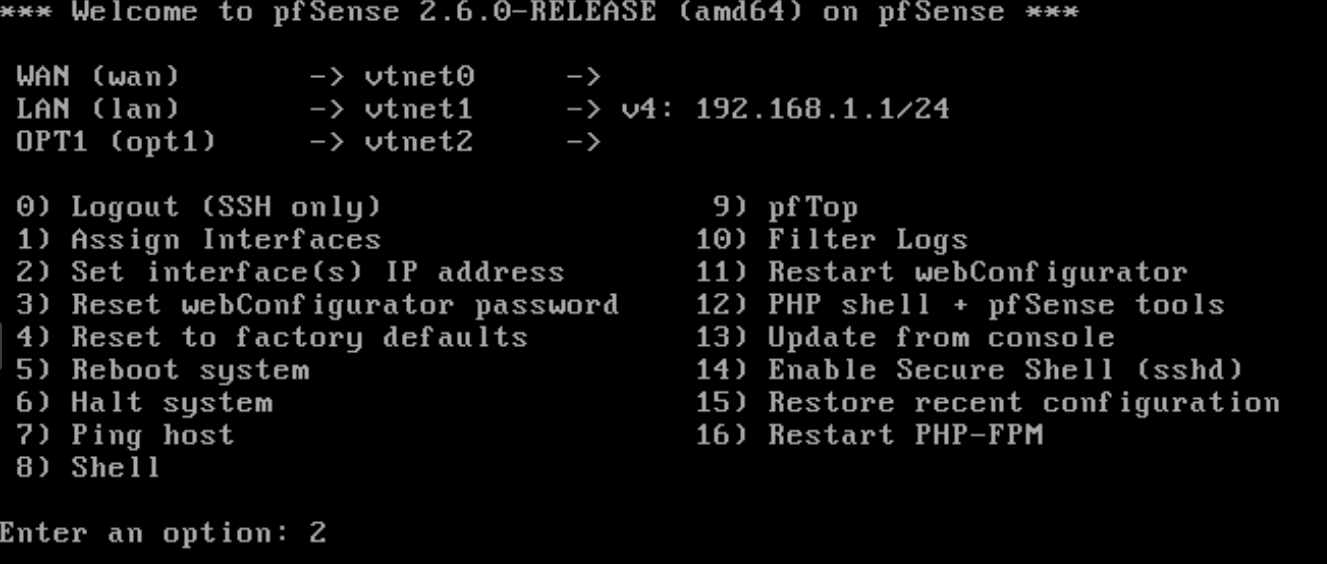
- We will now change the LAN interface to 192.168.1.2/24
- no gateway address
- no ipv6
- and add a dhcp server between 192.168.1.100 and 192.168.1.254
- Now our interface are ready, we can continue on the proxmox web interface.

Configure pfsense
- We will continue our pfsense installation and configuration with the web interface, to do that we will do an ssh tunnel.
- To do that we can connect with
ssh -L 8082:192.168.1.2:443 root@ip_proxmox - Or we can create an ~/.ssh/config file on our pc:
1
2
3
4
5
6
7
Host goadproxmox
   User root
   Hostname YOURPUBLICIP
   Port 22
   IdentityFile ~/.ssh/id_rsa_kimsufi_goad
   # pfsense
   LocalForward 8082 192.168.1.2:443
- We connect to ssh
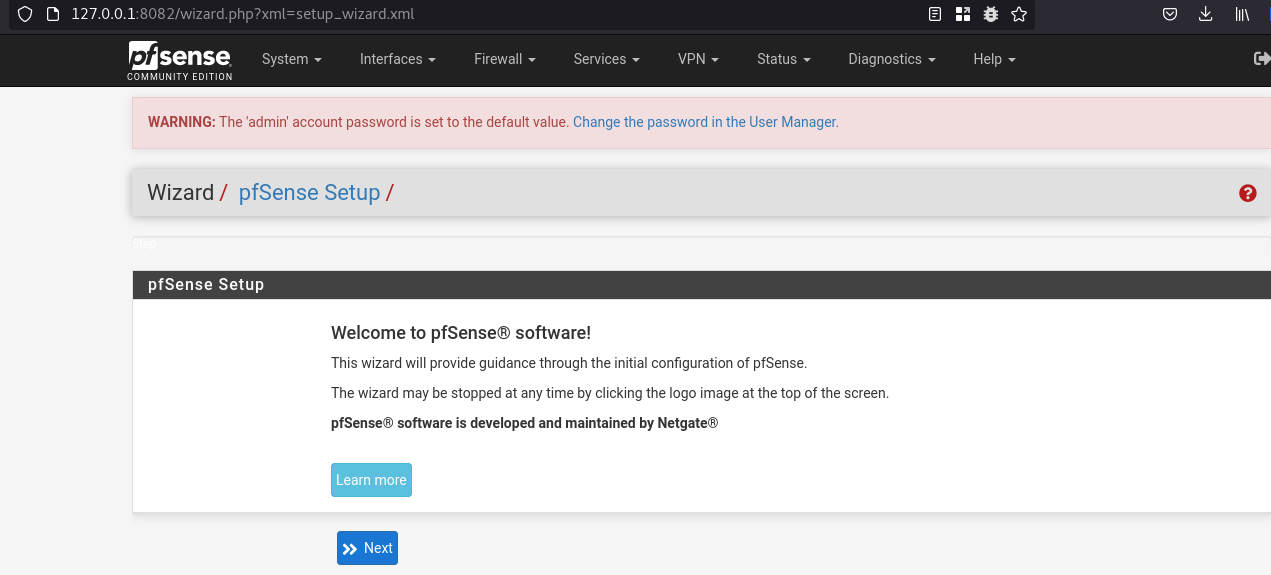
- And open https://127.0.0.1:8082/
Update: with pfsense 2.7.2 default scheme is now https and not http the port forwarding was updated to reach port 443 instead of 80
- we login with admin / pfsense
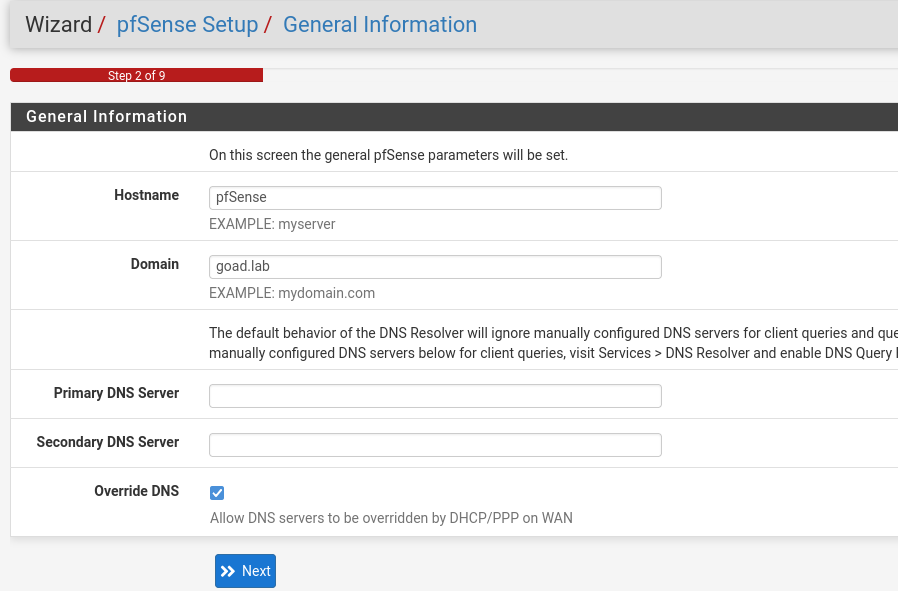
- click next on NTP
- on the wan interface keep static IP 10.0.0.2/30 with gateway 10.0.0.1
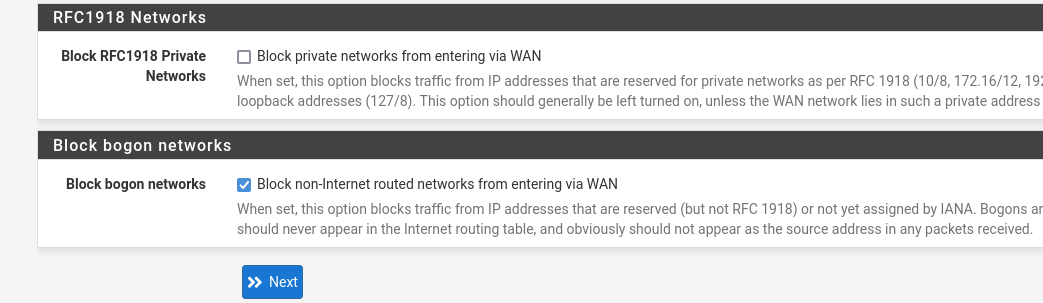
- and uncheck the block RFC1918 private network
- lan is still 192.168.1.2/24
- change the admin password !
- and than reload
Disable hardware checksum offloading
- Go to system > advanced and on the tab networking check “Disable hardware checksum offloading”
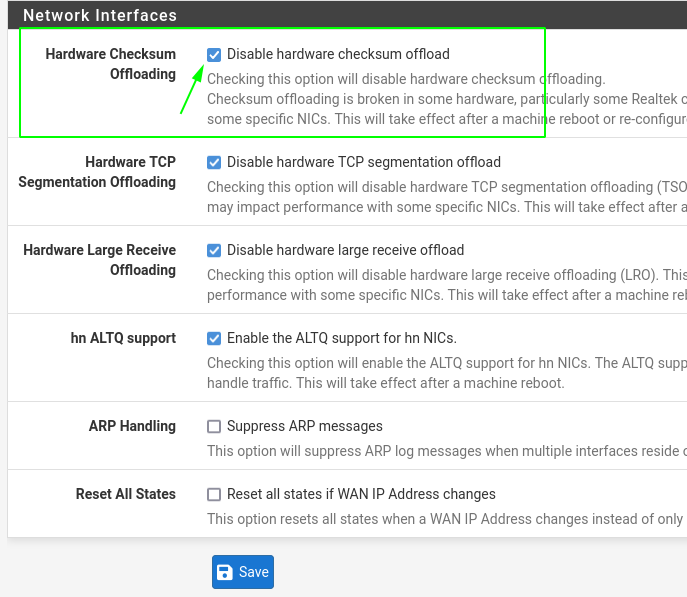
- And click reboot (or go to diagnostic > Reboot)
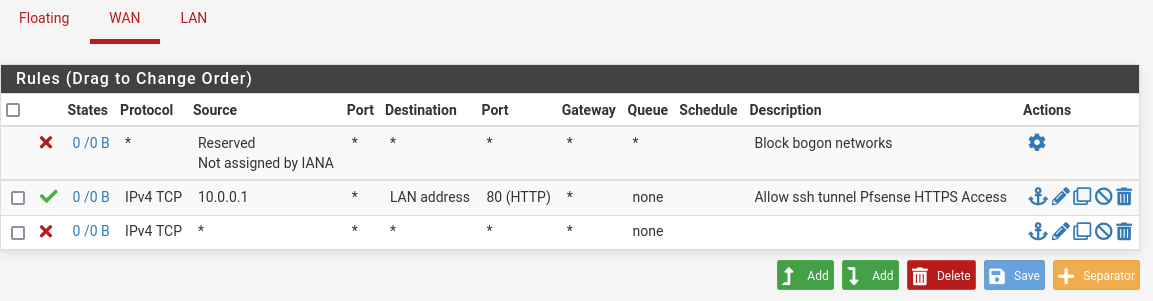
Setup network and firewall
- Now our pfsense is ready for the rules creation
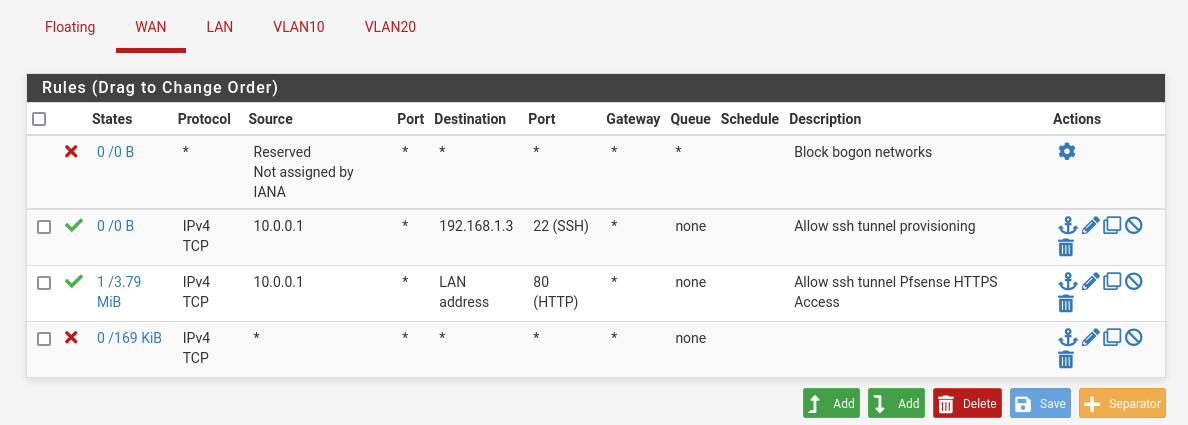
We will redirect all the ip incoming traffic to the pfsense WAN network with some rules in the next paragraph. But first we need to add a rule to don’t loose the web HTTP access.
- To do so, we will first configure the WAN firewall interface: Firewall > Rules > WAN
- We will add a rule to allow pfsense http interface to be accessed by proxmox host WAN address
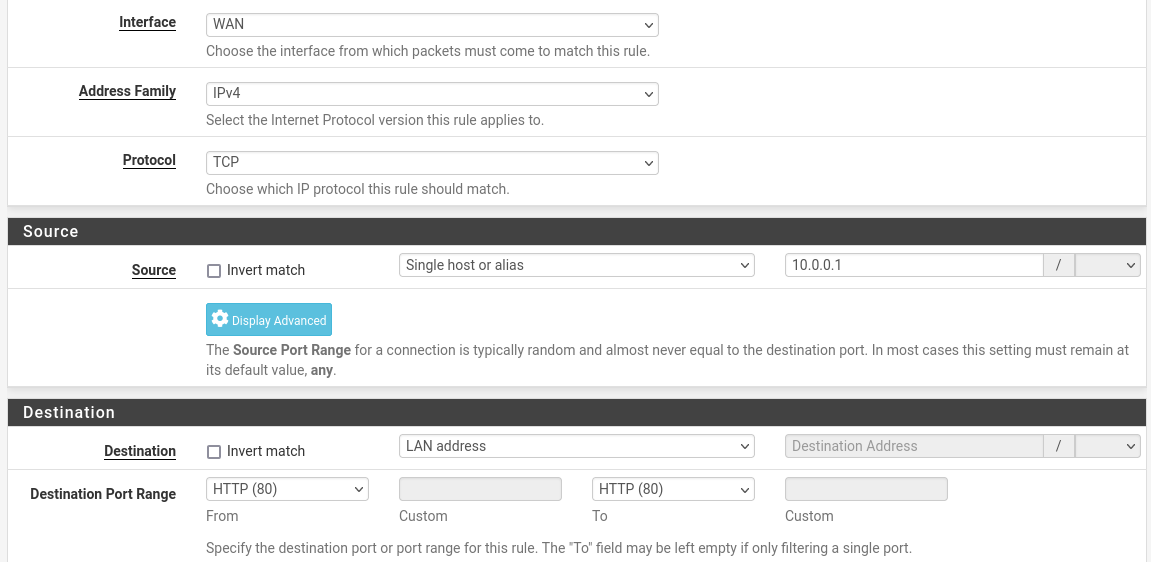
- and we add also a block any rule at the end
- Now we will change the proxmox network configuration on our ssh connection.
- As root we will do :
1
2
3
4
5
6
7
8
9
10
11
12
# activate ipforward
echo 1 | sudo tee /proc/sys/net/ipv4/ip_forward
# allow icmp to avoid ovh monitoring reboot the host
iptables -t nat -A PREROUTING -i vmbr0 -p icmp -j ACCEPT
# allow ssh
iptables -t nat -A PREROUTING -i vmbr0 -p tcp --dport 22 -j ACCEPT
# allow proxmox web
iptables -t nat -A PREROUTING -i vmbr0 -p tcp --dport 8006 -j ACCEPT
# redirect all to pfsense
iptables -t nat -A PREROUTING -i vmbr0 -j DNAT --to 10.0.0.2
# add SNAT WAN -> public ip
iptables -t nat -A POSTROUTING -o vmbr0 -j SNAT -s 10.0.0.0/30 --to-source MYPUBLICIP_HERE
Now we have:
1
2
3
4
5
6
7
8
9
10
11
12
$> route
Destination     Gateway         Genmask         Flags Metric Ref    Use Iface
default         x.x.x.x         0.0.0.0         UG    0      0        0 vmbr0
10.0.0.0        0.0.0.0         255.255.255.252 U     0      0        0 vmbr1
xxx.xxx.xxx.0   0.0.0.0         255.255.255.0   U     0      0        0 vmbr0
192.168.1.0     0.0.0.0         255.255.255.0   U     0      0        0 vmbr2

$> ip r
default via xxx.xxx.xxx.254 dev vmbr0 proto kernel onlink
10.0.0.0/30 dev vmbr1 proto kernel scope link src 10.0.0.1
xxx.xxx.xxx.0/24 dev vmbr0 proto kernel scope link src xxx.xxx.xxx.xxx
192.168.1.0/24 dev vmbr2 proto kernel scope link src 192.168.1.1
- backup the rules
1
iptables-save | sudo tee /etc/network/save-iptables
- Restore rules at start
1
2
vim /etc/network/interfaces
post-up iptables-restore < /etc/network/save-iptables
Setup vlans
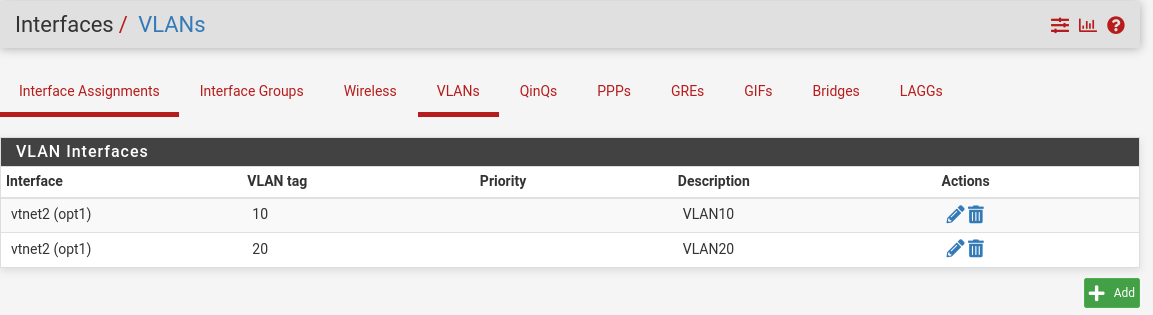
- We create our vlans: Interfaces > VLANs
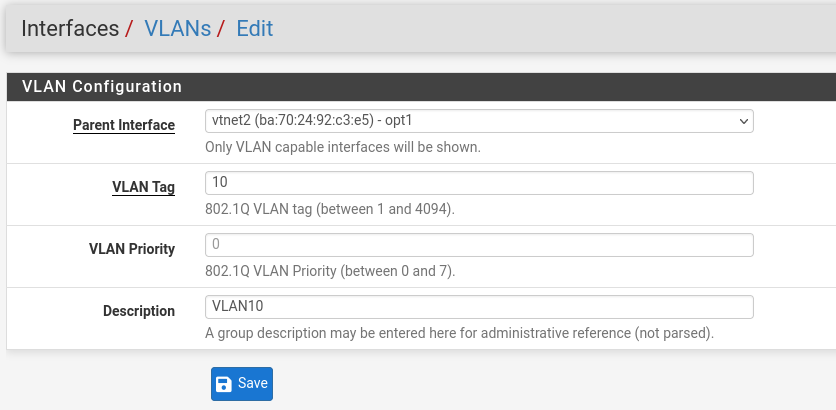
- Renew the operation for vlan20
- Now go to interfaces assignment and assign the ports
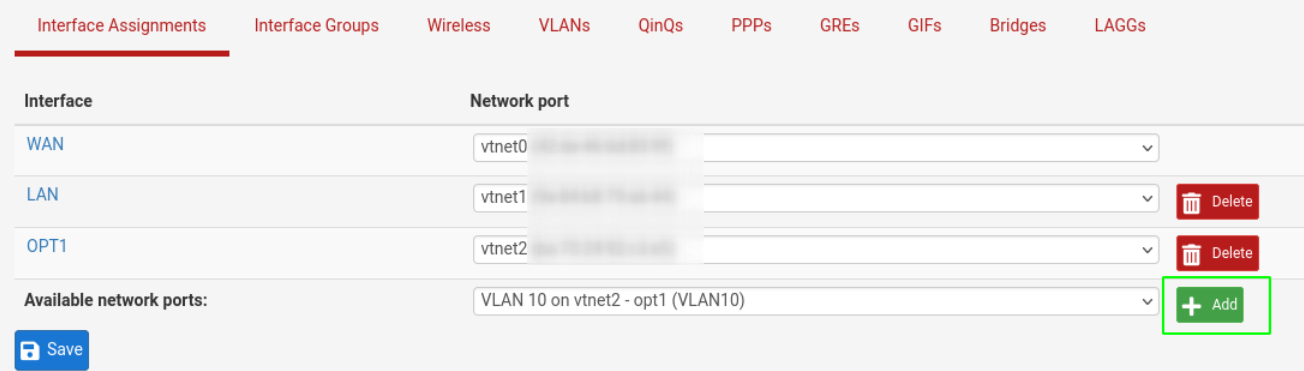
To the same for the vlan20.
Now click on the interface and choose the static IP configuration:
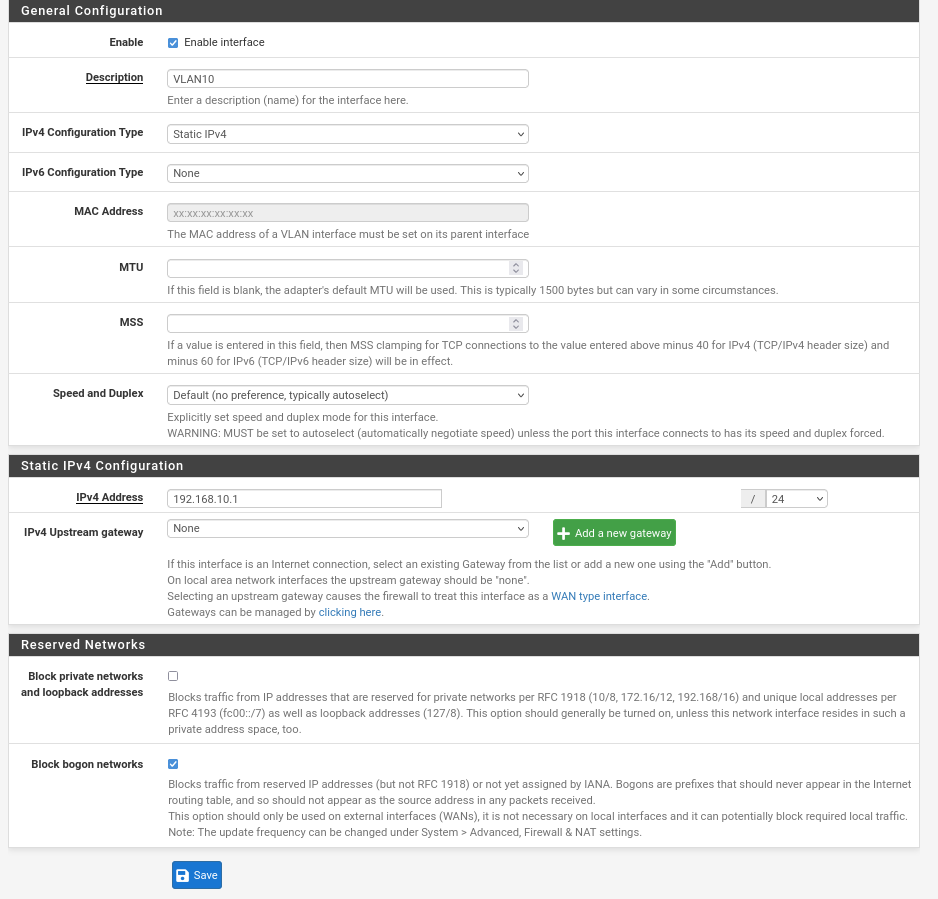
Do the same on vlan20 by changing the ip address to 192.168.20.1/24
Also you will have to enable the VLANs interface interface > VLANs > enable interface
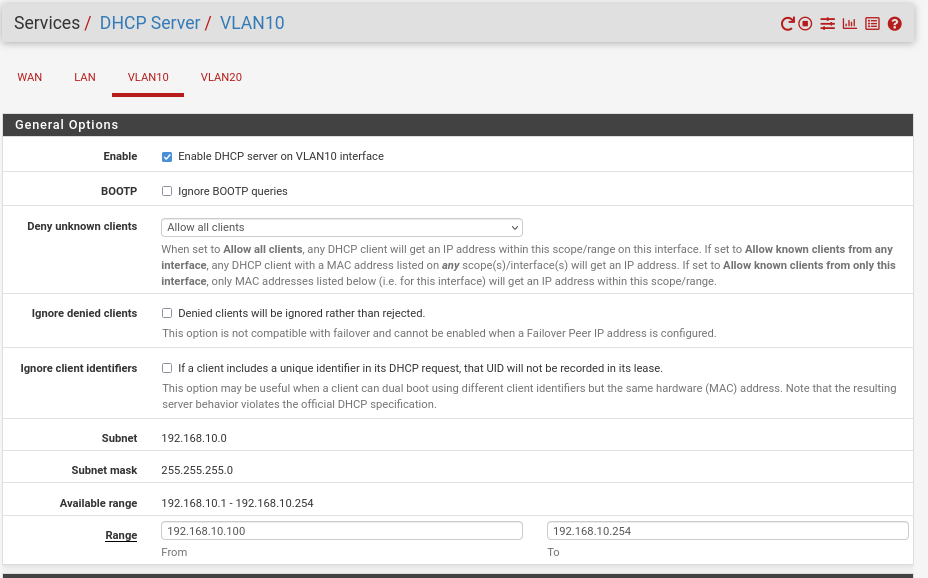
Add dhcp server to vlans
- Go to Services > dhcpserver
- Create a dhcpserver to vlan10 activate it and set ips: 192.168.10.100 - 192.168.10.254
- and to vlan20 same but different ips : 192.168.20.100 - 192.168.20.254
Set Up the vlan firewall
- Create an Alias for internal IPs : Firewall > alias
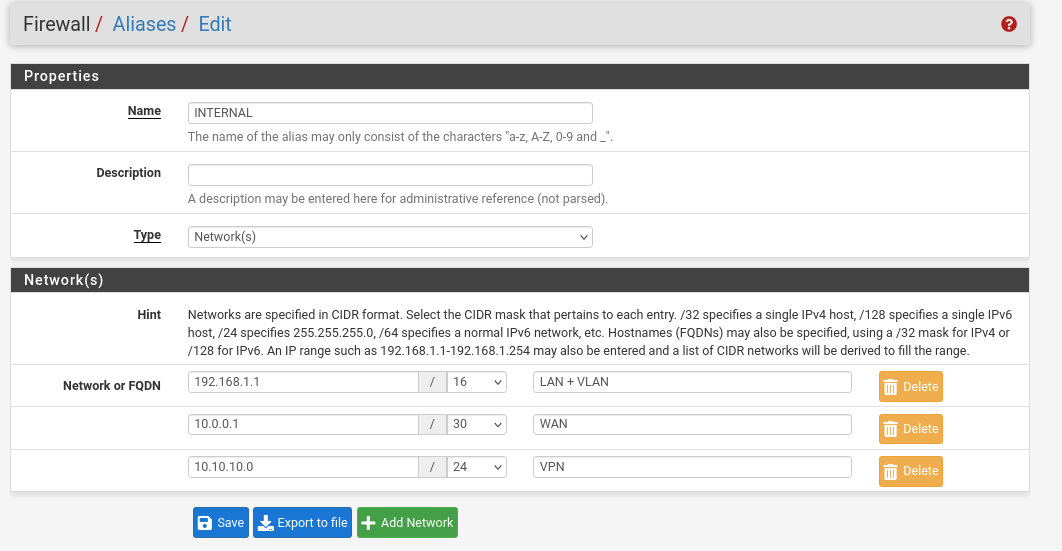
and add a firewall to allow output outside the internal network from the vlan to give internet access and access to all in output

the vlan rules match the following result :

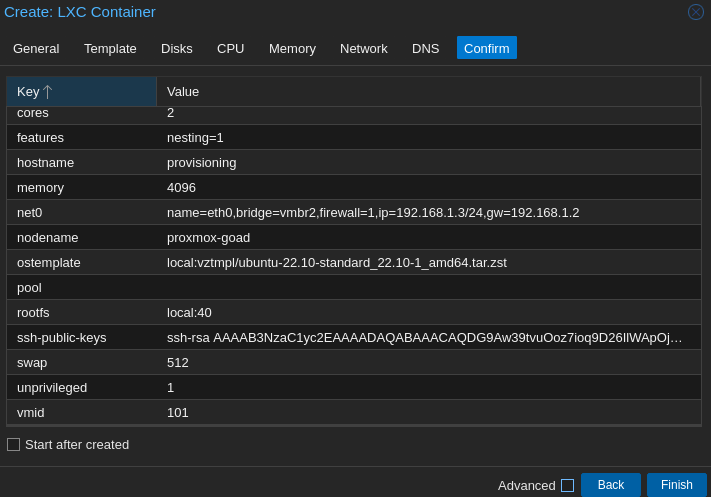
Create provisioning CT
First we will download the template
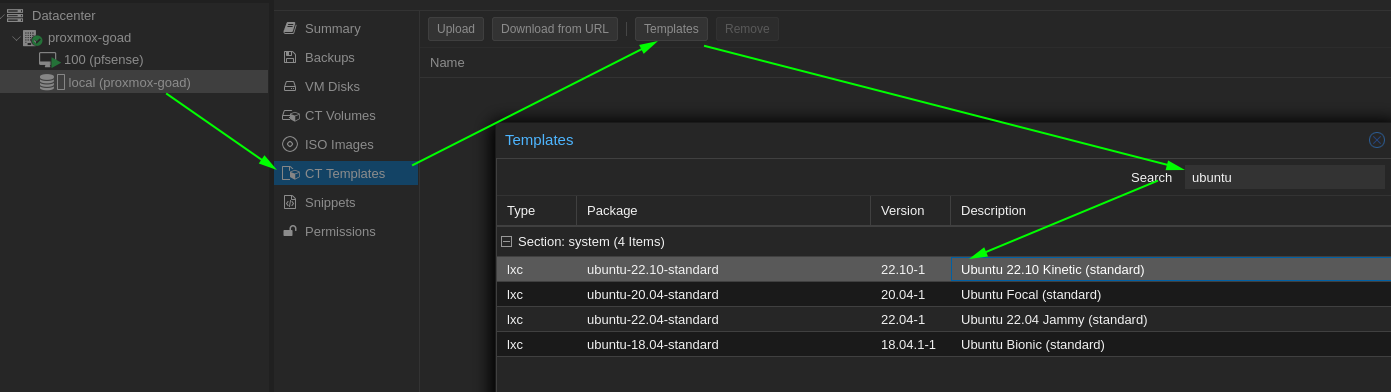
- And launch the installation:
- Create CT
- Hostname : provisioning
- setup a password and your key
- We will add a wan firewall rule to allow an ssh tunnel to the provisioning
- And add a ~/.ssh/config configuration
1
2
3
4
5
6
7
8
9
10
11
12
13
14
Host goadproxmox
   User root
   Hostname x.x.x.x
   Port 22
   IdentityFile ~/.ssh/id_rsa_kimsufi_goad
   # pfsense
   LocalForward 8082 192.168.1.2:80

Host goadprovisioning
   User root
   Hostname 192.168.1.3
   Port 22
   IdentityFile ~/.ssh/id_rsa_kimsufi_goad
   Proxyjump goadproxmox
Prepare the provisioning container
- ssh into the machine :
ssh goadprovisioningand launch update and upgrade
1
apt update && apt upgrade
- And install useful packages we will need during the different installation phases
1
apt install git vim tmux curl gnupg software-properties-common mkisofs
Install Packer
- For packer installation we will follow the guide at : https://developer.hashicorp.com/packer/docs/install
1
2
3
curl -fsSL https://apt.releases.hashicorp.com/gpg | apt-key add -
apt-add-repository "deb [arch=amd64] https://apt.releases.hashicorp.com $(lsb_release -cs) main"
apt update && apt install packer
- Installation finished give us:
1
2
root@provisioning:~# packer -v
1.8.6
Install Terraform
- For the terraform installation we will follow the install guide at: https://developer.hashicorp.com/terraform/tutorials/aws-get-started/install-cli
1
2
3
4
5
6
7
8
9
10
11
12
13
14
15
16
17
# Install the HashiCorp GPG key.
wget -O- https://apt.releases.hashicorp.com/gpg | \
gpg --dearmor | \
tee /usr/share/keyrings/hashicorp-archive-keyring.gpg

# Verify the key's fingerprint.
gpg --no-default-keyring \
--keyring /usr/share/keyrings/hashicorp-archive-keyring.gpg \
--fingerprint

# add terraform sourcelist
echo "deb [signed-by=/usr/share/keyrings/hashicorp-archive-keyring.gpg] \
https://apt.releases.hashicorp.com $(lsb_release -cs) main" | \
tee /etc/apt/sources.list.d/hashicorp.list

# update apt and install terraform
apt update && apt install terraform
- Installation finished give us:
1
2
3
root@provisioning:~# terraform -v
Terraform v1.4.5
on linux_amd64
Install Ansible
- For the ansible installation we will follow GOAD install guide but without venv as our CT is dedicated to provisioning:
1
2
3
4
apt install python3-pip
python3 -m pip install --upgrade pip
python3 -m pip install ansible-core==2.12.6
python3 -m pip install pywinrm
- Once the installation finished we got ansible and ansible-galaxy available :
1
2
3
4
5
6
7
8
9
10
11
12
13
14
15
16
17
18
19
20
root@provisioning:~# ansible-galaxy --version
ansible-galaxy [core 2.12.6]
  config file = None
  configured module search path = ['/root/.ansible/plugins/modules', '/usr/share/ansible/plugins/modules']
  ansible python module location = /usr/local/lib/python3.10/dist-packages/ansible
  ansible collection location = /root/.ansible/collections:/usr/share/ansible/collections
  executable location = /usr/local/bin/ansible-galaxy
  python version = 3.10.7 (main, Mar 10 2023, 10:47:39) [GCC 12.2.0]
  jinja version = 3.1.2
  libyaml = True
root@provisioning:~# ansible --version
ansible [core 2.12.6]
  config file = None
  configured module search path = ['/root/.ansible/plugins/modules', '/usr/share/ansible/plugins/modules']
  ansible python module location = /usr/local/lib/python3.10/dist-packages/ansible
  ansible collection location = /root/.ansible/collections:/usr/share/ansible/collections
  executable location = /usr/local/bin/ansible
  python version = 3.10.7 (main, Mar 10 2023, 10:47:39) [GCC 12.2.0]
  jinja version = 3.1.2
  libyaml = True
Clone the GOAD project
1
2
cd /root
git clone https://github.com/Orange-Cyberdefense/GOAD.git
Conclusion
- Now our environment is ready to start our vm creation
- On the next part we will start packing our VMs
resources
- FR:
- EN: